
Acrylic grout is a type of grouting material commonly used in tile installation. It is a water-based product that combines cement, sand, and acrylic polymers. This unique formulation gives acrylic grout several advantages over traditional cement grout, including better flexibility, enhanced stain resistance, and reduced water absorption.
With its improved flexibility, acrylic grout is less prone to cracking and can accommodate small movements in the tiled surface. Additionally, its acrylic polymers provide a protective barrier that helps prevent stains and discoloration, making it easier to maintain and clean.
Another significant advantage of acrylic grout is its reduced water absorption, which makes it less susceptible to fungus and mold growth. This property also makes it suitable for use in wet areas such as showers and outdoor installations where moisture exposure is common.
In summary, acrylic grout is a versatile and practical option for tile installation, offering flexibility, stain resistance, and protection against water damage. Its innovative formulation makes it a popular choice among homeowners and professionals alike.
How to Apply Acrylic Grout for a Professional Finish
When it comes to tiling projects, grouting is an essential step to achieve a polished and professional finish. Acrylic grout is a popular choice among DIY enthusiasts and professionals alike due to its durability and ease of application. In this section, we will guide you through the steps of applying acrylic grout for a seamless and long-lasting result.
Gather the necessary tools and materials
Before you begin, make sure you have all the tools and materials required for the grouting process. Here is a list of items you will need:
- Acrylic grout
- Grout float
- Grout sponge
- Bucket
- Water
- Grout sealer (optional)
- Protective gloves
Prepare the tile surface
Start by ensuring that the tile surface is clean and free from any debris or adhesive residue. Use a damp cloth or sponge to wipe down the tiles and remove any dust. Additionally, if you are grouting a newly installed tile surface, allow the adhesive to fully cure before proceeding with the grouting process.
Mix the acrylic grout
Pour the acrylic grout powder into a clean bucket, following the manufacturer’s instructions for the appropriate water-to-grout ratio. Use a trowel or margin trowel to gradually add water to the grout while continuously stirring. Aim for a smooth and creamy consistency that is easy to spread.
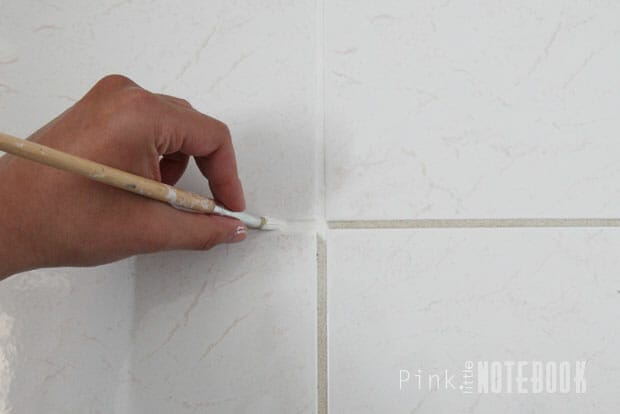
Apply the grout
With a grout float, scoop a generous amount of mixed grout and apply it to the tile surface at a 45-degree angle. Use the float to spread the grout evenly, ensuring that all the gaps between the tiles are filled. Work in small sections to prevent the grout from drying out before you can clean it.
Clean the excess grout
Once you have applied the grout, wait for the recommended amount of time specified by the manufacturer. Using a slightly damp grout sponge, gently wipe away the excess grout from the tile surface in a diagonal motion. Rinse the sponge frequently to avoid smearing the grout.
Final touches
After cleaning the excess grout, allow it to dry for the recommended period. Once dry, you can optionally apply a grout sealer to enhance the longevity and stain resistance of the grout. Follow the instructions on the sealer packaging for the application process.
Summary
Applying acrylic grout for a professional finish is a straightforward process that can greatly enhance the appearance and durability of your tiled surfaces. By following the steps outlined above and using the correct tools and materials, you can achieve a polished and long-lasting grout application. Remember to always consult the manufacturer’s instructions for specific guidance and recommendations.
Differences between Acrylic Grout and Traditional Cement-Based Grout
When it comes to selecting the right grout for your tiling projects, you may come across different options, such as acrylic grout and traditional cement-based grout. Both types of grout have their own set of advantages and disadvantages, and understanding the differences between them can help you make an informed decision. In this section, we will explore the dissimilarities between acrylic grout and traditional cement-based grout.
1. Composition
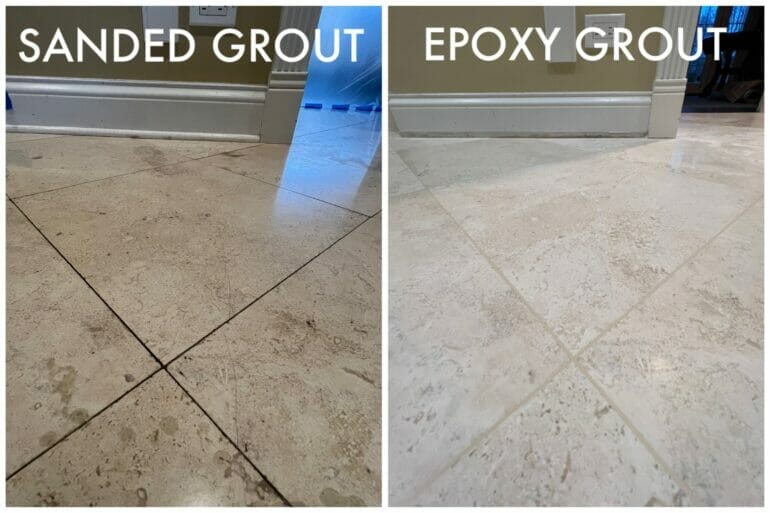
The primary difference between acrylic grout and traditional cement-based grout lies in their composition. Acrylic grout is a water-based, premixed product that combines a blend of acrylic resins, pigments, and other additives. On the other hand, traditional cement-based grout is made from a mixture of cement, sand, and water. This fundamental difference in composition affects various aspects of the grout’s performance.
2. Stain Resistance
One of the key advantages of acrylic grout over traditional cement-based grout is its superior stain resistance. Acrylic grout is specially formulated to repel stains, making it an excellent choice for high-traffic areas, such as kitchens and bathrooms. It is less likely to absorb dirt, oils, and other substances that can discolor the grout over time. In contrast, cement-based grout is more porous and susceptible to staining, requiring regular sealing to maintain its appearance.
3. Flexibility
Acrylic grout offers greater flexibility compared to traditional cement-based grout. This flexibility allows the grout to withstand slight movements in the tiled surface without cracking or crumbling. This makes acrylic grout ideal for environments where there may be slight structural shifts, such as in older buildings or areas prone to temperature fluctuations. Cement-based grout, while durable, is more rigid and may crack under similar conditions.
4. Ease of Application
When it comes to ease of application, acrylic grout offers several advantages. It is a premixed product, which means it is ready to use right out of the container. This saves time and eliminates the need for precise measurement and mixing. Acrylic grout also has a longer working time compared to cement-based grout, allowing for easier cleanup and adjustment of the grout lines. Cement-based grout, on the other hand, requires careful mixing and tends to set quickly, making it more challenging for beginners or larger projects.
5. Color Options
If you are looking for a wide range of color choices, acrylic grout may be the way to go. Acrylic grout is available in a variety of colors, allowing you to match or contrast with your tile selection. Traditional cement-based grout typically offers a more limited color palette, primarily in neutral shades. This can be a significant factor if you have a specific design vision in mind.
6. Cost
Cost is often a significant consideration when choosing grout for your tiling project. In general, acrylic grout is more expensive than traditional cement-based grout. However, it is essential to weigh the cost against the benefits offered by acrylic grout, such as stain resistance and flexibility. For smaller projects or those on a tight budget, cement-based grout may be a more economical option.
In summary, acrylic grout and traditional cement-based grout differ in composition, stain resistance, flexibility, ease of application, color options, and cost. Understanding these differences can help you select the grout that best suits your project’s needs and requirements.
Maintaining and Cleaning Acrylic Grout: Tips and Tricks
Acrylic grout is a popular choice for many homeowners and contractors due to its durability and resistance to stains. However, like any other type of grout, acrylic grout requires regular maintenance and cleaning to keep it looking its best. In this section, we will discuss some helpful tips and tricks for maintaining and cleaning acrylic grout.
1. Regular Cleaning
One of the most important aspects of maintaining acrylic grout is regular cleaning. This helps to prevent the buildup of dirt, grime, and stains over time. Here are some tips for effective regular cleaning:
- Use a mild cleaning solution: Avoid harsh chemicals or abrasive cleaners that can damage the grout. Instead, opt for a mild solution of warm water and a pH-neutral cleaner.
- Apply the cleaning solution: Use a soft-bristle brush or a sponge to apply the cleaning solution to the grout lines. Scrub gently in a circular motion to remove any dirt or stains.
- Rinse thoroughly: After scrubbing, rinse the grout lines with clean water to remove any residue from the cleaning solution.
- Dry the grout: It is essential to dry the grout thoroughly after cleaning to prevent moisture from seeping into the grout lines, which can lead to mold and mildew growth.
2. Dealing with Stubborn Stains
Despite regular cleaning, acrylic grout may still develop stubborn stains over time. Here are some tips to tackle those tough stains:
- Use a grout cleaner: If regular cleaning solutions do not remove the stains, you can try using a specialized grout cleaner. Make sure to follow the instructions on the cleaner’s label and test it on a small, inconspicuous area first.
- Vinegar and baking soda paste: For mild stains, you can create a paste using vinegar and baking soda. Apply the paste to the stained grout lines, let it sit for a few minutes, and then scrub gently with a brush. Rinse with water.
- Hydrogen peroxide: For tougher stains, hydrogen peroxide can be effective. Apply a small amount of hydrogen peroxide directly to the stained grout lines and let it sit for about 15 minutes. Scrub gently and rinse with water.
- Steam cleaning: If all else fails, you can try using a steam cleaner to remove stubborn stains from acrylic grout. The high temperature of the steam helps to break down the dirt and grime.
3. Sealing Acrylic Grout
Sealing acrylic grout is an essential step in its maintenance. Sealing helps to protect the grout from stains, moisture, and bacteria. Follow these steps to effectively seal acrylic grout:
- Clean the grout: Before sealing, make sure the grout lines are clean and free of any dirt or stains. Use a mild cleaning solution and a brush to clean the grout thoroughly.
- Choose the right sealer: There are various types of sealers available for acrylic grout. Select a sealer that is specifically designed for acrylic grout and follow the manufacturer’s instructions.
- Apply the sealer: Use a small brush or an applicator bottle to apply the sealer to the grout lines. Make sure to cover all the grout lines evenly.
- Allow drying and curing: Let the sealer dry and cure as per the manufacturer’s instructions. Avoid walking or placing any objects on the freshly sealed grout until it is fully dry.
4. Preventive Measures
Taking preventive measures can help prolong the life and appearance of acrylic grout. Here are some preventive tips:
- Use grout-friendly cleaning tools: Avoid using abrasive brushes or scouring pads that can scratch or damage the grout. Instead, opt for soft-bristle brushes or non-abrasive cleaning tools.
- Wipe spills immediately: Acrylic grout is resistant to stains to some extent, but it is still beneficial to wipe up spills promptly to prevent any potential staining.
- Keep the grout dry: Excessive moisture can lead to mold and mildew growth in the grout lines. Ensure proper ventilation and promptly address any leaks or water-related issues.
- Avoid heavy impact: Acrylic grout is durable but can still
Enhancing the Durability and Longevity of Acrylic Grout: Best Practices
Acrylic grout is a popular choice for many homeowners and contractors due to its durability, versatility, and ease of use. However, like any other grout, acrylic grout can deteriorate over time if not properly maintained. In this section, we will explore some best practices to enhance the durability and longevity of acrylic grout, ensuring that it remains in pristine condition for years to come.
1. Proper Installation
One of the key factors in ensuring the longevity of acrylic grout is proper installation. It is essential to follow the manufacturer’s instructions and guidelines during the installation process. Here are some best practices to consider:
- Thoroughly clean the tile surface before grouting to remove any dirt, dust, or debris.
- Prepare the grout according to the manufacturer’s instructions, paying attention to the correct water-to-grout ratio.
- Apply the grout evenly and consistently, filling all the gaps between the tiles.
- Use the appropriate tools, such as a grout float or squeegee, to smooth and level the grout lines.
- Remove excess grout from the tile surface using a damp sponge or cloth.
- Allow the grout to cure completely before exposing it to moisture or foot traffic.
2. Regular Cleaning and Maintenance
Maintaining a regular cleaning and maintenance routine is essential for preserving the durability and appearance of acrylic grout. Here are some tips to keep in mind:
- Wipe down the grout lines regularly with a soft cloth or mop to remove surface dirt and grime.
- Avoid using harsh or abrasive cleaning agents that can damage the grout. Instead, opt for mild, pH-neutral cleaners specifically designed for grout.
- Consider using a grout sealer to provide an additional layer of protection against stains and moisture penetration.
- Immediately clean up any spills or stains on the grout to prevent them from setting in.
- Avoid excessive exposure to water or moisture, as it can weaken the grout over time.
3. Addressing Cracks and Damage
If you notice any cracks or damage in the acrylic grout, it is crucial to address them promptly to prevent further deterioration. Here are some steps to take:
- Remove any loose or damaged grout using a grout removal tool, taking care not to damage the surrounding tiles.
- Clean and dry the area thoroughly before applying a new layer of acrylic grout.
- Ensure proper adhesion by applying a grout adhesive or primer to the cleaned area before grouting.
- Smooth the new grout evenly, following the same installation process as mentioned earlier.
- Allow the patched grout to cure fully before subjecting it to moisture or heavy use.
4. Avoiding Common Mistakes
To maximize the durability and longevity of acrylic grout, it is essential to avoid common mistakes that can compromise its integrity. Here are some pitfalls to watch out for:
- Avoid using excessive water while mixing the grout, as it can weaken the consistency and compromise its strength.
- Do not rush the curing process. Allow the grout sufficient time to cure fully before using the tiled area.
- Refrain from using sharp or abrasive tools to clean the grout, as it can scratch or damage the surface.
- Do not ignore signs of damage or deterioration. Address any issues promptly to prevent further complications.
- Avoid using improper cleaning agents or harsh chemicals that can stain or damage the grout.
Summary
By following these best practices, you can significantly enhance the durability and longevity of acrylic grout. Proper installation, regular cleaning and maintenance, addressing cracks and damage promptly, and avoiding common mistakes are key to preserving the integrity and appearance of acrylic grout. Remember, a well-maintained grout not only enhances the aesthetics of your tiled surfaces but also ensures their long-term functionality.
FAQs
What is acrylic grout?
Acrylic grout is a type of grouting material that is made from a mixture of acrylic resins and additives. It is used to fill the gaps between tiles or stones in order to create a strong and durable bond. Acrylic grout is known for its flexibility, stain resistance, and ease of application.
Conclusion
In conclusion, acrylic grout is a versatile and durable option for grouting various types of tiles, such as ceramic, porcelain, and natural stone. Its composition, which includes a mixture of acrylic resin and Portland cement, provides excellent resistance to stains, water, and mold growth. Furthermore, acrylic grout is known for its ease of application and ability to adhere to different surfaces, making it a popular choice among homeowners and professionals alike.
With its wide range of color options, acrylic grout allows for greater design flexibility, allowing you to achieve the desired look for your tiled surfaces. Its low maintenance requirements and long-lasting performance make it a practical choice for both indoor and outdoor applications.
Overall, acrylic grout is a reliable and functional solution that enhances the appearance and durability of tiled areas, making it an ideal choice for any grouting project.