
Painting windows in acrylic can be a fun and creative way to add a pop of color and personality to your living space. Whether you’re a beginner or an experienced artist, acrylic paints offer versatility and vibrant pigments that can bring your windows to life.
Before you begin, make sure to clean the windows thoroughly to ensure a smooth and even surface for painting. Next, gather your acrylic paints, brushes, and any stencils or masking tape you may need to create clean and precise designs.
Start by applying a base layer of acrylic paint to the window, using broad brushstrokes or a roller for larger areas. Once the base layer is dry, you can begin adding details and designs using smaller brushes or stencils.
Remember to let each layer dry completely before adding another layer or blending different colors. This will prevent the paint from smudging or mixing together unintentionally.
Once you’re satisfied with your window painting, protect it by applying a layer of clear acrylic sealant. This will help to preserve the colors and prevent them from fading over time.
Whether you’re decorating for a special occasion or simply want to add a touch of creativity to your home, painting windows in acrylic can be an enjoyable and rewarding project. So unleash your creativity and let those windows become your canvas!
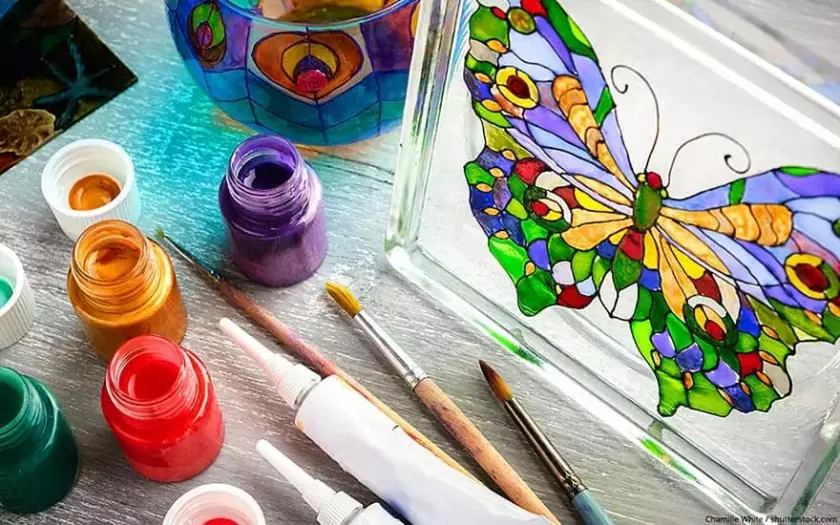
Essential Tools and Materials for Painting Windows in Acrylic
Painting windows with acrylics can be a fun and creative project that adds a unique touch to your home’s interior or exterior. Whether you want to create a vibrant design or simply add a pop of color, having the right tools and materials is essential to achieve the best results. In this section, we will discuss the necessary tools and materials you will need to successfully paint windows with acrylics.
1. Acrylic Paint
The first and most important item you will need is acrylic paint. Acrylic paints are water-based and offer a wide range of colors to choose from. They dry quickly and create a durable finish, making them ideal for window painting. Look for high-quality acrylic paints that are specifically designed for use on windows or glass surfaces. These paints are formulated to adhere well and withstand exposure to sunlight and weather conditions.
2. Brushes
Having the right brushes is crucial for achieving a smooth and precise finish. When it comes to window painting, it is recommended to use synthetic brushes that are designed for acrylic paints. These brushes have bristles that hold the paint well and allow for smooth application. Look for brushes in different sizes to effectively handle detailed work as well as larger areas.
3. Palette and Palette Knife
A palette is essential for mixing your acrylic paints and creating custom colors. You can use a traditional palette made of plastic or a disposable palette pad. Additionally, a palette knife is useful for mixing paints and achieving the desired consistency.
4. Painter’s Tape
Painter’s tape is essential for creating clean and sharp edges when painting windows. It helps to create boundaries and prevents any accidental paint marks on the surrounding areas. Make sure to choose a painter’s tape that is specifically designed for delicate surfaces like glass to avoid any damage when removing it.
5. Glass Cleaner
Prior to painting, it is important to thoroughly clean the windows to ensure proper adhesion of the paint. Use a glass cleaner or a mixture of water and mild detergent to remove any dirt, dust, or grease from the surface of the window. Make sure to dry the windows completely before starting the painting process.
6. Water Container
Since acrylic paints are water-based, having a container of water nearby is essential. This allows you to clean your brushes between color changes and maintain the desired consistency of the paint.
7. Protective Layers
To protect the surrounding areas from accidental paint splatters and spills, it is advisable to use drop cloths or plastic sheets. Cover the floor, furniture, and any other surfaces that may be exposed to paint. Additionally, wearing old clothing or an apron can help protect your clothes from getting stained.
8. Sealant
Once you have completed your window painting, it is recommended to apply a clear sealant to protect the artwork and enhance its longevity. A clear acrylic sealant specifically designed for use on windows or glass surfaces will provide a protective barrier against moisture, UV rays, and weather conditions.
9. Reference Materials
If you are planning to create a specific design or pattern, having reference materials such as stencils or templates can be helpful. These can assist you in achieving precise shapes and patterns on your window.
In summary, painting windows with acrylics requires the right tools and materials to achieve the desired results. Acrylic paint, brushes, palette, palette knife, painter’s tape, glass cleaner, water container, protective layers, sealant, and reference materials are essential for a successful window painting project. With these tools and materials, you can unleash your creativity and transform your windows into works of art.
Preparing the Surface: Cleaning and Priming the Window
Before you start painting your windows, it is important to properly prepare the surface. This involves cleaning the windows thoroughly and applying a primer to ensure a smooth and long-lasting finish. In this section, we will guide you through the steps of cleaning and priming your windows.
Cleaning the Windows
The first step in preparing the surface is to clean the windows to remove dirt, dust, and any other debris. Here’s how you can do it:
- Start by removing any window screens or coverings.
- Using a soft brush or cloth, remove loose dirt and dust from the windows.
- Prepare a mixture of mild detergent and warm water in a bucket.
- Dip a sponge or soft cloth into the soapy water and gently scrub the windows, paying attention to any stubborn stains or spots.
- Rinse the windows thoroughly with clean water to remove any soap residue.
- Dry the windows using a clean, lint-free cloth or towel.
By cleaning the windows properly, you ensure that the paint adheres well to the surface and prevents any dirt or debris from affecting the final result.
Applying the Primer
After the windows are clean and dry, it’s time to apply a primer. The primer helps the paint to adhere better to the surface and provides a smooth base for the topcoat. Follow these steps to apply the primer:
- Choose a high-quality primer suitable for the type of window material you have.
- Using a brush or roller, apply the primer evenly to the entire surface of the window. Make sure to cover all areas, including corners and edges.
- Allow the primer to dry completely according to the manufacturer’s instructions. This usually takes a few hours.
- If necessary, lightly sand the primed surface with fine-grit sandpaper to ensure a smooth finish.
- Remove any dust or debris resulting from sanding by wiping the surface with a clean, damp cloth.
Once the primer is dry and the surface is smooth, you are now ready to proceed with painting your windows. The primer provides a strong foundation for the paint, ensuring better adhesion and longevity of the finish.
In summary, preparing the surface before painting your windows is essential for achieving a professional and long-lasting result. By thoroughly cleaning the windows and applying a primer, you create a smooth and clean surface that allows the paint to adhere well. This preparation step is crucial for ensuring the success of your window painting project.

Step 1: Gather Your Materials
Before you begin painting your windows in acrylic, make sure you have all the necessary materials. You will need:
- Acrylic paint in your desired colors
- Paintbrushes of various sizes
- A palette or mixing surface
- Water for cleaning brushes
- Masking tape
- Palette knife (optional)
- A reference photo or sketch of the window design
Step 2: Prepare the Window Surface
Before you start painting, it’s important to prepare the window surface to ensure the paint adheres properly. Clean the window thoroughly using glass cleaner and a lint-free cloth. If there are any cracks or chips in the window frame, repair them before painting.
Step 3: Tape off the Window Frame
To protect the window frame from accidental paint splatters, use masking tape to tape off the edges of the frame. Be sure to press the tape down firmly to create a tight seal.
Step 4: Mix Your Colors
If you want to use specific colors for your window painting, this is the time to mix them. Use your palette or mixing surface to create the desired shades and hues. You can use a palette knife to mix the colors more effectively and achieve the right consistency.
Step 5: Start Painting
Begin by painting the background of your window design. Use a larger brush to cover larger areas and a smaller brush for more intricate details. Apply the paint evenly and smoothly, taking care not to leave any visible brush strokes.
Step 6: Add Details
Once the background is dry, you can start adding details to your window painting. Use a smaller brush for finer lines and smaller areas. Take your time and be patient, as this step requires precision and attention to detail.
Step 7: Allow the Paint to Dry
After you have completed your window painting, let it dry completely before removing the masking tape. This will prevent smudging or smearing of the paint.
Step 8: Remove the Masking Tape
Carefully peel off the masking tape from the window frame. Take your time, and if any paint does come off with the tape, touch it up with a small brush.
Step 9: Seal the Painting (Optional)
If you want to protect your window painting and give it a glossy finish, you can apply a clear varnish or sealant. This will also help to preserve the colors and prevent fading over time.
Step 10: Enjoy Your Window Art
Once the sealant is dry, step back and admire your beautiful window painting. Display it proudly and enjoy the unique touch it adds to your space.
Summary
Painting windows in acrylic can be a fun and creative way to add a personal touch to your home. By following these step-by-step instructions, you can create a stunning piece of art that will enhance the beauty of your windows. Remember to gather all the necessary materials, prepare the surface, tape off the frame, mix your colors, paint the background and details, allow the paint to dry, remove the masking tape, and optionally seal the painting. Once complete, you can enjoy your unique window art for years to come.
Tips and Techniques for Achieving Stunning Window Paintings
Window paintings can be a wonderful way to add creativity and charm to any space. Whether you are a professional artist or just starting out, there are several tips and techniques that can help you achieve stunning results. In this section, we will explore some of these tips and techniques to help you create beautiful window paintings.
1. Choose the Right Paint
The first step in achieving stunning window paintings is to choose the right paint. Look for paints that are specifically designed for glass, as they will adhere better and last longer. Acrylic paints are a popular choice, as they are water-based and easy to work with. Make sure to choose a range of colors that complement your design and allow for blending and layering.
2. Prepare the Surface
Before painting, it is important to prepare the surface of the window. Clean the window thoroughly to remove any dirt or debris. You can use a glass cleaner or a mixture of vinegar and water. Once the window is clean, use a lint-free cloth to dry it completely. This will ensure that the paint adheres smoothly and evenly.
3. Plan Your Design
Before diving into your window painting, it is helpful to plan your design. Consider the space you have available and the theme or message you want to convey. Sketch out your design on paper or use a digital design program to visualize your ideas. This will help you create a cohesive and well-executed window painting.
4. Start with an Outline
When you are ready to begin painting, start by outlining your design on the window. You can use a removable glass marker or a thin brush and water-soluble paint. This outline will serve as your guide and help you stay on track as you fill in the details. Don’t worry about being too precise at this stage, as you can always make adjustments later.
5. Layer and Blend Colors
One of the key techniques for achieving stunning window paintings is to layer and blend colors. Start with lighter shades and gradually add darker tones to create depth and dimension. Use a clean brush or sponge to blend the colors together for a smooth and seamless look. Experiment with different techniques, such as dry brushing or stippling, to add texture and visual interest.
6. Add Details and Highlights
Once you have the base colors in place, it’s time to add details and highlights to your window painting. Use a smaller brush or a fine-tip paint pen to add intricate lines, patterns, or small accents. You can also use a lighter shade of paint to create highlights and add a touch of realism to your artwork. Pay attention to the light source and make sure your highlights are consistent throughout the painting.
7. Seal and Protect
Once your window painting is complete, it is important to seal and protect it. Look for a clear varnish or sealant that is specifically designed for glass surfaces. Apply it evenly over the entire painting to protect it from fading, peeling, or scratching. Follow the manufacturer’s instructions for drying and curing times to ensure the best results.
8. Maintain and Refresh
To keep your stunning window painting looking its best, it is important to maintain and refresh it regularly. Clean the window and painting gently with a soft cloth or sponge. Avoid harsh chemicals or abrasive materials that could damage the paint or surface. If needed, touch up any areas that may have faded or become damaged over time.
Summary
Creating stunning window paintings requires the right tools, techniques, and a touch of creativity. Choose the right paint, prepare the surface, plan your design, and start with an outline. Layer and blend colors to create depth, add details and highlights for realism, and seal and protect your finished artwork. Remember to maintain and refresh your window painting regularly to keep it looking its best. With these tips and techniques, you’ll be able to achieve stunning window paintings that will enhance any space.
FAQs
Q: How do I paint windows in acrylic?
To paint windows in acrylic, start by creating a rough sketch of the window frame using a pencil. Then, use a small brush and acrylic paint to carefully fill in the frame, using thin and even layers. To create the glass effect, paint the window panes with a transparent or translucent acrylic paint. Add shadows and highlights for a realistic look.
Q: What type of brush should I use to paint windows in acrylic?
For painting windows in acrylic, it is best to use a small and fine-tipped brush. A round or liner brush works well for adding details to the window frame, while a filbert or flat brush can be used to fill in larger areas. Make sure the brush is clean and in good condition to achieve precise and smooth strokes.
Q: How can I create a realistic glass effect when painting windows in acrylic?
To create a realistic glass effect, use a transparent or translucent acrylic paint for the window panes. Apply multiple thin layers of the paint, allowing each layer to dry before applying the next. Use a reference image or observe real windows to understand the play of light and shadows on glass surfaces and replicate those elements in your painting.
Conclusion
In conclusion, painting windows in acrylic can be a fun and creative way to add a unique touch to your home or artwork. With the right materials and techniques, you can achieve stunning results that will enhance the aesthetic appeal of any space.
Remember to properly prepare the surface by cleaning the windows and applying a primer before starting to paint. Use thin layers of acrylic paint and build up the colors gradually for a smooth and vibrant finish. Don’t forget to seal your painted windows with a clear varnish to protect the artwork from fading and damage.
Whether you’re painting windows as part of a decorative project or as a standalone artwork, practicing different techniques and experimenting with colors will help you develop your skills and unleash your creativity. So, grab your brushes and start painting those windows with acrylics!