
If you’re looking to create a mesmerizing masterpiece of the mystical Northern Lights using acrylic paints, you’re in the right place!
Painting the Northern Lights with acrylics allows you to capture the ethereal beauty of this natural phenomenon with vibrant and bold colors.
In this guide, we’ll take you through the step-by-step process of painting the Northern Lights using acrylics, from choosing the right colors to creating the dreamy, atmospheric effects.
With a few techniques and some patience, you’ll be able to bring the enchanting dance of the Northern Lights to life on your canvas.
So, let’s dive in and learn how to paint the captivating Northern Lights with acrylics!
Introduction
In this section, we will explore various strategies for optimizing content for search engine optimization (SEO). SEO plays a crucial role in improving the visibility and ranking of a website in search engine results pages (SERPs).
1. Keyword Research and Analysis
To begin with, keyword research and analysis is the foundation of any successful SEO strategy. It involves identifying the most relevant keywords and phrases that users are searching for in relation to your industry or niche. There are several tools available, such as Google Keyword Planner and SEMrush, that can assist in this process.
Once you have a list of potential keywords, it is important to analyze their search volume, competition level, and relevance to your target audience. This will help you prioritize which keywords to focus on and optimize your content accordingly.
2. On-Page Optimization
On-page optimization refers to the optimization of various elements on your website to improve its visibility and relevance to search engines. This includes optimizing meta titles and descriptions, headers, URLs, and content.
Meta titles and descriptions are HTML tags that provide a brief summary of your webpage to search engines and users. They should include relevant keywords and accurately describe the content of the page.
Headers, represented by H1, H2, H3, etc., tags, play a significant role in organizing and structuring your content. They provide hierarchy and help search engines understand the main topics covered in your webpage.
URL optimization involves creating user-friendly and descriptive URLs that contain relevant keywords. This makes it easier for both search engines and users to understand the context of your webpage.
Lastly, optimizing the content itself is crucial. It should be high-quality, informative, and engaging for users. Incorporate relevant keywords naturally throughout the content, keeping in mind keyword density and avoiding keyword stuffing.
3. Link Building
Link building is an essential part of SEO and involves acquiring high-quality backlinks from other websites. Backlinks act as votes of confidence for search engines, indicating that your website is credible and authoritative.
There are several strategies for link building, such as guest blogging, creating shareable content, and reaching out to relevant websites for link opportunities. It is important to focus on acquiring backlinks from reputable and relevant sources to improve your website’s SEO.
4. Mobile Optimization
In today’s mobile-dominated world, optimizing your website for mobile devices is crucial for SEO. Mobile optimization involves creating a responsive design that adapts to different screen sizes and ensuring fast loading times.
Search engines prioritize mobile-friendly websites, and having a mobile-optimized site can significantly improve your search rankings. It also enhances the user experience, resulting in higher engagement and lower bounce rates.
5. User Experience and Engagement
User experience (UX) and engagement are increasingly important factors for SEO. Search engines like Google take into account metrics such as bounce rate, time on page, and click-through rate in their ranking algorithms.
To improve UX and engagement, ensure your website is easy to navigate, has clear calls-to-action, and provides relevant and valuable content to users. Use multimedia elements such as images and videos to enhance the visual appeal of your pages.
Summary
In summary, optimizing content for SEO requires a strategic approach that involves in-depth keyword research, on-page optimization, link building, mobile optimization, and focusing on user experience and engagement. By implementing these strategies, you can improve your website’s visibility, attract more organic traffic, and ultimately rank higher in search engine results.
Materials You Need to Paint Northern Lights Acrylic
If you are interested in creating a beautiful masterpiece of the mesmerizing Northern Lights using acrylic paints, you will need a few essential materials to bring your vision to life. In this section, we will discuss the materials you need to paint the Northern Lights acrylic.
1. Acrylic Paints
The most important material for painting the Northern Lights is a set of acrylic paints. Acrylic paints are known for their vibrant colors and quick-drying properties, making them an ideal choice for capturing the ethereal beauty of the Aurora Borealis. Make sure to have a range of colors such as blues, purples, greens, and pinks to create the dynamic and radiant effect of the Northern Lights.
2. Brushes
To apply the acrylic paints onto the canvas, you will need a set of brushes. It is recommended to have a variety of brush sizes to achieve different brushstrokes and details. A flat brush can be used for broad strokes, while a fine-tipped brush is perfect for adding intricate details to your painting.
3. Canvas
Choose a canvas that is suitable for acrylic paints. A stretched canvas or canvas board is commonly used for acrylic paintings. Consider the size of the canvas based on your desired painting dimensions. A larger canvas will allow you to capture more details and create a striking representation of the Northern Lights.
4. Palette
A palette is essential for mixing and blending your acrylic paints. You can use a traditional palette made of acrylic or a disposable palette pad. Having a palette knife can also be useful for mixing colors and creating unique effects.
5. Water and Palette Paper
Since acrylic paints dry quickly, it is important to have water and palette paper on hand. Use water to rinse your brushes between color changes and to thin out the paints if needed. Palette paper provides a clean surface for mixing colors and prevents contamination.
6. Easel or Tabletop
Choose a comfortable working surface such as an easel or a tabletop where you can set up your canvas and paints. An easel allows you to adjust the height and angle of your painting surface, providing better control and convenience during the painting process.
7. Reference Images
To create a realistic representation of the Northern Lights, it is helpful to have reference images or photographs. Study the colors, patterns, and overall composition of the Northern Lights to guide your painting process. You can find reference images online or use your own photographs if you have had the opportunity to witness the Northern Lights firsthand.
8. A Sense of Creativity and Patience
Lastly, don’t forget to bring your sense of creativity and patience to the painting process. The Northern Lights are a natural wonder, and capturing their breathtaking beauty on canvas requires experimentation, practice, and the willingness to explore different techniques. Embrace the process and let your imagination guide you as you paint the Northern Lights acrylic.
In summary, to paint the Northern Lights acrylic, you will need acrylic paints, brushes of varying sizes, a suitable canvas, a palette, water and palette paper, a comfortable working surface, reference images, and a sense of creativity and patience. With these materials in hand, you can embark on a creative journey to recreate the awe-inspiring beauty of the Northern Lights.
Choosing the Perfect Color Palette for Northern Lights Acrylic Painting
When it comes to creating a stunning acrylic painting of the mesmerizing Northern Lights, one of the most important aspects to consider is the choice of colors. The Northern Lights, also known as the Aurora Borealis, showcase a breathtaking display of vibrant hues dancing across the night sky. To capture the essence of this natural wonder, selecting the perfect color palette is crucial. In this section, we will explore some key considerations and tips to help you choose the ideal colors for your Northern Lights acrylic painting.
1. Understanding the Colors of the Northern Lights
The first step in selecting the right color palette is to familiarize yourself with the colors observed in the Northern Lights. These celestial displays typically feature a range of hues, including shades of green, blue, purple, pink, and even hints of yellow or red. However, green is the most dominant color in many Northern Lights sightings.
To recreate the magic of the Northern Lights, you can experiment with various shades and blends of these colors. Remember to observe real-life photographs or references of the Northern Lights to gain inspiration and a better understanding of the color combinations.
2. Using a Limited Color Palette
While the Northern Lights offer a vast array of colors, using a limited color palette can help you achieve a more harmonious and cohesive painting. Limiting your palette to four or five primary colors can create a unified and visually pleasing artwork.
Consider selecting a few shades of green, blue, and purple as your main colors, and gradually introduce other hues to add depth and variation to your painting. This approach will prevent your artwork from appearing overwhelming or chaotic.
3. Creating Depth and Contrast
When painting the Northern Lights, it’s important to incorporate depth and contrast to make your artwork more dynamic and realistic. Begin by applying a dark base color to represent the night sky. Then, layer your chosen colors on top, gradually building up the intensity and brightness to mimic the ethereal glow of the Aurora Borealis.
By adding darker shades of the same color or contrasting colors near the edges of the lights, you can create a sense of depth and make the Northern Lights appear more three-dimensional. This technique will enhance the overall visual impact of your painting.
4. Experimenting with Different Techniques
Acrylic painting offers a variety of techniques that can be explored when depicting the Northern Lights. Experimenting with different brush strokes, blending techniques, and the use of glazing or dry brushing can add unique textures and effects to your artwork.
For instance, you can use a dry brush technique to create wispy, feathery strokes for the lights, or employ a glazing technique to achieve a smooth, luminous effect. Don’t be afraid to try out different approaches and discover the ones that work best for your style and desired outcome.
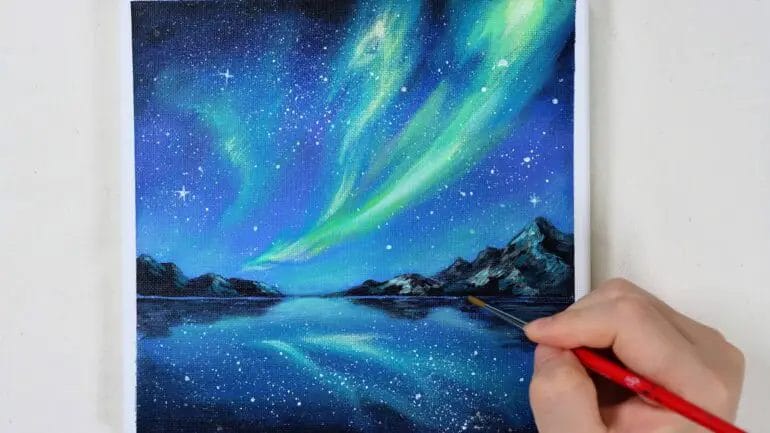
5. Considering the Atmosphere and Surroundings
When choosing the color palette for your Northern Lights painting, it’s essential to consider the surrounding elements and the overall atmosphere you want to convey. Think about the landscape and whether you want to incorporate elements such as mountains, trees, or a serene reflective body of water.
The colors you select for the sky and the surrounding environment should complement each other while maintaining the focus on the Northern Lights. Harmonizing the colors will create a cohesive and visually appealing composition.
Summary
Choosing the perfect color palette for your Northern Lights acrylic painting involves understanding the colors observed in the Aurora Borealis, using a limited color palette, creating depth and contrast, experimenting with different techniques, and considering the atmosphere and surroundings. By following these guidelines and allowing your creativity to flow, you can create a captivating and awe-inspiring artwork that captures the beauty of the Northern Lights.
Step-by-Step Guide: Painting Northern Lights Acrylic
Are you inspired by the breathtaking beauty of the Northern Lights? Do you want to capture that mesmerizing phenomenon on canvas? Look no further! In this step-by-step guide, we will walk you through the process of painting your very own Northern Lights using acrylic paints.
Materials You Will Need
Before you begin, gather the following materials:
- Canvas or canvas board
- Acrylic paints (blue, green, purple, white, and black)
- Paintbrushes (various sizes)
- Palette or mixing tray
- Water cup
- Palette knife (optional)
- Pencil
Step 1: Prepare Your Canvas
Start by preparing your canvas. If you are using a new canvas, make sure to apply a base layer of gesso and let it dry. If you are using a canvas board or a pre-gessoed canvas, you can skip this step.
Step 2: Sketch the Outline
Using a pencil, lightly sketch the outlines of the landscape and any other elements you want to include in your painting. This will serve as a guide as you start layering the colors.
Step 3: Mix Your Colors
Next, prepare your palette by squeezing out the acrylic paints you will need for the Northern Lights. Mix blue, green, purple, and white together to create the base colors. You can use a palette knife for mixing if desired.
Step 4: Start with the Background
Begin by painting the background of your canvas using broad strokes. Use the base colors you mixed in the previous step to create a gradient effect, starting with darker shades at the top and gradually transitioning to lighter shades towards the horizon.
Step 5: Add the Northern Lights
Now it’s time to add the Northern Lights to your painting. Dip a thin paintbrush into your mixed colors and use varying strokes to create the swirling, dancing patterns of the lights. Allow the colors to blend and overlap naturally for a realistic effect.
Step 6: Enhance the Lights
To make the Northern Lights more vibrant, add some white paint to your palette and use it to highlight certain areas of the lights. This will give them an added glow and depth.
Step 7: Add Details
Once you are satisfied with the Northern Lights, you can start adding other details to your painting, such as trees, mountains, or a silhouette of a landscape. Use darker shades of paint and different brush sizes to create depth and texture.
Step 8: Final Touches
Take a step back and evaluate your painting. Make any necessary adjustments or add any additional details to bring your vision to life. Once you are happy with the result, let the paint dry completely.
Step 9: Protect Your Artwork
Once your painting is dry, consider applying a protective varnish to preserve your masterpiece. This will also enhance the colors and give your painting a professional finish.
Step 10: Display and Enjoy
Congratulations! You have successfully painted your own Northern Lights using acrylics. Now it’s time to display your artwork and enjoy the magical beauty of the Northern Lights in the comfort of your own space.
In summary, painting Northern Lights with acrylic paints is a rewarding and captivating experience. With the right materials, techniques, and a touch of creativity, you can create a stunning masterpiece that showcases the awe-inspiring beauty of nature’s light show.
Adding Depth and Texture to Your Northern Lights Acrylic Painting
Creating a stunning acrylic painting of the mesmerizing Northern Lights requires more than just capturing the vibrant colors and swirling patterns. To truly bring your artwork to life, you need to add depth and texture to mimic the ethereal beauty of the natural phenomenon. In this section, we will explore various techniques and tips to help you achieve a realistic and captivating portrayal of the Northern Lights in your acrylic painting.
1. Layering the Colors
One essential technique for adding depth to your Northern Lights painting is layering the colors. Start by applying a dark background color, such as deep blue or black, to represent the night sky. Then, using a soft brush or a sponge, gradually build up layers of different colors to create the vibrant hues of the Northern Lights. Begin with lighter shades like purples and pinks near the horizon, gradually transitioning to intense greens and blues as you move upwards.
2. Blending and Gradation
To achieve a smooth transition of colors and a realistic gradient effect, blending is key. Use a large flat brush or a blending brush to gently blend the colors together, working in circular motions. Ensure that the colors seamlessly merge into one another to create a harmonious and natural-looking Northern Lights display. Remember to maintain the intensity of the colors while blending to retain the vibrancy and depth of the painting.
3. Creating Movement and Swirls
The Northern Lights are known for their mesmerizing movement and swirling patterns across the sky. To capture this dynamic element in your painting, use a liner brush or a small round brush to create delicate swirls and lines. Choose lighter shades of colors and add them sporadically throughout the painting to mimic the dance of the lights. Vary the thickness and direction of the lines to simulate the organic nature of the Northern Lights.
4. Adding Texture with Dry Brushing
To give your Northern Lights painting a textured appearance, consider incorporating dry brushing techniques. Dip a dry brush into a small amount of paint and then remove most of it on a paper towel. Lightly and sporadically apply the paint onto the canvas, creating subtle strokes and texture. This technique adds depth and dimension to the painting, enhancing the visual interest and making the Northern Lights appear more vibrant and realistic.
5. Using Metallic or Iridescent Paints
For an added touch of magic and sparkle, consider using metallic or iridescent paints in your Northern Lights painting. These paints contain metallic particles that reflect light, creating a shimmering effect on the canvas. Apply these paints sparingly, focusing on areas where the lights are brightest or where you want to highlight certain details. The metallic or iridescent accents will add a captivating and otherworldly quality to your artwork.
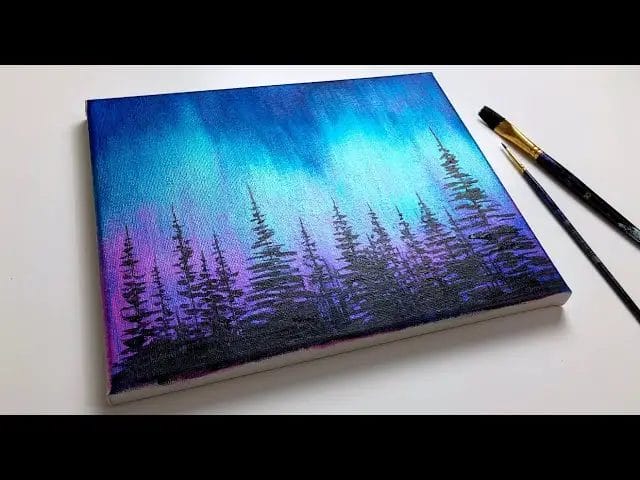
6. Adding Stars and Silhouettes
To complete your Northern Lights painting and enhance the overall atmosphere, consider adding stars and silhouettes of trees or mountains. Use a small brush or a toothbrush to splatter white or light-colored paint across the canvas to create stars. For the silhouettes, paint dark shapes of trees or mountains against the glowing backdrop of the Northern Lights. This addition will add depth and perspective to your painting, making it more visually captivating.
In summary, by incorporating these techniques, you can bring depth and texture to your Northern Lights acrylic painting, creating a visually captivating and realistic portrayal of this breathtaking natural phenomenon. Experiment with different colors, blending techniques, and textures to make your artwork truly unique and mesmerizing. Let your creativity soar as you capture the awe-inspiring beauty of the Northern Lights on canvas.
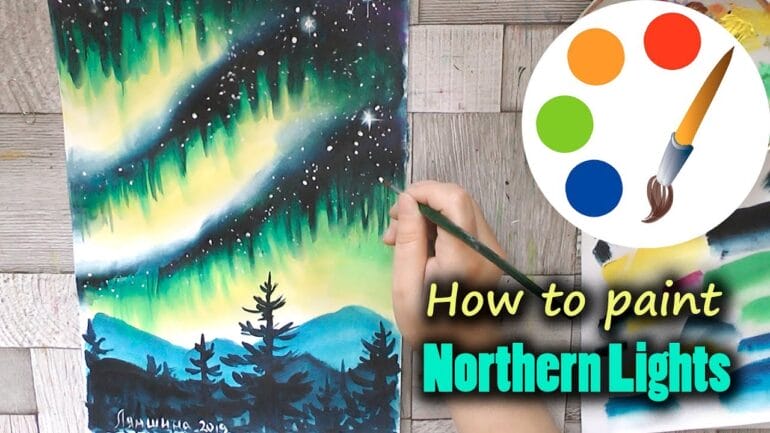
Tips and Tricks for Achieving Realistic Northern Lights Effect in Acrylics
If you’ve ever seen the breathtaking beauty of the Northern Lights, you may have wondered how to capture that magical display on canvas. With a few tips and tricks, you can create a realistic Northern Lights effect in acrylics. Whether you’re a beginner or an experienced artist, these techniques will help you bring the wonder of the aurora borealis to life in your own artwork.
1. Choose the Right Colors
The key to achieving a realistic Northern Lights effect lies in choosing the right colors. Opt for a palette of vibrant blues, purples, greens, and pinks to mimic the ethereal glow of the aurora. Use a variety of shades within each color to add depth and dimension to your painting.
2. Use a Wet-on-Wet Technique
To create the soft, blended appearance of the Northern Lights, try using a wet-on-wet technique. Start by wetting your canvas with a thin layer of water or acrylic medium. Then, quickly apply your chosen colors, allowing them to mix and flow together naturally. This technique will give your painting a smooth and seamless look.
3. Add Layers of Translucent Glazes
To enhance the luminosity of the Northern Lights, consider adding layers of translucent glazes to your painting. Apply thin washes of color over your base layer, allowing each layer to dry before adding the next. This technique will create a sense of depth and intensity, giving your Northern Lights a mesmerizing glow.
4. Experiment with Different Brush Techniques
Don’t be afraid to experiment with different brush techniques to achieve the desired effect. Use a fan brush to create soft, feathery strokes for the wispy strands of the Northern Lights. Try stippling or dabbing with a sponge to add texture and mimic the dancing lights in the night sky. Play around with different brush sizes and shapes to create a variety of effects.
5. Incorporate Metallic or Iridescent Paints
To add an extra touch of magic to your Northern Lights painting, consider incorporating metallic or iridescent paints. These paints can mimic the shimmering and iridescent quality of the aurora borealis, giving your artwork a mesmerizing sparkle. Use them sparingly to highlight certain areas or create subtle reflections.
6. Don’t Forget the Background
The Northern Lights are often seen against a night sky backdrop, so make sure to pay attention to your painting’s background. Create a dark, atmospheric sky using shades of deep blue or black. Gradually blend in lighter colors towards the horizon to mimic the fading glow of the Northern Lights as they meet the Earth’s atmosphere.
7. Practice and Experiment
Finally, remember that achieving a realistic Northern Lights effect may take some practice and experimentation. Don’t be discouraged if your first attempts don’t turn out exactly as you envisioned. Keep practicing and trying different techniques until you achieve the desired result. Each painting you create will bring you closer to capturing the beauty of the aurora borealis.
In summary, creating a realistic Northern Lights effect in acrylics requires careful color selection, a wet-on-wet technique, layers of translucent glazes, experimentation with brush techniques, the use of metallic or iridescent paints, and attention to the background. With these tips and tricks, you can bring the awe-inspiring beauty of the aurora borealis to life on your canvas.
FAQs
1. How do I paint Northern Lights with acrylic?
To paint Northern Lights with acrylic, start by creating a dark background using deep shades of blue and purple. Then, using a thin brush, apply thin streaks of fluorescent green, blue, and purple paint in a sweeping motion upwards, mimicking the movement of the lights. Gradually layer the colors to create depth and blend them softly for a natural look.
2. What colors should I use to paint Northern Lights with acrylic?
For painting Northern Lights with acrylic, use colors like fluorescent green, blue, and purple. These colors are commonly used to capture the vibrant and ethereal beauty of the auroras. You can also experiment with adding hints of white and yellow to add a touch of brightness and realism to your painting.
3. Any tips for painting realistic Northern Lights with acrylic?
To paint realistic Northern Lights with acrylic, keep the strokes light and flowing to mimic the movement of the lights. Use a limited color palette to capture the subtle variations in the auroras. It’s also important to step back and assess your painting from a distance to ensure that the overall composition looks balanced and visually pleasing.
Conclusion
In conclusion, painting the mesmerizing beauty of the Northern Lights with acrylic paints can be a captivating and rewarding experience. By using layering techniques and playing with colors, you can recreate the vibrant hues and ethereal glow of this natural phenomenon on your canvas.
With the right brushes, blending tools, and a bit of experimentation, you can achieve stunning results that capture the magic and mystery of the Northern Lights. Remember to study reference images and gather inspiration before starting your artwork, and don’t be afraid to let your creativity shine through.
Whether you’re a seasoned artist or a beginner, acrylic painting offers endless possibilities for expressing your imagination. So grab your paintbrushes, prepare your color palette, and embark on a mesmerizing journey to paint the Northern Lights in acrylic.