
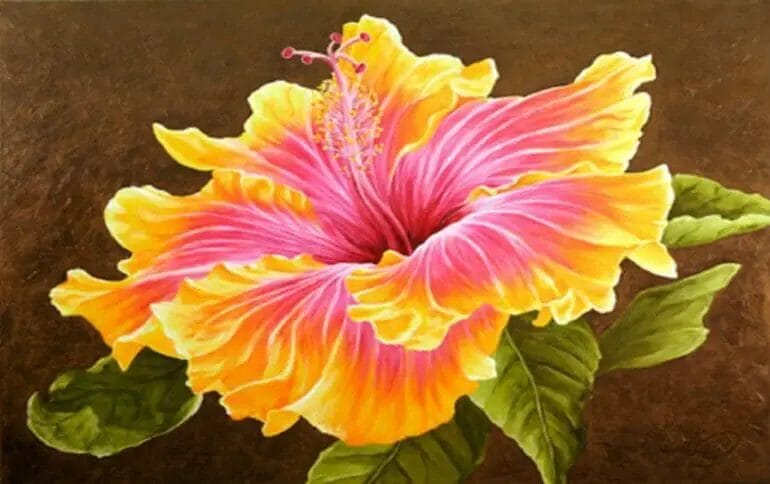
Looking to paint a stunning hibiscus flower in acrylic? We’ve got you covered! With its vibrant colors and intricate petals, the hibiscus flower makes for a beautiful subject in any painting. In this guide, we’ll show you step-by-step how to create a realistic hibiscus flower using acrylic paints.
First, start by sketching the outline of the flower on your canvas using a pencil. Then, select your acrylic colors, such as red, yellow, and green, to capture the essence of the hibiscus. Next, carefully apply thin layers of paint to build up the shape and details of the petals.
Once you’re satisfied with the base layer, start adding depth and dimension by adding darker shades to the shadows and lighter tones to the highlights. Don’t forget to blend the colors to achieve a smooth transition. For the finishing touches, add the intricate details of the stamen and pistil using a small brush.
Lastly, step back and admire your masterpiece! With practice, you’ll be able to create stunning hibiscus flower paintings that capture the beauty of nature.
Choosing the Right Acrylic Paint for Hibiscus Flower Painting
When it comes to creating a beautiful hibiscus flower painting, choosing the right acrylic paint is crucial. Acrylic paint is a popular choice among artists due to its versatility and vibrant colors. However, with so many options available in the market, it can be overwhelming to select the best paint for your hibiscus flower masterpiece. In this section, we will explore the factors to consider when choosing acrylic paint for hibiscus flower painting.
1. Quality and Brand
The quality of acrylic paint can vary significantly depending on the brand. It is important to invest in high-quality paint from reputable brands as they offer better pigmentation, lightfastness, and durability. Some well-known brands for acrylic paint include Golden, Liquitex, Winsor & Newton, and Da Vinci.
2. Pigmentation
The pigmentation of acrylic paint determines the vibrancy and opacity of the color. Look for paints with a high pigment load as they will provide better coverage and intensity. Transparent and translucent colors are ideal for creating translucent petals and adding depth to your hibiscus flower painting.
3. Lightfastness
Lightfastness refers to the ability of a paint color to resist fading when exposed to light. It is essential to choose paints with good lightfastness ratings, especially if your painting will be displayed in a well-lit area or under direct sunlight. Paints with poor lightfastness may fade over time, affecting the overall appearance of your artwork.
4. Color Range
The color range available in acrylic paints can vary between brands. Consider the specific colors you need for your hibiscus flower painting and choose a brand that offers a wide range of hues. This will give you more options for achieving the desired color palette and creating realistic hibiscus flower petals.
5. Consistency
Acrylic paints come in various consistencies, including heavy body, soft body, and fluid. The consistency you choose will depend on your preferred painting style and technique. Heavy body paints are thick and retain brush strokes, making them suitable for impasto techniques and creating texture. Soft body and fluid paints have a smoother consistency, allowing for easier blending and glazing.
6. Drying Time
The drying time of acrylic paint can vary between brands and consistencies. Consider the drying time required for your painting technique and preferences. Some artists prefer slow-drying paints for longer blending time, while others prefer fast-drying paints for layering and building up colors quickly.
7. Price
Lastly, consider your budget when choosing acrylic paint for your hibiscus flower painting. While high-quality paints may be more expensive, they often provide better color saturation and longevity. However, there are also affordable options available that offer decent quality for beginner artists or those on a tight budget.
In summary, selecting the right acrylic paint for your hibiscus flower painting involves considering factors such as quality and brand, pigmentation, lightfastness, color range, consistency, drying time, and price. By taking these factors into account, you can ensure that your paint choice enhances the beauty of your hibiscus flower artwork.
Step-by-Step Guide to Preparing the Canvas for Hibiscus Flower Acrylic Painting
Creating a beautiful acrylic painting of a hibiscus flower requires careful preparation of your canvas. In this section, we will provide you with a step-by-step guide on how to prepare your canvas for a hibiscus flower acrylic painting.
Materials You’ll Need:
- Canvas
- Acrylic paints
- Paintbrushes
- Palette
- Water container
- Palette knife
- Sketching pencil
- Masking tape
- Gesso
- Sandpaper
Step 1: Prepare the Canvas
Start by ensuring that your canvas is clean and free from any dust or debris. Use a damp cloth to wipe the surface of the canvas, removing any dirt or loose particles.
Step 2: Apply Gesso
To enhance the adhesion of the acrylic paint and provide a smooth surface, apply a layer of gesso to the canvas. Gesso also helps to seal the canvas and prevent the paint from sinking into the fabric. Use a wide brush or a palette knife to evenly apply the gesso over the entire canvas. Allow it to dry completely.
Step 3: Sand the Surface
After the gesso has dried, lightly sand the surface of the canvas using fine-grit sandpaper. This will create a slightly textured surface that helps the paint to adhere better.
Step 4: Create a Sketch
Using a sketching pencil, lightly draw the outline of the hibiscus flower on the canvas. Take your time to ensure accuracy and capture all the details of the flower.
Step 5: Masking Tape
If you want clean and defined edges for your painting, use masking tape to create borders or sections that you want to protect from the paint. Apply the tape carefully along the edges of the canvas, making sure it adheres securely.
Step 6: Prepare the Paint Palette
Squeeze out the desired colors of acrylic paint onto your palette. Make sure to place each color in its own designated area for easy access while you paint.
Step 7: Start Painting
Dip your paintbrush into the desired color and begin applying the paint to your canvas. Start with the background or base layer and work your way up to the finer details of the hibiscus flower. Remember to blend and layer the colors to create depth and dimension.
Step 8: Allow the Paint to Dry
Once you have finished painting, allow your artwork to dry completely. Acrylic paints dry relatively quickly, but it is always best to give them ample time to dry before moving on to the next step.
Step 9: Remove Masking Tape
Once the paint has dried, carefully remove the masking tape from the canvas. This will reveal clean and crisp edges, enhancing the overall appearance of your hibiscus flower painting.
Step 10: Finishing Touches
If desired, you can add final touches to your painting using a fine brush or palette knife. This is the time to add any additional details or highlights to make your hibiscus flower painting truly stand out.
In summary, preparing the canvas for a hibiscus flower acrylic painting requires a step-by-step process that includes cleaning and priming the canvas, creating a sketch, applying masking tape for clean edges, and carefully painting the flower. By following these steps, you can create a stunning hibiscus flower painting that will be admired by all.
Techniques for Creating Realistic Petals in Hibiscus Flower Acrylic Painting
Hibiscus flowers are known for their vibrant colors and delicate petals, making them a popular subject for artists. When it comes to acrylic painting, creating realistic petals can be a challenge, but with the right techniques, you can capture the beauty of a hibiscus flower on your canvas. In this section, we will explore some effective techniques that will help you achieve realistic and lifelike petals in your hibiscus flower acrylic painting.
1. Layering
One of the key techniques for creating realistic petals in a hibiscus flower painting is layering. Start by applying a base color for the petals and let it dry completely. Then, using a thin brush, add another layer of color to create depth and dimension. Start with lighter shades and gradually build up to darker tones. This will give your petals a more realistic and three-dimensional look.
To add more depth, you can also use a dry brush technique. Load a dry brush with a small amount of paint and lightly brush it over the dried layers. This will create texture and add a touch of realism to the petals.
2. Creating Highlights and Shadows
To make your hibiscus petals appear more realistic, it is important to create highlights and shadows. Start by observing the light source in your painting and determine where the light would hit the petals. Use a lighter shade of paint to create highlights on the areas that catch the light. This will give your petals a glossy and illuminated appearance.
For adding shadows, use a darker shade of paint and carefully paint along the creases and edges of the petals. This will create depth and make the petals look more three-dimensional. Blend the shadow color with the base color to achieve a smooth transition and a natural look.
3. Wet-on-Wet Technique
The wet-on-wet technique is another effective method for creating realistic petals in a hibiscus flower acrylic painting. This technique involves applying wet paint on a wet surface, which allows the colors to mix and blend seamlessly, resulting in soft and organic petal shapes.
To use the wet-on-wet technique, wet your canvas with a spritz of water or a thin layer of acrylic medium. Then, apply your base color for the petals using a large brush. While the paint is still wet, use a smaller brush to add details and subtle variations in color. This technique allows for more spontaneity and creates a natural flow in your hibiscus petals.
4. Texturing
Adding texture to your hibiscus petals can enhance their realism. There are several ways to achieve texture in acrylic painting. One method is to use a palette knife to create raised areas on the petals. Apply thick paint with the palette knife and gently scrape it across the canvas to create texture and mimic the texture of a real petal.
Another technique is to use a dry brush to add fine lines or veins on the petals. Dip a dry brush into a slightly darker shade of paint and gently stroke it over the surface of the petals. This will create delicate lines and add intricate details to your hibiscus flower.
5. Blending and Feathering
Blending and feathering are essential techniques in achieving smooth and realistic petals in hibiscus flower acrylic painting. Blending involves seamlessly merging two or more colors together to create a smooth transition. Use a brush or a soft cloth to gently blend the colors on your petals, creating a soft and natural gradient effect.
Feathering, on the other hand, involves creating soft edges and transitions between colors. Use a dry brush or a light touch to gently feather the edges of your petals. This will soften the lines and edges, resulting in a more realistic and natural look.
In summary, creating realistic petals in a hibiscus flower acrylic painting requires a combination of layering, creating highlights and shadows, wet-on-wet technique, texturing, blending, and feathering. By using these techniques, you can bring your hibiscus flower to life on canvas, capturing the intricate beauty of its petals. Remember to observe and study real hibiscus flowers to understand their unique characteristics and replicate them in your painting. With patience and practice, you can master these techniques and create stunning hibiscus flower acrylic paintings.
Adding Depth and Texture to Hibiscus Flower Acrylic Painting with Layering Techniques
Creating a stunning and realistic acrylic painting requires more than just skillful brushwork. To truly bring a hibiscus flower to life on canvas, it is essential to add depth and texture using layering techniques. These techniques allow you to build layers of color, shadows, and highlights that give your painting a three-dimensional feel. In this section, we will explore various layering techniques that can be used to enhance the beauty of a hibiscus flower acrylic painting.
1. Establishing the Base Layer
The first step in creating depth and texture is to establish a solid base layer for your painting. Begin by sketching the basic outline of your hibiscus flower on the canvas using a light pencil. Then, apply a thin layer of paint in the base color of your flower. This base layer will serve as the foundation for the subsequent layers.
2. Building Layers of Color
To add depth and dimension to your hibiscus flower, it is important to build layers of color. Start by identifying the various hues present in the petals of the flower. Use a variety of brush sizes and strokes to apply these colors in thin layers, gradually building up the intensity and richness. Remember to let each layer dry completely before applying the next to prevent muddy colors.
To create a more realistic effect, consider adding subtle variations within each layer. Mix small amounts of different colors and lightly brush them onto the petals to mimic the natural color variations found in real flowers. This technique adds depth and visual interest to your painting.
3. Creating Shadows and Highlights
To further enhance the three-dimensional effect, it is crucial to create shadows and highlights. Shadows add depth and create the illusion of light falling on the flower, while highlights mimic the reflections of light. Use darker shades of your base color to create shadows on the petals, paying attention to the direction of light source. Apply these shadows in thin layers, gradually building up intensity as needed.
For highlights, mix a lighter shade of your base color and apply it sparingly on the areas where the light would hit the petals. This technique adds a luminous quality to your painting and helps create a sense of depth and texture.
4. Adding Texture and Details
Texture plays a vital role in creating a realistic hibiscus flower painting. Use a variety of techniques to add texture to different parts of the flower. For the petals, consider using a dry brush technique, where you load your brush with paint and then remove most of it by wiping it on a paper towel. This creates a textured effect that mimics the delicate surface of the petals.
Additionally, you can use tools such as sponges, palette knives, or even your fingers to add texture to the center of the flower or the leaves. Experiment with different techniques and materials to achieve the desired effect.
5. Final Touches and Details
Once you have completed the layering process and added texture to your hibiscus flower, it’s time to add the final touches and details. Use smaller brushes to add fine lines, veins, and stamen to the petals. Pay attention to the subtle details that make the flower look more realistic.
Remember to step back occasionally and assess your painting from a distance. This will help you identify areas that may require further refinements or adjustments.
Summary
Adding depth and texture to a hibiscus flower acrylic painting can elevate it from a flat representation to a stunning, lifelike masterpiece. By employing layering techniques, building layers of color, creating shadows and highlights, adding texture, and adding final details, you can create a painting that captures the essence and beauty of a hibiscus flower.
Tips for Adding Details and Highlights to Complete the Hibiscus Flower Acrylic Painting
Once you have laid down the base colors and shapes for your hibiscus flower acrylic painting, it’s time to add those final touches that will bring your artwork to life. Adding details and highlights can enhance the overall realism and depth of your painting, creating a stunning finished piece. Here are some tips to help you add those final touches:
1. Observe and Study the Flower:
Before you start adding details, take some time to carefully observe and study a real hibiscus flower or reference images. Pay attention to the intricate details such as the texture of the petals, the arrangement of stamens, and the shape of the leaves. This will give you a better understanding of how to recreate these details in your painting.
2. Use Fine Brushes:
When adding details to your hibiscus flower painting, it’s important to use fine brushes with a sharp point. These brushes will allow you to create precise lines and intricate details. Experiment with different brush sizes to find the one that works best for the specific details you want to add.
3. Layering and Blending Colors:
To create depth and dimension in your painting, use layering and blending techniques. Start by adding a base color for the petals, then gradually build up layers of lighter and darker shades to create highlights and shadows. Use a dry brush or a soft blending brush to gently blend the colors together for a smooth transition.
4. Focus on the Petals:
The petals of a hibiscus flower are its most striking feature. Pay special attention to the details of each petal, such as the veins, texture, and any subtle color variations. Use thin brush strokes to recreate these details, adding depth and realism to your painting.
5. Highlighting the Stamen:
The stamen of a hibiscus flower is often a vibrant color, such as bright yellow or orange. Use a small brush and a lighter shade of the stamen color to add highlights and create a sense of light reflecting off the stamen. This will draw attention to this focal point of the flower.
6. Adding Texture to the Leaves:
Hibiscus leaves have a unique texture, with prominent veins and a glossy surface. Use a dry brush or a fine liner brush to recreate this texture. Paint thin lines to represent the veins and add subtle highlights along the edges of the leaves to enhance their three-dimensional appearance.
7. Fine-Tuning and Refining:
Take a step back and evaluate your painting as you add details. Make any necessary adjustments to ensure that the proportions and shapes are accurate. Look for areas that may need additional highlights or shadows to create a more realistic effect.
8. Don’t Overdo It:
While adding details is important, it’s crucial not to overdo it. Be mindful of maintaining a balance between the level of detail and the overall composition of your painting. Sometimes, leaving certain areas with less detail can create a more visually appealing and dynamic piece of art.
By following these tips, you can add the necessary details and highlights to complete your hibiscus flower acrylic painting. Remember to take your time and enjoy the process of adding those final touches. With practice and patience, you can create a stunning and realistic floral masterpiece.
FAQs
1. How can I paint a hibiscus flower using acrylic paint?
To paint a hibiscus flower with acrylic paint, start by sketching the outline of the flower on your canvas. Then, choose the colors you want to use for the different parts of the flower, like the petals and the center. Start by blocking in the base colors and gradually build up the details and shading. Use thin layers of paint and let them dry between each application. Add highlights and final touches to complete the painting.
2. What brushes should I use for painting a hibiscus flower with acrylics?
For painting a hibiscus flower with acrylics, you can use a variety of brushes depending on the size and details you want to achieve. For larger areas and blending, use flat brushes. For more detailed work, use round or liner brushes. It’s a good idea to have a range of brush sizes to make it easier to paint different parts of the flower.
3. Can I paint a hibiscus flower on any surface with acrylic paint?
Acrylic paint can be used on a variety of surfaces, including canvas, paper, wood, and even glass or ceramic with the right preparation. However, for best results when painting a hibiscus flower with acrylics, it is recommended to use a surface that has been primed specifically for acrylic painting. This helps the paint adhere better and ensures longevity of the artwork.
Conclusion
In conclusion, painting a hibiscus flower with acrylics can be a rewarding and enjoyable experience. With the right techniques and a little practice, you can create a vibrant and beautiful representation of this iconic flower.
By using layering and blending techniques, you can achieve depth and dimension in your painting. Don’t be afraid to experiment with different color combinations and brush strokes to bring your hibiscus flower to life.
Remember to start with a sketch and plan out your composition before diving into the painting process. Take your time and be patient with yourself as you develop your skills.
With dedication and a passion for art, you can master the art of painting hibiscus flowers with acrylics and create stunning pieces that will be admired by all.