
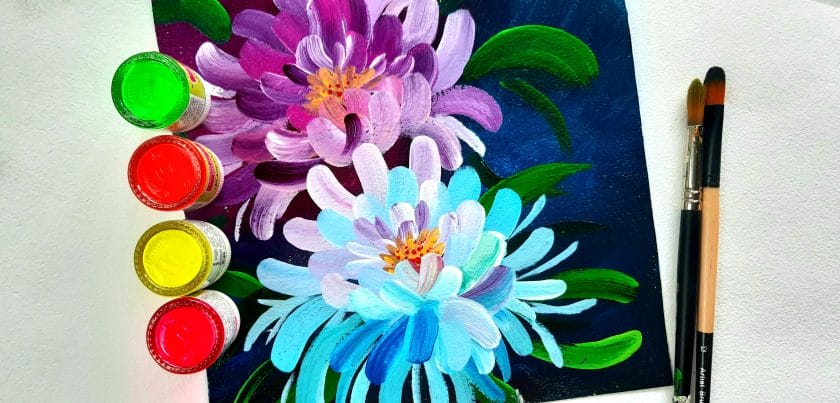
Are you looking to create stunning 3D flowers using acrylic paint? Look no further! In this guide, we will show you the step-by-step process to make beautiful and realistic 3D flowers using acrylic paint. Whether you are a beginner or an experienced artist, this technique is sure to leave you amazed with the lifelike results you can achieve.
To start, gather your materials – acrylic paint in various colors, a palette for mixing, brushes of different sizes, a canvas or paper, and any other tools you may need. Next, sketch out the basic shape of your flower on the surface using a pencil or a light colored pencil. This will serve as your guideline as you paint.
Once your sketch is complete, it’s time to bring your flowers to life! Start by laying down your base colors using a flat brush, gradually building up the layers to create depth and dimension. Use a dabbing or stippling motion to create texture and mimic the natural look of petals and leaves.
After your base colors are dry, it’s time to add highlights and shadows to make your flowers pop. Use a smaller brush to carefully apply lighter shades to the areas that catch the light, and darker shades to areas that are in shadow. This technique will add realism and depth to your flowers.
Finally, add the finishing touches by adding details such as veins on leaves, delicate strokes on petals, or even tiny spe
Essential Supplies for Creating 3D Flowers with Acrylic Paint
Creating 3D flowers with acrylic paint is a fun and creative way to add depth and dimension to your artwork. Whether you are a beginner or an experienced artist, having the right supplies is essential to achieve the desired effect. In this section, we will explore the essential supplies you need to create stunning 3D flowers with acrylic paint.
1. Acrylic Paint
The first and most important supply you will need is acrylic paint. Choose a variety of colors to bring your flowers to life. Acrylic paint is known for its vibrant pigments and quick drying time, making it perfect for creating intricate details and layering colors.
2. Paint Brushes
To create realistic and detailed 3D flowers, you will need a variety of paint brushes. Opt for fine brushes for delicate petals and larger brushes for broader strokes. Having a range of brush sizes will allow you to achieve different textures and effects.
3. Palette
A palette is essential for mixing and blending your acrylic paints. You can either use a traditional handheld palette or invest in a stay-wet palette, which keeps your paint moist for longer periods. This is especially useful when working on intricate flower designs that require multiple color mixtures.
4. Palette Knife
A palette knife is a versatile tool that can be used to mix paints, create texture, and apply thick layers of acrylic. It allows for more precise control when adding dimension to your 3D flowers. Experiment with different stroke techniques using the palette knife to achieve unique effects.
5. Canvas or Painting Surface
Choose a canvas or painting surface that is suitable for acrylic paints. Stretched canvas, canvas boards, or acrylic paper are commonly used surfaces for acrylic painting. Make sure the surface is primed and prepared to ensure the best adhesion and longevity of your artwork.
6. Modeling Paste or Gel Medium
To create the three-dimensional effect of your flowers, you will need modeling paste or gel medium. These substances can be mixed with acrylic paint to add texture and volume to your petals and leaves. Experiment with different consistencies to achieve the desired effect.
7. Reference Images
Having reference images of real flowers or botanical illustrations can greatly enhance the accuracy and realism of your 3D flower paintings. Use them as a guide for color choices, shape, and petal arrangement. You can find inspiration from books, magazines, or even online sources.
8. Varnish
Once your 3D flower painting is complete, it is important to protect and enhance the finished artwork. Apply a varnish specifically designed for acrylic paintings to protect the surface from dust, UV damage, and to give it a professional finish. Choose a gloss, satin, or matte varnish depending on your preference.
9. Mixing Trays
Mixing trays or small containers are essential for combining and diluting your acrylic paints. They provide a clean and organized space for mixing colors and experimenting with different shades and hues. Disposable plastic trays or reusable palettes with multiple wells are both suitable options.
10. Water and Paper Towels
Water is necessary for diluting or cleaning your brushes during the painting process. Keep a jar or cup of water nearby to rinse your brushes. Paper towels or rags are handy for drying your brushes or wiping excess paint. They help maintain the cleanliness and quality of your paintbrushes.
In summary, the essential supplies for creating 3D flowers with acrylic paint include acrylic paint in various colors, a variety of paint brushes, a palette for mixing and blending, a palette knife for adding texture, a suitable canvas or painting surface, modeling paste or gel medium for dimension, reference images for accuracy, varnish for protection and finish, mixing trays for color manipulation, and water and paper towels for cleaning.
With these supplies in hand, you are ready to embark on your journey of creating beautiful and lifelike 3D flowers using acrylic paint. Let your creativity blossom as you explore different techniques and experiment with colors to bring your floral creations to life.

Step-by-Step Guide to Creating Lifelike 3D Flowers with Acrylic Paint
Acrylic paint is a versatile medium that allows artists to create stunning three-dimensional (3D) effects in their artwork. One popular subject for 3D painting is flowers, as they add a touch of beauty and elegance to any composition. In this section, we will provide you with a step-by-step guide to creating lifelike 3D flowers using acrylic paint.
Materials Needed:
- Canvas or painting surface
- Acrylic paint in various colors
- Palette or mixing tray
- Paintbrushes (round, flat, and fine detail brushes)
- Water jar for cleaning brushes
- Palette knife
- Modeling paste or gel medium
- Color palette or reference photo of flowers
- Masking tape (optional)
Step 1: Prepare Your Painting Surface
Start by preparing your canvas or painting surface. If desired, you can tape the edges of the canvas with masking tape to create clean borders. This step is optional but can give your artwork a more polished look.
Step 2: Mix Your Colors
Next, mix your acrylic paint colors on a palette or mixing tray. Refer to a color palette or reference photo of flowers to help you match the shades accurately. Acrylic paint is known for its fast drying time, so make sure to work quickly and mix enough paint to finish your flowers.
Step 3: Create a Base Layer
Apply a thin, even layer of modeling paste or gel medium to your canvas using a palette knife. This layer will provide texture and depth to your flowers. Allow the paste to dry completely before moving on to the next step.
Step 4: Outline the Flower Shape
Using a round brush or fine detail brush, outline the shape of your flower with a light color. This will serve as a guideline for the petals and help you with the placement of the details later on.
Step 5: Paint the Petals
Starting from the center of the flower, paint the petals using a flat brush. Use short, curved brush strokes to create the shape of each petal. Gradually add lighter and darker shades to add depth and dimension to the petals. Blend the colors together using a dry brush technique for a more natural look.
Step 6: Add Details and Highlights
With a fine detail brush, add intricate details to your flower, such as veins, textures, and highlights. These details will make your flower appear more realistic and lifelike. Use lighter shades of paint to create highlights on the petals, giving them a subtle shine.
Step 7: Paint the Stem and Leaves
Once you are satisfied with your flower, move on to painting the stem and leaves. Use a flat brush to create the stems and fill them in with shades of green. Add highlights and shadows to the leaves to make them look more natural.
Step 8: Let the Painting Dry
Allow your painting to dry completely before adding any final touches or layers. Acrylic paint dries relatively quickly, but it is essential to ensure that each layer is fully dry to prevent smudging or blending of colors.
Step 9: Optional Final Touches
If desired, you can add additional details or embellishments to your painting. This could include adding accents with metallic paints, glitters, or even using a gloss varnish to enhance certain areas.
Step 10: Display and Enjoy Your 3D Flower Painting
Once your painting is fully dry and you are satisfied with the results, it’s time to display and enjoy your stunning 3D flower artwork. You can frame it, hang it on the wall, or showcase it on a decorative easel to add a touch of beauty to any space.
In summary, creating lifelike 3D flowers with acrylic paint requires careful planning, layering, and attention to detail. By following this step-by-step guide, you can create vibrant and realistic flowers that will captivate viewers with their beauty and depth. Enjoy the process and let your creativity blossom!
Adding Depth and Dimension to Your 3D Flower Paintings
Creating three-dimensional flower paintings can offer a unique and captivating visual experience. By adding depth and dimension to your artwork, you can bring your floral compositions to life and make them more engaging for the viewer. In this section, we will explore different techniques and strategies that can help you achieve this effect.
1. Layering Technique
One effective way to add depth to your flower paintings is by using the layering technique. Start by painting the background of your canvas or paper with a light color. Then, gradually build up your composition by layering different elements of the flowers, such as petals and leaves.
Begin with the foreground elements and work your way back, adding more detail and depth with each layer. This technique creates the illusion of distance and allows you to showcase the different layers of the flowers, giving them a three-dimensional appearance.
2. Use of Shadows and Highlights
Shadows and highlights are essential in creating depth and dimension in any artwork. In flower paintings, shadows can be used to add depth to the petals and leaves, while highlights can bring out the three-dimensional qualities of the flowers.
Observe the light source in your composition and determine where the shadows would naturally fall. Use darker shades of paint to create these shadows, carefully blending them with the surrounding colors to achieve a seamless transition.
On the other hand, highlights can be painted with lighter shades to emphasize the areas that catch the most light. This technique creates a sense of volume and enhances the three-dimensional effect of your flower paintings.
3. Textures and Details
Adding textures and details to your flower paintings can significantly enhance their depth and realism. Pay attention to the different textures found in flowers, such as the velvety feel of petals or the roughness of leaves.
You can use various techniques to create these textures, such as dry brushing, stippling, or even using palette knives to add texture to the paint. Experiment with different brushstrokes and techniques to capture the intricate details of the flowers, making them appear more three-dimensional.
4. Perspective and Proportions
Understanding the principles of perspective and proportions can greatly contribute to the depth and dimensionality of your flower paintings. By accurately depicting the size and placement of the flowers in relation to each other and the background, you can create a convincing sense of depth.
Consider the concept of foreshortening, where objects appear shorter or compressed when viewed from certain angles. Applying this technique to your flower paintings can add a realistic touch and make them visually striking.
5. Experiment with Mixed Media
Exploring different art mediums and techniques can give your flower paintings a unique and multidimensional quality. Consider incorporating mixed media elements into your artwork, such as collage, textured papers, or even adding real petals or leaves.
This combination of different materials and techniques adds depth and dimension to your flower paintings, making them visually intriguing and capturing the essence of the flowers in a more tactile way.
By incorporating these techniques and strategies into your flower paintings, you can elevate them to a new level of depth and dimension. Experiment with various approaches and find the ones that resonate with your artistic style and vision. Remember, adding depth and dimension to your artwork enhances the overall visual experience and allows viewers to immerse themselves in the beauty of your floral compositions.
Tips and Techniques for Perfecting Your 3D Flower Painting Skills
Are you passionate about art and looking to enhance your painting skills? If so, 3D flower painting is a beautiful and captivating art form that you should explore. By incorporating depth and dimension into your floral artwork, you can bring your paintings to life and create stunning visual effects. In this section, we will share some valuable tips and techniques to help you perfect your 3D flower painting skills.
1. Study Real Flowers
Before you start painting, take the time to observe and study real flowers. Pay attention to the intricate details, shapes, and colors. Notice how light interacts with the petals and leaves, creating highlights and shadows. By understanding the anatomy of flowers, you will be better equipped to recreate their beauty on canvas.
Tip: Consider visiting botanical gardens or floral shops to observe a wide variety of flowers and gain inspiration for your paintings.
2. Use Layering Technique
To achieve a realistic 3D effect, utilize the layering technique in your flower paintings. Start by sketching the basic outline of the flower and then gradually build up layers of paint. Begin with lighter colors and gradually add darker tones to create depth and dimension. Pay close attention to the direction of brushstrokes to mimic the natural flow of petals and leaves.
Tip: Experiment with different brush sizes and techniques to achieve various textures and details in your paintings.
3. Play with Light and Shadows
Light and shadows play a crucial role in creating a three-dimensional effect in paintings. Observe how light falls on the flowers and casts shadows. Use lighter shades for areas that catch more light and darker shades for shadows. This technique will add depth and realism to your artwork.
Tip: Experiment with different lighting conditions and angles to understand how they influence the appearance of flowers.
4. Add Textures and Details
Texturing is an essential aspect of 3D flower painting. Use a variety of techniques to add texture and details to your artwork. You can achieve this by using palette knives, sponges, or even household items like toothbrushes to create different effects. Incorporate tiny details like the veins on petals or the delicate hairs on leaves to add realism.
Tip: Practice on a separate canvas or paper to experiment with different texturing techniques before applying them to your final painting.
5. Experiment with Mixed Media
Don’t limit yourself to just paint! Experiment with mixed media to add depth and interest to your flower paintings. You can incorporate elements like collage, fabric, or even pressed flowers to create unique and visually stunning artwork. Mixed media allows you to explore different textures and materials, enhancing the three-dimensional effect.
Tip: Research and gather various materials that you can use in your mixed media flower paintings, and let your creativity flow.
6. Practice Patience and Persistence
Mastering any skill takes time and practice, and 3D flower painting is no exception. It’s important to be patient with yourself and persistent in your efforts. Don’t be discouraged by initial setbacks or imperfections. Keep practicing, experimenting, and refining your techniques, and you will see improvement over time.
Tip: Join art classes or workshops to learn from experienced artists and gain valuable insights and feedback on your work.
In summary, 3D flower painting is a captivating art form that requires attention to detail, observation, and practice. By studying real flowers, using layering techniques, playing with light and shadows, adding textures and details, experimenting with mixed media, and practicing patience and persistence, you can perfect your 3D flower painting skills. So grab your brushes, immerse yourself in the world of flowers, and let your creativity bloom on canvas!
Frequently Asked Questions
How can I make 3D flowers using acrylic paint?
To make 3D flowers with acrylic paint, start by painting the base color of the flower on your canvas. Once it dries, mix a small amount of paint with a thickening medium to create a paste-like consistency. Use a palette knife or a piping bag to apply the paint mixture onto the canvas, building up layers to create a textured and three-dimensional effect. Allow the paint to dry completely before adding any additional details or highlights.
What kind of paint should I use for 3D flower painting?
For 3D flower painting, it is recommended to use acrylic paint. Acrylic paint has a thick consistency and dries quickly, making it easier to create textured and dimensional effects. It also adheres well to various surfaces, including canvas, wood, and paper. Additionally, acrylic paint is available in a wide range of colors, allowing you to create vibrant and realistic flower designs.
Can I use a brush to create 3D flowers with acrylic paint?
While it is possible to use a brush to create some texture and dimension in your flower painting, using a palette knife or a piping bag is more effective for achieving a true 3D effect. These tools allow you to apply the paint in thick, textured layers, giving your flowers a more realistic and three-dimensional appearance. Experiment with different tools to find the technique that works best for you.
Conclusion:
In conclusion, creating 3D flowers with acrylic paint is a fun and innovative way to add depth and dimension to your artwork. By following simple techniques, such as layering paint and using different brush strokes, you can bring your flowers to life on canvas. The versatility of acrylic paint allows for endless possibilities and experimentation, enabling you to explore various color combinations and textures. Whether you are a beginner or an experienced artist, this technique offers a great opportunity to showcase your creativity and bring a touch of nature to your art. So, grab your brushes, acrylic paints, and let your imagination blossom with stunning 3D flowers!