
If you’re looking to refresh the look of your grout, using acrylic paint can be a viable option. Acrylic paint offers a durable and waterproof finish, making it suitable for painting grout lines. By applying a thin layer of acrylic paint over your grout, you can easily change its color and give it a fresh, new appearance. However, it’s important to properly prepare the surface and choose the right type of paint to ensure long-lasting results. Read on to learn more about painting grout with acrylic paint.

Benefits of Painting Grout with Acrylic Paint
Grout is an essential part of any tile installation, providing stability and protection to the tiles. However, over time, grout can become discolored, stained, or simply outdated. One way to revitalize and enhance the appearance of your grout is by painting it with acrylic paint. Painting grout with acrylic paint offers several benefits that can transform the look of your tiles and give them a fresh new appearance.
1. Restores the Look
Over time, grout can become dull or discolored due to dirt, mold, or aging. Painting grout with acrylic paint can restore its original look and make it appear clean and fresh. The paint adheres to the grout surface, covering up stains and discoloration, giving your tiles a refreshed and rejuvenated appearance.
2. Provides a Protective Barrier
In addition to enhancing the aesthetics, acrylic paint creates a protective barrier on the grout surface. This barrier helps to prevent further staining, mold growth, and water penetration. By sealing the grout, you are extending its lifespan and ensuring that it remains in good condition for years to come.
3. Offers Versatility
Acrylic paint comes in a wide range of colors, allowing you to choose the perfect shade to complement your tiles and overall decor. Whether you want a classic white or a bold accent color, acrylic paint offers endless possibilities. You can even mix different colors to create a unique shade that matches your personal style and design vision.
4. Easy Application
Painting grout with acrylic paint is a DIY-friendly project that can be easily done by homeowners. The paint can be applied using a small brush or a grout pen, making it convenient and accessible for anyone. With a little patience and attention to detail, you can achieve professional-looking results without the need for expensive tools or professional help.
5. Cost-Effective Solution
Compared to the cost of regrouting or replacing tiles, painting grout with acrylic paint is a cost-effective solution. It allows you to give your tiles a new lease on life without breaking the bank. Acrylic paint is readily available at most hardware stores and is affordable, making it a budget-friendly option for refreshing your grout.
6. Durability
Acrylic paint is known for its durability, making it an ideal choice for painting grout. Once the paint has dried and cured, it forms a strong and resilient layer that can withstand everyday wear and tear. This means that your painted grout will continue to look great for an extended period, even in high-traffic areas or bathrooms with moisture.
7. Easy Maintenance
Maintaining painted grout is as simple as regular tile cleaning. You can use mild soap and water or a non-abrasive cleaner to keep the grout looking fresh and clean. Avoid using harsh chemicals or abrasive tools that can damage the paint. With proper maintenance, your painted grout can retain its beauty for years.
Overall, painting grout with acrylic paint offers a cost-effective and versatile solution for revitalizing the appearance of your tiles. It restores the look of the grout, provides a protective barrier, and offers a wide range of color options. Additionally, it is easy to apply, durable, and requires minimal maintenance. So why not give your tiles a fresh new look by painting the grout with acrylic paint?
Step-by-Step Guide to Paint Grout with Acrylic Paint
Grout is an essential part of any tiled surface, but over time it can become discolored or dull. If you’re looking to refresh the appearance of your grout, painting it with acrylic paint can be a great solution. In this guide, we will walk you through the step-by-step process of painting grout with acrylic paint.
Materials You Will Need:
- Acrylic paint
- Paintbrush
- Clean cloth
- Painter’s tape
- Grout sealer (optional)
Step 1: Prepare the Surface
The first step is to thoroughly clean the grout lines. Use a mild cleaner and a brush to remove any dirt, grime, or stains. Make sure the grout is completely dry before proceeding to the next step.
Step 2: Apply Painter’s Tape
To protect the tiles from getting paint on them, apply painter’s tape along the edges of the tiles, covering them completely. This will create a neat and defined border for your paint job.
Step 3: Choose the Right Paint
Acrylic paint is a versatile option for painting grout as it provides good coverage and is available in a wide range of colors. Select a color that complements your tiles and suits your desired aesthetic.
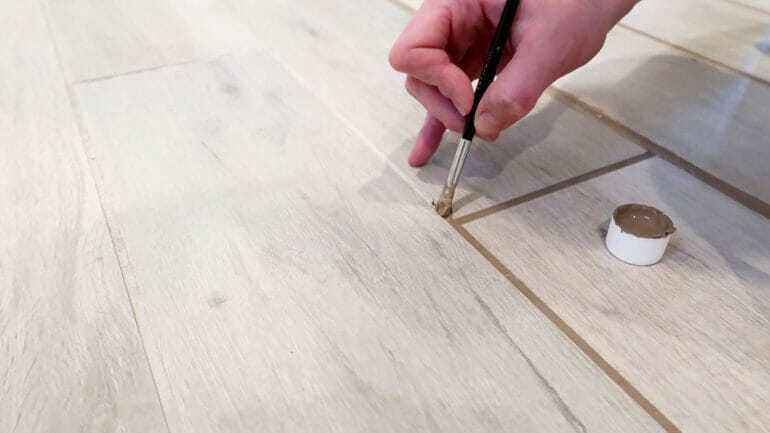
Step 4: Apply the Paint
Using a small paintbrush, carefully apply the acrylic paint to the grout lines. Start from one end and work your way systematically to avoid smudging the paint. Apply a thin, even coat and let it dry completely before applying additional coats.
Step 5: Add Multiple Coats (Optional)
If you want a more vibrant or opaque color, you can apply multiple coats of paint. Allow each coat to dry before applying the next one. Be mindful not to apply too thick of a layer, as it may cause the paint to peel or crack over time.
Step 6: Seal the Paint (Optional)
If you want to protect the painted grout and make it more resistant to staining and moisture, consider applying a grout sealer. Follow the manufacturer’s instructions for proper application and drying time.
Step 7: Remove the Painter’s Tape
Once the paint is completely dry, carefully remove the painter’s tape. Take your time to avoid any accidental smudging or damage to the painted grout.
Step 8: Clean and Maintain
To keep your painted grout looking fresh, clean it regularly with a mild cleaner and a soft cloth. Avoid using abrasive cleaners or scrub brushes that could damage the paint.
In summary, painting grout with acrylic paint is a simple and effective way to revitalize the appearance of your tiled surfaces. By following these step-by-step instructions, you can achieve a professional-looking result and enjoy a fresh and vibrant grout color.
Choosing the Right Acrylic Paint Colors for Your Grout
When it comes to adding a pop of color and personality to your home decor, acrylic paint can be a versatile and affordable option. Whether you’re looking to refresh your grout or add a decorative touch to a tile project, choosing the right acrylic paint colors is essential. In this section, we will explore some helpful tips and considerations to help you make the best choice for your grout.
1. Assess Your Space
Before diving into the world of acrylic paint colors, take a moment to assess your space. Consider the overall color scheme and style of the room. Are you aiming for a bold and vibrant look, or do you prefer a more subtle and cohesive design? Understanding the existing elements in your space will guide you in selecting the right acrylic paint colors for your grout.
2. Consider the Tile Material
The material of your tiles can influence the way acrylic paint colors appear on your grout. Porous materials, such as natural stone or unglazed ceramic, can absorb more paint and may require additional coats for the desired effect. On the other hand, non-porous materials, like glazed ceramic or porcelain, may require a primer to help the paint adhere better. Keep the tile material in mind when choosing your acrylic paint colors to achieve the desired look.
3. Create Contrast or Harmony
When choosing acrylic paint colors for your grout, you have the option to create contrast or harmony with the existing tile color. Contrast can make a bold statement by selecting colors that are significantly different from the tile. For example, if you have light-colored tiles, consider using a darker shade for your grout. On the other hand, creating harmony involves selecting colors that complement or blend seamlessly with the tile, resulting in a cohesive and balanced look.
4. Test Swatches
Before committing to a particular acrylic paint color for your grout, it’s always a good idea to test swatches. Paint small sections of grout in different colors and observe how they interact with the tile and the overall atmosphere of the room. Natural and artificial lighting can also affect how colors appear, so be sure to assess the swatches in various lighting conditions to make an informed decision.
5. Consider Longevity
When selecting acrylic paint colors for your grout, it’s important to consider the longevity of the paint. Acrylic paints are known for their durability, but it’s still essential to choose colors that won’t easily fade or wear off over time. Look for paints labeled as fade-resistant or formulated specifically for use on grout. Additionally, using a sealant after applying the paint can help protect it from stains and ensure its longevity.
6. Get Creative with Accents
In addition to choosing colors for the entire grout area, you can also get creative with accents. Consider adding a pop of color to specific sections or creating a pattern using different shades. This allows you to personalize your space and adds an artistic touch to your grout. Don’t be afraid to experiment and unleash your creativity when working with acrylic paint colors.
7. Seek Professional Advice
If you’re unsure about which acrylic paint colors to choose or how to properly apply them to your grout, don’t hesitate to seek professional advice. Consult with a local paint specialist or a professional in home interior design. They can provide expert guidance based on your specific needs and help you achieve the desired result.
Summary
Choosing the right acrylic paint colors for your grout can greatly enhance the overall aesthetic of your space. Assess your space, consider the tile material, and decide whether you want to create contrast or harmony. Test swatches and consider the longevity of the paint. Additionally, don’t be afraid to get creative with accents and seek professional advice if needed. With these tips in mind, you can confidently select the perfect acrylic paint colors to transform your grout into a stunning focal point.
Tips and Tricks for a Long-Lasting Painted Grout Finish
If you’re looking to refresh the appearance of your tiled surfaces without the hassle and expense of regrouting, painting the grout can be a great solution. However, achieving a long-lasting painted grout finish requires proper preparation and application techniques. In this section, we will provide you with a set of useful tips and tricks to ensure a durable and beautiful painted grout finish.
1. Clean and Prepare the Grout
Before painting the grout, it’s essential to thoroughly clean and prepare the surface. Use a grout cleaner or a mixture of baking soda and water to remove any dirt, stains, or mildew. Scrub the grout lines with a grout brush to ensure they are free of debris and contaminants. Rinse the grout with clean water and allow it to dry completely before proceeding.
2. Choose the Right Paint
Selecting the right paint is crucial for a successful painted grout finish. Look for a high-quality, water-based epoxy or acrylic grout paint that is specifically formulated for painting grout lines. These types of paint are durable, waterproof, and resistant to stains and mold. Additionally, choose a color that complements your tile and desired aesthetic.
3. Apply Primer
Applying a primer to the grout before painting can improve adhesion and ensure a more even finish. Use a small brush to apply a thin coat of primer to the grout lines, making sure to cover the entire surface evenly. Allow the primer to dry according to the manufacturer’s instructions before proceeding to the next step.
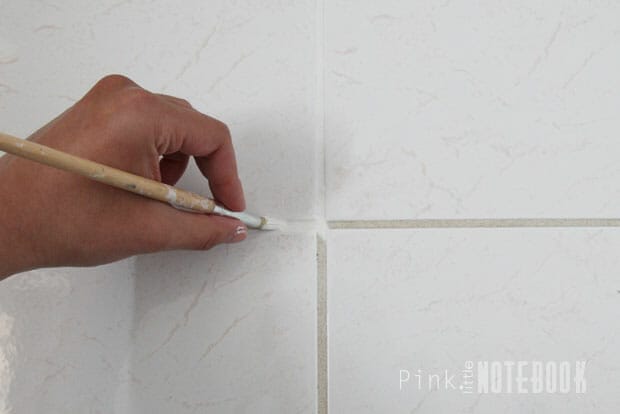
4. Use a Small Paintbrush or Grout Pen
When it comes to painting the grout lines, precision is key. Use a small paintbrush or a grout pen specifically designed for this purpose. The narrow tip of these tools allows for more precise application, ensuring that you only paint the grout and not the surrounding tile. Take your time and paint each grout line carefully, working in small sections to maintain control over the application.
5. Remove Excess Paint
After painting each grout line, immediately remove any excess paint from the tile surface using a damp cloth or sponge. This step is crucial for achieving a clean and professional finish. Be careful not to wipe too hard or smudge the painted grout. If needed, use a small, pointed object to gently clean any paint that accidentally gets on the tile.
6. Allow Sufficient Drying Time
Allow the painted grout to dry completely before exposing it to moisture or heavy use. Follow the drying instructions provided by the paint manufacturer, as different products may have varying drying times. It’s important to give the paint sufficient time to cure and harden for optimal durability.
7. Apply a Clear Sealant
To further protect the painted grout and extend its lifespan, consider applying a clear sealant over the painted surface. The sealant will provide an additional layer of protection against stains, moisture, and wear. Choose a grout sealant that is compatible with the type of paint you used and apply it according to the manufacturer’s instructions.
8. Regular Maintenance
To maintain the longevity of your painted grout finish, it’s important to follow a regular cleaning and maintenance routine. Avoid using abrasive cleaners or scrub brushes that may damage the paint. Instead, use a non-abrasive cleaner and a soft brush or cloth to clean the grout. Periodically reapply a grout sealant to keep the painted surface protected.
By following these tips and tricks, you can achieve a long-lasting painted grout finish that enhances the appearance of your tiled surfaces. Remember, proper preparation, careful application, and regular maintenance are key to maintaining the durability and beauty of your painted grout.
Alternative Methods to Enhance Grout Color without Painting
Grout is an essential element in tile installations, serving both a functional and aesthetic purpose. Over time, however, the color of grout can fade or become stained, detracting from the overall appearance of your tilework. While painting the grout is a common solution, there are alternative methods to enhance grout color without resorting to paint. In this section, we will explore some of these methods, providing you with practical options to revitalize the look of your grout.
1. Grout Stain
A grout stain is a specially formulated product that can be used to change the color of your grout without the need for paint. These stains penetrate the porous surface of the grout, creating a long-lasting color change. Grout stains are available in a variety of colors, allowing you to choose a shade that complements your tile.
To use a grout stain, start by cleaning the grout thoroughly with a grout cleaner to remove any dirt or residue. Once the grout is dry, apply the stain using a small brush or applicator. Work the stain into the grout lines, ensuring even coverage. Allow the stain to dry according to the manufacturer’s instructions and then seal the grout to protect the new color.
2. Grout Pen
If you’re looking for a quick and easy solution to enhance grout color, a grout pen can be a great option. Grout pens are markers filled with a pigment that allows you to change the color of your grout with precision. They are available in various colors, making it easy to match your existing grout or experiment with a new look.
To use a grout pen, start by cleaning the grout lines thoroughly. Shake the pen well, then press the tip against the grout line and gently squeeze to release the pigment. Trace along the grout lines, applying even pressure to ensure consistent color. Once the grout pen has dried, seal the grout to protect the new color.
3. Grout Renew
Grout renew is a ready-to-use product that can dramatically transform the color of your grout. It is designed to restore and renew the original color of your grout, making it look fresh and clean. Grout renew is available in a range of colors, allowing you to choose a shade that suits your preferences.
To use grout renew, start by cleaning the grout lines thoroughly. Apply the product directly onto the grout lines using a small brush or applicator. Work the product into the grout, ensuring even coverage. Allow it to dry for the recommended time, then wipe off any excess with a damp cloth. Once the grout renew has dried and cured, seal the grout to protect the new color.
4. Colored Grout Powder
If you prefer a DIY approach to enhancing grout color, colored grout powder can be a viable option. Colored grout powders are available in various shades and can be mixed with white grout to achieve the desired color. This method allows you to customize the color to match your existing tile or create a unique look.
To use colored grout powder, start by mixing the powder with the white grout according to the manufacturer’s instructions. Stir the mixture until the color is consistent. Apply the colored grout mixture to the tile installation, ensuring full coverage of the grout lines. Allow the grout to dry and then clean off any excess with a damp sponge. Seal the grout to protect the new color and enhance its longevity.
5. Natural Remedies
If you prefer a more natural approach to enhance grout color, there are a few household items you can try. For light-colored grout, a mixture of baking soda and water can help brighten the grout lines. Apply the paste to the grout, scrub gently, and rinse with water. For darker grout, a mixture of hydrogen peroxide and water can be effective. Apply the solution to the grout, let it sit for a few minutes, scrub gently, and rinse.
Alternatively, lemon juice can also be used to bleach and brighten grout. Apply the lemon juice directly to the grout lines, let it sit for a few minutes, scrub gently, and rinse. It’s important to note that natural remedies may not provide a drastic color change but can help revive the appearance of grout.
Summary
Enhancing the color of grout without resorting to paint is possible with these alternative methods. Whether you choose a
FAQs
Can you paint grout with acrylic paint?
Yes, you can paint grout with acrylic paint. Acrylic paint is a suitable option for painting grout, as it adheres well to the surface and provides a durable finish. Make sure to clean and prime the grout before applying the acrylic paint to ensure proper adhesion and long-lasting results.
Conclusion
In conclusion, painting grout with acrylic paint is a feasible option for refreshing the look of your tiled surfaces. The versatility and wide range of colors available in acrylic paints make it a popular choice for DIY enthusiasts and homeowners seeking to update their grout lines. By carefully prepping the surface and selecting the right type of acrylic paint, you can achieve a durable and long-lasting finish. However, it’s important to note that acrylic paint may require periodic touch-ups due to wear and tear. Additionally, for areas with heavy foot traffic or exposure to moisture, it’s recommended to use a specialized grout paint or sealer for better results and improved durability.
Overall, painting grout with acrylic paint offers a cost-effective and creative solution to transform the appearance of your tiled spaces, allowing you to customize and revitalize the overall aesthetic of your home.