
If you’ve chipped or broken a tooth and are looking for a temporary fix, using nail acrylic may seem like an easy solution. Nail acrylic is a common household item, readily available in most homes. However, it’s important to note that using nail acrylic to fix a broken tooth is not a permanent solution and should only be used as a temporary fix until you can see a dentist.
While nail acrylic may provide a short-term solution, it is not designed for use on teeth and may not provide the necessary strength and durability needed to properly restore your tooth. It’s also important to consider the potential health risks associated with using nail acrylic in your mouth.
If you have a broken tooth, it’s best to schedule an appointment with a dentist as soon as possible. Dentists have the expertise and tools necessary to properly fix your broken tooth and restore it to its original strength and appearance. They can provide you with a long-term solution that will ensure the health and longevity of your tooth.
Remember, using nail acrylic to fix a broken tooth is not recommended and can lead to further damage or complications. It’s always best to seek professional dental care to address any dental issues you may have.
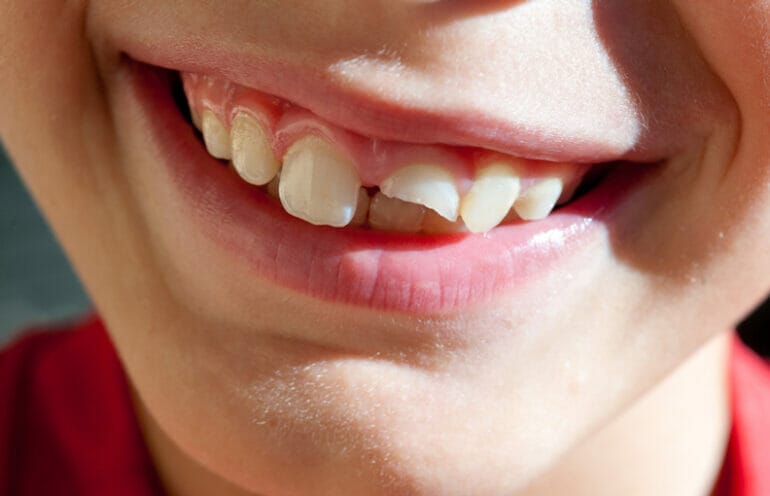
DIY Dental Fix: Using Nail Acrylic to Mend a Broken Tooth
Having a broken tooth can be both painful and inconvenient. It can affect your ability to eat and speak properly, and it may also cause self-consciousness about your smile. While it is always best to seek professional dental treatment for a broken tooth, there may be situations where immediate help is not available. In such cases, a temporary DIY fix using nail acrylic can be a viable option until you can see a dentist.
Before proceeding with this DIY dental fix, it is important to understand that it is a temporary solution and should not replace professional dental care. Using nail acrylic to mend a broken tooth is not a permanent fix and should only be used in emergency situations. It is crucial to see a dentist as soon as possible to prevent further damage or complications.
Materials Needed for DIY Dental Fix:
- Nail acrylic powder
- Nail acrylic liquid or monomer
- Disposable mixing dish
- Disposable brush
- Sanding block or file
Step-by-Step Instructions:
- Start by cleaning the broken tooth and the surrounding area with warm water and a gentle toothbrush. Make sure to remove any food debris or bacteria.
- In a disposable mixing dish, pour a small amount of nail acrylic liquid or monomer.
- Add nail acrylic powder to the liquid in small increments, mixing it with the disposable brush until it forms a paste-like consistency. Be careful not to make the mixture too runny or too thick.
- Apply a thin layer of the acrylic paste to the broken area of the tooth using the disposable brush. Make sure to cover the entire broken surface and shape it to match the natural contour of the tooth.
- Allow the acrylic to dry and harden for a few minutes. You may use a dental mirror to check if the acrylic has set properly.
- Once the acrylic is fully hardened, use a sanding block or file to smoothen the surface of the repaired tooth. Be gentle and avoid exerting too much pressure, as you don’t want to damage the tooth further.
- After sanding, rinse your mouth thoroughly with water to remove any residue. Check if the repaired tooth feels comfortable and does not cause any discomfort.
It is important to note that this DIY dental fix using nail acrylic is not a long-term solution. The acrylic may not have the same strength and durability as professional dental materials, and it may wear off or break over time. Therefore, it is crucial to seek proper dental treatment as soon as possible.
Precautions and Considerations:
- Do not attempt this DIY dental fix if you are experiencing severe pain or if there is extensive damage to the tooth. In such cases, it is best to seek immediate professional dental care.
- If the broken tooth has sharp edges, use dental wax or a temporary dental filling material to cover them and prevent injury to the tongue or cheek.
- Avoid chewing on hard or sticky foods that could put additional stress on the repaired tooth.
- Regularly monitor the repaired tooth for any changes or signs of discomfort. If you experience pain, sensitivity, or any other issues, seek professional dental advice promptly.
In summary, using nail acrylic as a temporary DIY dental fix for a broken tooth can provide temporary relief until you can see a dentist. However, it is crucial to understand that this is not a permanent solution and proper dental care should be sought as soon as possible. Take adequate precautions, follow the instructions carefully, and prioritize your oral health by seeking professional treatment from a qualified dentist.

Temporary Tooth Repair: Nail Acrylic as an Emergency Solution
Accidents happen, and sometimes they result in chipped or broken teeth. Whether it’s a fall, a sports injury, or biting down on something hard, a damaged tooth can be painful and inconvenient. While it’s important to seek professional dental care as soon as possible, there are times when immediate relief is needed. In such cases, using nail acrylic as a temporary tooth repair solution can provide a quick fix until you can see a dentist.
Why Choose Nail Acrylic?
Nail acrylic, commonly used for artificial nails, can be a handy alternative for temporary tooth repair in emergency situations. Here are a few reasons why it can be a suitable option:
- Availability: Nail acrylic is readily available at most beauty supply stores, pharmacies, and even online.
- Strength and Durability: Nail acrylic is designed to withstand daily wear and tear on nails, making it a durable option for temporary tooth repair.
- Non-Toxic: Most nail acrylics are non-toxic and safe to use on teeth, as long as they are not ingested.
- Easy Application: Applying nail acrylic to a damaged tooth is a relatively simple process that can be done at home.
Steps to Apply Nail Acrylic as a Temporary Tooth Repair
Before attempting to use nail acrylic for tooth repair, keep in mind that this is a temporary solution and should not replace professional dental care. Follow these steps to apply nail acrylic:
- Clean the Area: Ensure that the damaged tooth is clean and free of any debris or bacteria. Gently rinse the mouth with warm water.
- Prepare the Nail Acrylic: Start by selecting a clear or tooth-colored nail acrylic powder and liquid. Mix them according to the instructions provided.
- Shape the Acrylic: Take a small amount of the mixed acrylic and shape it to match the missing part or the chipped area of the tooth. Use a clean dental instrument or a small brush to mold and shape the acrylic.
- Apply the Acrylic: Carefully place the shaped acrylic onto the damaged tooth, making sure it adheres well. Use gentle pressure to smoothen the surface and create a natural-looking appearance.
- Allow it to Dry: Give the acrylic enough time to dry and harden completely. Avoid eating or drinking anything until the acrylic is fully set.
Important Considerations
While using nail acrylic for temporary tooth repair can provide relief in emergency situations, it’s essential to keep the following considerations in mind:
- Temporary Solution: Nail acrylic is not a permanent fix, and it’s crucial to seek professional dental care as soon as possible.
- Oral Hygiene: Maintain good oral hygiene by brushing and flossing carefully around the repaired tooth.
- Avoid Hard Foods: To prevent further damage, avoid biting down on hard foods or using the repaired tooth for excessive chewing.
- Remove When Necessary: If the acrylic becomes loose, uncomfortable, or causes any pain, it should be removed immediately.
In summary, nail acrylic can be a temporary tooth repair solution during emergency situations. It offers availability, strength, ease of application, and non-toxic properties. However, it is crucial to remember that dental care from a professional is necessary to address the underlying issue. Nail acrylic should only be used as a temporary measure until you can seek proper dental treatment.
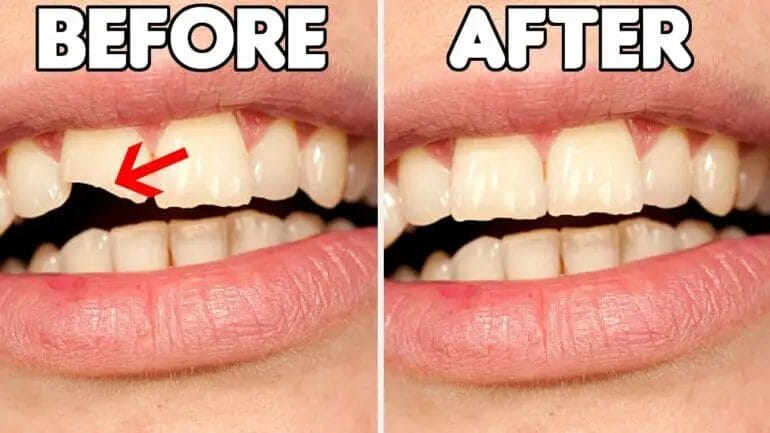
Step-by-Step Guide: Fixing a Chipped Tooth with Nail Acrylic
Having a chipped tooth can be both uncomfortable and unsightly. While it’s important to visit a dentist for professional treatment, there are temporary solutions you can try at home to fix a chipped tooth. One such solution is using nail acrylic. In this section, we will provide a step-by-step guide on how to fix a chipped tooth using nail acrylic.
Materials Needed
Before you begin the process, make sure you have the following materials:
- Nail acrylic powder
- Nail acrylic liquid
- A small mixing dish
- A toothpick or small brush
- A clean cloth or tissue
Step 1: Clean the Affected Tooth
The first step is to clean the chipped tooth thoroughly. Use a toothbrush and toothpaste to gently brush the tooth, removing any debris or bacteria that may be present. Rinse your mouth with water to ensure it’s clean before proceeding.
Step 2: Mix the Nail Acrylic
Pour a small amount of nail acrylic liquid into a mixing dish. Add the nail acrylic powder gradually, mixing it with the liquid until you achieve a thick, paste-like consistency. Use a toothpick or small brush to blend the mixture well.
Step 3: Apply the Nail Acrylic
Using the toothpick or brush, carefully apply the nail acrylic mixture onto the chipped area of the tooth. Make sure to fill in the entire chipped portion, shaping it to match the natural contour of the tooth. Smooth out any excess acrylic using the toothpick or brush.
Step 4: Shape and Polish
Once the acrylic has been applied, shape it to match the shape of the surrounding teeth. You can use a toothpick or the edge of a clean cloth to carefully mold and shape the acrylic. Take your time to achieve the desired shape and smoothness.
After shaping, allow the acrylic to dry and harden as per the manufacturer’s instructions. Once dry, use a fine-grit nail file to gently polish the surface of the acrylic, ensuring a smooth and natural appearance.
Step 5: Finishing Touches
After polishing, rinse your mouth with water to remove any residue. Gently brush the treated tooth with a soft toothbrush to ensure it is clean and free from any excess acrylic. Remember to maintain good oral hygiene by brushing and flossing regularly.
Summary
While using nail acrylic to fix a chipped tooth is a temporary solution, it can provide aesthetic relief until you can visit a dentist. Remember to exercise caution when applying the acrylic, ensuring it adheres to the chipped tooth properly and matches the natural shape. If you experience any discomfort or if the chipped tooth worsens, seek professional dental help as soon as possible.
Save Money on Dental Bills: Repairing a Broken Tooth with Nail Acrylic
When you have a broken tooth, it’s essential to seek dental treatment to prevent further damage and ensure your oral health. However, dental procedures can be expensive, leaving many people searching for alternative solutions. One unconventional method that has gained attention is repairing a broken tooth with nail acrylic, a technique that can potentially save you money on dental bills.
1. Understanding the Basics
Before delving into this DIY dental hack, it’s crucial to understand the basics of nail acrylic and how it can be used to repair a broken tooth. Nail acrylic, typically used for creating artificial nails, is a combination of a liquid monomer and a powdered polymer. When mixed together, they create a paste-like substance that hardens when exposed to air.
While nail acrylic is not designed for dental use, some individuals have experimented with using it to repair minor tooth fractures or chipped teeth. Keep in mind that this method is a temporary fix and should not be considered a long-term solution. It’s always best to consult with a dentist for proper diagnosis and treatment.
2. The Process
Repairing a broken tooth with nail acrylic requires precision and caution. Here’s a step-by-step guide on how to proceed:
- Clean the tooth: Start by thoroughly cleaning the broken tooth with warm water and a toothbrush. Ensure that the area is free from any debris or food particles.
- Prepare the nail acrylic: Follow the instructions provided with the nail acrylic kit to mix the liquid monomer and powdered polymer. Make sure to use the recommended proportions.
- Apply the acrylic: Using a small brush or applicator, carefully apply a thin layer of the acrylic mixture onto the broken tooth. Be sure to cover the entire surface of the tooth while avoiding contact with the gumline.
- Shape the acrylic: Once applied, shape the acrylic using a dental spatula or a clean, damp cloth. This step is crucial to achieve a natural-looking contour.
- Allow it to harden: Allow the acrylic to harden completely, which typically takes a few hours. Avoid eating or drinking during this time to prevent any damage to the temporary repair.
3. Limitations and Risks
While using nail acrylic to repair a broken tooth may seem like a cost-effective solution, it’s important to be aware of its limitations and potential risks:
- Temporary fix: Nail acrylic is not a permanent solution and should only be considered as a temporary fix until you can seek professional dental treatment.
- Increased risk of infection: Applying nail acrylic to a broken tooth may increase the risk of infection if not done correctly. It’s essential to maintain good oral hygiene and monitor the repaired tooth for any signs of infection.
- Potential damage to the tooth: Using nail acrylic may cause additional damage to the broken tooth if not applied correctly. It’s crucial to proceed with caution and consult with a dentist for proper guidance.
4. Seeking Professional Dental Treatment
While DIY methods like using nail acrylic may offer temporary relief, it’s vital to visit a dentist for proper diagnosis and treatment of a broken tooth. Professional dental care ensures that the underlying cause of the fracture is addressed, and the tooth is repaired correctly.
A dentist will recommend appropriate treatment options based on the severity of the broken tooth, such as dental bonding, dental crowns, or veneers. These solutions provide a longer-lasting and more reliable result, ensuring your oral health is restored effectively.
In Summary
Repairing a broken tooth with nail acrylic can be an alternative method to temporarily address a minor fracture. However, it’s crucial to remember that this is not a permanent solution and should not replace professional dental treatment. Seeking proper care from a dentist is essential to prevent further damage and ensure the long-term health of your teeth.
FAQs
Can I fix a broken tooth with nail acrylic?
No, using nail acrylic to fix a broken tooth is not recommended. Nail acrylic is not designed or approved for dental use and may not provide a strong and durable repair. It’s best to consult a dentist who can suggest appropriate dental treatments to fix a broken tooth.
What are the risks of using nail acrylic on a broken tooth?
Using nail acrylic on a broken tooth can have several risks. The acrylic may not bond properly to the tooth, leading to a temporary fix that can easily break again. Nail acrylic contains chemicals that are not meant to be used in the mouth, which can cause irritation or damage to oral tissues. It’s important to seek professional dental care for a broken tooth.
What are the recommended treatments for a broken tooth?
The recommended treatments for a broken tooth depend on the severity of the break. Simple cracks or chips can be repaired with dental bonding or a veneer. More extensive fractures may require a dental crown or root canal treatment. It’s best to consult a dentist who can assess the situation and recommend the appropriate treatment for your broken tooth.
Conclusion
In conclusion, using nail acrylic to fix a broken tooth is not recommended. While it may seem like a quick and affordable solution, it can have serious consequences for your oral health. Nail acrylic is not designed for use in the mouth and may contain harmful chemicals. Additionally, it does not provide the same strength and durability as dental materials specifically developed for repairing teeth. It is essential to seek professional dental care to ensure the proper treatment and long-term health of your tooth. Remember, your smile and oral health are worth investing in professional care.
Don’t compromise on your dental health. Visit a qualified dentist who can provide you with safe and effective solutions for fixing a broken tooth. Remember to maintain good oral hygiene practices and schedule regular dental check-ups to prevent future tooth damage. Your dentist is the best resource for addressing any dental concerns and ensuring a healthy and beautiful smile. Take care of your teeth, and they will take care of you!