
Looking to create the perfect beige shade with acrylic paint? Look no further! In this guide, we’ll show you exactly how to achieve the ideal beige hue using acrylic paint. By blending different colors and experimenting with ratios, you’ll be able to create a custom shade of beige that suits your artistic needs. Unleash your creativity and start painting with confidence using your very own homemade beige acrylic paint!

Step-by-Step Guide to Achieving Beige with Acrylic Paint
Acrylic paint is a versatile medium that allows artists to create a wide range of colors. If you’re looking to achieve a beige color with acrylic paint, follow this step-by-step guide to get the perfect shade.
Gather Your Materials
Before you begin, make sure you have all the necessary materials. You will need:
- Acrylic paint in white, brown, and yellow
- A palette or mixing surface
- Paintbrushes
- Water for cleaning brushes
Start with White
The first step is to start with a base of white paint. Squeeze out a small amount of white paint onto your palette or mixing surface.
Using a clean paintbrush, take a small amount of white paint and apply it to your canvas or desired surface. This will act as the base for your beige color.
Add Brown
Next, it’s time to add some brown paint to create depth and warmth in your beige color. Squeeze out a small amount of brown paint next to the white paint on your palette.
Dip your paintbrush into the brown paint, and then mix it with the white paint on your canvas. Start with a small amount of brown and gradually add more until you achieve the desired shade of beige.
Introduce Yellow
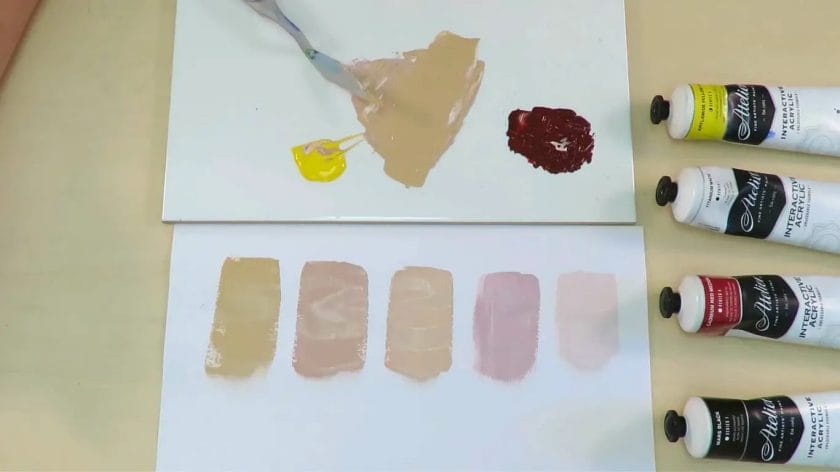
To add a touch of warmth and brightness to your beige color, introduce a small amount of yellow paint. Squeeze out a small amount of yellow paint next to the white and brown paints on your palette.
Dip your paintbrush into the yellow paint, and then mix it with the white and brown paints on your canvas. Again, start with a small amount of yellow and gradually add more until you achieve the desired hue.
Blend and Adjust
Once you have added the brown and yellow paints, use your paintbrush to blend the colors together. This will help create a smooth transition between the shades and achieve a more natural-looking beige color.
If the color is not quite right, you can continue to add more white, brown, or yellow paint as needed. Remember to blend and adjust until you are satisfied with the final result.
Let It Dry
Once you have achieved your desired beige color, allow the paint to dry completely. Depending on the thickness of the paint layers, this may take a few hours or overnight.
Once the paint is dry, you can continue to use it for your artwork or project. Beige is a versatile color that can be used as a base or as a neutral backdrop for other colors.
Clean Up
After you have finished painting, be sure to clean your brushes with water. Acrylic paint can dry quickly, so it’s important to clean your brushes promptly to prevent them from becoming stiff and unusable.
Additionally, clean any excess paint from your palette or mixing surface and store your acrylic paints in a cool, dry place for future use.
In summary, achieving a beige color with acrylic paint is a straightforward process that involves starting with a base of white paint and gradually adding brown and yellow to create the desired shade. Remember to blend and adjust as needed and allow the paint to dry before using it for your artwork. Happy painting!
Essential Tips for Making Beige using Acrylic Paints
Acrylic paints are a versatile medium that allows artists to create a wide range of colors. One commonly used color is beige, known for its warm and neutral tones. If you’re looking to achieve the perfect shade of beige using acrylic paints, here are some essential tips to keep in mind:
1. Start with a Neutral Base Color
Begin by selecting a neutral base color such as white or light gray. These colors will serve as the foundation for your beige shade. Start with a small amount of paint on your palette and gradually mix in other colors to achieve the desired beige tone.
2. Use Earthy Colors
Earth tones are perfect for creating a natural-looking beige. Mix in colors like raw sienna, burnt sienna, and yellow ochre to add warmth and depth to your beige paint. Experiment with different ratios of these earthy colors to achieve the desired hue.
3. Add a Touch of Red or Orange
For a more warm-toned beige, incorporate a touch of red or orange into your mix. These colors can help enhance the warmth and richness of your beige shade. Start with small amounts and gradually add more until you achieve the desired effect.
4. Gradually Adjust with White or Gray
If your beige mixture veers towards a darker or lighter tone than desired, you can easily adjust it by adding small amounts of white or gray paint. These colors can help lighten or darken your beige to achieve the perfect balance.
5. Blend Thoroughly
When mixing your colors, it’s important to blend them thoroughly to ensure a consistent shade. Use a palette knife or brush to mix the colors together until they are well combined. This will help prevent any streaks or uneven patches in your final beige paint.
6. Test and Adjust
Throughout the process, don’t forget to test your mixture on a separate canvas or piece of paper. This will allow you to see how the color appears when dry and make any necessary adjustments. Remember, it’s easier to darken a shade than to lighten it, so start with lighter colors and gradually add deeper tones as needed.
7. Experiment and Have Fun
Creating the perfect beige shade is an art in itself, and it may require some experimentation. Don’t be afraid to try different color combinations and ratios to achieve the desired result. The beauty of acrylic paints is that they are forgiving and can be easily corrected or layered to achieve the desired effect.
In summary, making beige using acrylic paints involves starting with a neutral base color, incorporating earthy tones, adding touches of red or orange for warmth, adjusting with white or gray as needed, thoroughly blending the colors, testing and adjusting along the way, and most importantly, having fun with the creative process. With these essential tips, you’ll be able to create the perfect shade of beige for your acrylic paintings.
Exploring Different Techniques for Achieving Beige with Acrylic Paint
Acrylic paints are a versatile medium, allowing artists to create a wide range of colors and effects. One popular color that artists often strive to achieve is beige. Beige is a warm, neutral color that can add a sense of calm and sophistication to any artwork. In this section, we will explore different techniques that can be used to achieve the perfect beige with acrylic paint.
1. Mixing Colors:
One of the simplest ways to achieve beige with acrylic paint is by mixing different colors together. Start with a base color such as white or light brown, and gradually add small amounts of other colors to create the desired beige shade. Experiment with colors like yellow, red, and brown to achieve different variations of beige.
Remember to start with small amounts of color and gradually build up, as it is easier to darken a color than to lighten it. Use a palette knife or brush to mix the colors thoroughly until you achieve a smooth and consistent beige tone.
2. Tinting with White:
Another technique to achieve beige is by tinting a base color with white. Start with a color such as raw sienna, burnt sienna, or raw umber, and gradually add small amounts of white to lighten the color. Continuously mix and test the color until you achieve the desired beige shade.
Tinting with white can create a softer and more pastel-like beige, perfect for creating subtle and delicate effects in your artwork. This technique is particularly useful when working with skin tones or creating light, airy compositions.
3. Glazing:
Glazing is a technique where a transparent layer of color is applied over a dried layer of paint. To achieve a beige glaze, start with a base layer of paint in a color such as yellow or brown. Once the base layer is dry, mix a transparent beige color using a combination of white and a small amount of yellow or brown.
Apply the beige glaze over the base layer using a soft brush or sponge, allowing the underlying color to show through. This technique can create a subtle, translucent beige effect, perfect for adding depth and dimension to your artwork.
4. Dry Brushing:
Dry brushing is a technique where a small amount of paint is applied to a dry brush, and then lightly dragged across the surface of the painting. To achieve a beige effect with dry brushing, select a beige color and load a small amount of paint onto a dry brush.
Gently drag the brush across the surface, allowing the texture of the canvas or previous layers of paint to show through. This technique can create a textured, slightly uneven beige effect, perfect for adding texture and interest to your artwork.
5. Layering:
Layering is a technique where multiple layers of paint are applied to create depth and richness in color. To achieve a beige color through layering, start with a base layer of a light color such as yellow or light brown. Allow the layer to dry completely, and then apply subsequent layers of beige paint, gradually building up the desired color intensity.
This technique can create a rich and complex beige color with depth and vibrancy. Experiment with different tones and variations of beige by layering different combinations of colors.
Summary
Acrylic paint offers artists a multitude of possibilities for achieving the perfect beige color. Whether through mixing colors, tinting with white, glazing, dry brushing, or layering, artists can experiment with different techniques to achieve their desired beige shade. Remember to have fun and embrace the process of exploring and experimenting with these techniques to create beautiful and unique artworks.
Creating Depth and Texture in Beige Paintings with Acrylics
When it comes to creating captivating paintings, artists often strive to achieve depth and texture in their artwork. These elements add visual interest and a sense of realism to the piece, making it more engaging for the viewer. In this section, we will explore how to create depth and texture in beige paintings using acrylic paints.
Choosing the Right Shades of Beige
Before diving into the techniques, it is essential to choose the right shades of beige for your painting. Beige is a versatile color that can range from warm to cool tones. Consider the mood and atmosphere you want to create in your artwork. Warmer beiges can evoke a sense of coziness and comfort, while cooler beiges can create a more serene and tranquil feel.
Layering Technique
One effective way to create depth in beige paintings is through the layering technique. Start by applying a base layer of a lighter shade of beige to your canvas. This will serve as the foundation for your painting. Once the base layer is dry, gradually build up layers of darker shades of beige on top.
As you add each layer, focus on creating contrast and variation in color. Use a variety of brush strokes, such as dry brushing or stippling, to mimic the texture and patterns found in natural materials. This layering technique will give your painting a sense of depth, as the different shades of beige interact with each other.
Adding Texture
To enhance the tactile quality of your beige painting, incorporating texture is crucial. Acrylic paints can be mixed with various mediums to achieve different textures. Here are a few techniques you can try:
- Impasto: Mix acrylic paint with a gel medium to create a thick, textured paste. Apply this mixture to your canvas using a palette knife or a stiff brush. The raised areas will add depth and dimension to your painting.
- Collage: Incorporate elements of collage into your artwork to add texture. Use torn pieces of tissue paper, fabric, or even sand to create interesting surfaces. Once the collaged elements are glued down, paint over them with beige acrylic paint to unify the composition.
- Brushwork: Experiment with different brush techniques to add texture to specific areas of your painting. Use stippling, cross-hatching, or dry brushing to create the illusion of texture in objects such as trees, rocks, or architectural details.
Creating Highlights and Shadows
To further enhance the depth in your beige painting, it’s important to pay attention to highlights and shadows. These elements create contrast, bringing certain areas of your artwork forward or pushing them back.
Identify the light source in your painting and determine where the highlights and shadows would fall. Use lighter shades of beige or even off-white to create highlights on the areas that catch the light. Conversely, use darker shades of beige or even brown to create shadows in the recessed areas or on objects that are in shadow.
In summary, creating depth and texture in beige paintings with acrylics can transform a simple composition into a visually captivating artwork. Remember to choose the right shades of beige, utilize layering techniques, incorporate texture, and pay attention to highlights and shadows. By implementing these techniques, you can bring your beige paintings to life and create a rich and engaging visual experience for your viewers.
FAQs
Q: How to make beige with acrylic paint?
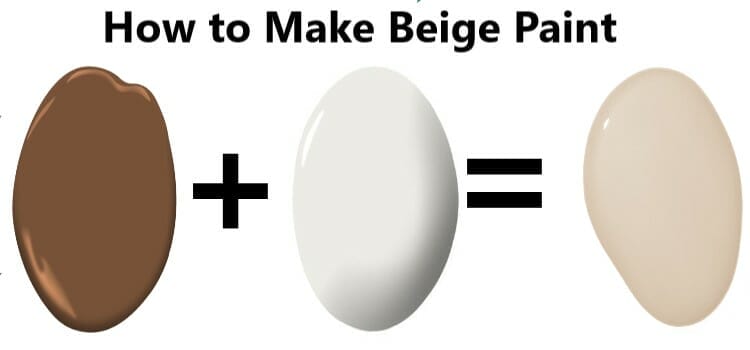
To make beige with acrylic paint, mix equal parts of white and brown paint. Adjust the ratio to achieve your desired shade of beige. Start with a small amount of paint, as it is easier to darken a color than to lighten it. Mix the paints thoroughly to ensure an even color.
Q: Can I mix different brands of acrylic paint together?
Yes, you can mix different brands of acrylic paint together. However, keep in mind that different brands may have slight variations in color and consistency. It’s a good practice to test a small amount of the mixed paints on a separate surface to ensure that the colors blend well without any unwanted effects.
Q: How to thin acrylic paint for a smoother finish?
To thin acrylic paint for a smoother finish, you can add a small amount of water or acrylic medium to the paint. Start by adding a few drops at a time and mix thoroughly. Keep in mind that adding too much water or medium can affect the paint’s opacity and adhesion, so it’s best to add small amounts gradually until you achieve the desired consistency.
Conclusion
In conclusion, learning how to make beige with acrylic paint can open up a world of possibilities for artists and DIY enthusiasts. By mixing equal parts of yellow and brown acrylic paint, you can achieve a beautiful beige color that is versatile and timeless. Whether you’re working on a painting, designing home decor, or experimenting with crafts, beige can add warmth and a neutral touch to your creations. With its subtle elegance and compatibility with a wide range of other colors, beige is a must-have in any artist’s palette.