
Looking for a simple and cost-effective solution to thicken your acrylic paint? Look no further than your pantry! By adding flour to your acrylic paint, you can achieve a thicker consistency, perfect for impasto techniques and creating texture in your artwork.
With just a few simple steps, you can transform your thin acrylic paint into a thicker, more substantial medium. Whether you’re a beginner or an experienced artist, this handy technique will elevate your paintings to a whole new level.
Forget about purchasing expensive additives or gels – flour is a versatile and accessible ingredient that can easily be incorporated into your painting process. Plus, it’s a budget-friendly alternative that won’t break the bank.
So, if you’re ready to elevate your acrylic paintings and add depth and dimension to your artwork, grab some flour and get ready to thicken that paint to perfection.
Flour as a Thickening Agent: A Practical Guide for Acrylic Painters
Acrylic painting is a versatile and popular medium among artists. One of the challenges that artists often face is achieving the desired consistency and texture of their acrylic paint. This is where flour can come to the rescue as a thickening agent. In this section, we will explore the benefits of using flour as a thickening agent, as well as provide a step-by-step guide on how to use it effectively in acrylic painting.
The Benefits of Using Flour as a Thickening Agent
Flour is an easily accessible and cost-effective thickening agent that can be found in most households. It offers several advantages for acrylic painters:
- Cost-effective: Flour is a budget-friendly option compared to commercial thickening agents.
- Readily available: You can find flour in your kitchen pantry, making it convenient to use on the spot.
- Easy to use: Using flour as a thickening agent requires minimal preparation and expertise.
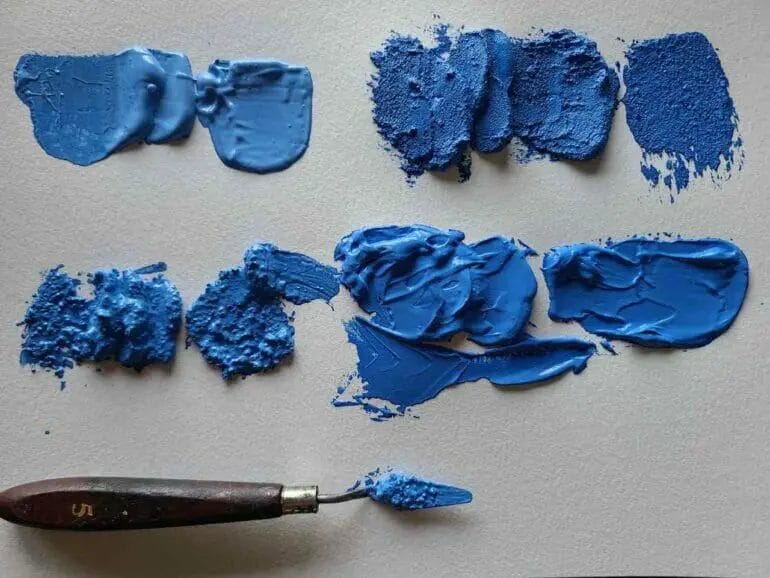
- Allows for texture control: Adding flour to acrylic paint allows you to adjust the consistency and create various textures in your artwork.
Step-by-Step Guide to Using Flour as a Thickening Agent
Follow these steps to effectively utilize flour as a thickening agent in your acrylic painting:
- Gather your materials: You will need acrylic paint, flour, a palette knife or brush, and a palette or mixing surface.
- Prepare your paint: Squeeze out the desired amount of acrylic paint onto your palette or mixing surface.
- Add flour gradually: Start by adding a small amount of flour to your paint, using the palette knife or brush to mix it thoroughly. Gradually add more flour until you reach the desired thickness.
- Mix thoroughly: Stir the mixture well to ensure the flour is evenly distributed and there are no lumps.
- Test the consistency: Apply a small amount of the thickened paint to a test surface to assess the texture and adjust as needed.
- Paint with your thickened acrylic: Once you are satisfied with the consistency, use your thickened acrylic paint to create your artwork.
Considerations and Tips
While flour can be a useful thickening agent for acrylic paint, there are a few considerations and tips to keep in mind:
- Experiment with different flours: All-purpose flour is commonly used, but you can also try other types such as cornstarch or rice flour to achieve different effects.
- Start with small amounts: It is always better to add flour gradually to avoid over-thickening your paint. You can always add more, but it is challenging to reverse the process.
- Store leftover mixtures: If you have any leftover thickened paint, you can store it in an airtight container for future use. However, keep in mind that the mixture might dry out over time, so add water to revive it if needed.
- Experiment and have fun: Using flour as a thickening agent allows for experimentation and the creation of unique effects in your acrylic paintings. Embrace the process and enjoy the possibilities it offers!
Summary
Using flour as a thickening agent in acrylic painting can be a practical and cost-effective solution for achieving the desired consistency and texture. It offers artists the ability to control the thickness of their paint and create various effects in their artwork. By following a step-by-step guide and considering some tips, you can effectively utilize flour as a thickening agent in your acrylic painting practice. So, go ahead, gather your materials, and embark on your artistic journey using flour as a versatile tool in your acrylic painting process!
Experimenting with Flour: Techniques to Thicken Acrylic Paint
Acrylic paint is a versatile medium that can be used on a variety of surfaces. However, sometimes you may find that your acrylic paint is too thin and lacks the desired consistency. This is where the use of a thickening agent, such as flour, can come in handy. In this section, we will explore different techniques to thicken acrylic paint using flour.
1. Mixing Flour Directly into Acrylic Paint
The simplest way to thicken acrylic paint is by mixing flour directly into the paint. To do this, follow these steps:
- Start with a small amount of acrylic paint in a container.
- Add a small amount of flour to the paint and mix well using a palette knife or a stirring stick.
- Continue adding flour in small increments until you achieve the desired consistency.
It’s important to note that adding too much flour can affect the color and texture of the paint, so it’s best to add it gradually and test the consistency as you go.
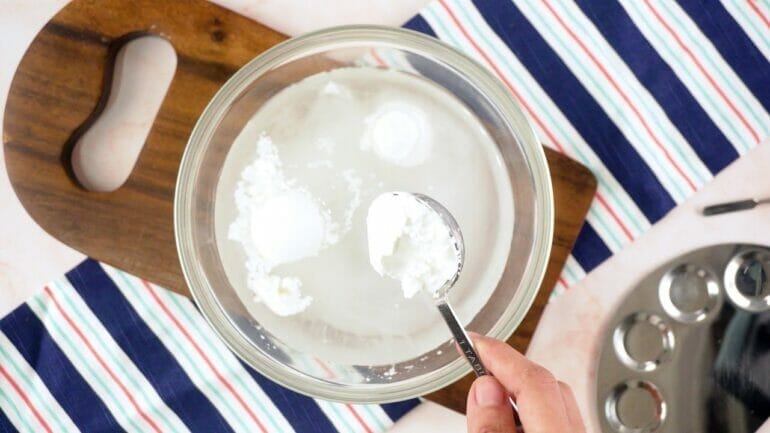
2. Making a Flour Paste
Another technique to thicken acrylic paint is by making a flour paste. Here’s how you can do it:
- In a separate container, mix flour with water to create a paste-like consistency.
- Add a small amount of the paste to the acrylic paint and mix well.
- Continue adding the flour paste in small increments until the paint reaches the desired thickness.
Using a separate flour paste allows for more control over the thickening process and avoids adding too much flour directly into the paint.
3. Creating a Flour Gel Medium
If you prefer a more professional approach, you can create a flour gel medium to thicken your acrylic paint. Here’s how:
- Mix equal parts of flour and water in a saucepan.
- Cook the mixture over medium heat, stirring constantly, until it thickens to a gel-like consistency.
- Allow the gel medium to cool before adding it to your acrylic paint.
The flour gel medium can be stored in airtight containers for future use and can be mixed with acrylic paint to achieve the desired thickness.
4. Using Flour as a Textured Additive
Aside from thickening acrylic paint, flour can also be used as a textured additive to create interesting effects. To do this:
- Mix flour with acrylic paint to create a thick paste.
- Apply the mixture to your canvas or surface using a palette knife or a brush.
- Experiment with different application techniques, such as stippling or creating raised textures.
This technique not only thickens the paint but also adds dimension and texture to your artwork.
Summary
Experimenting with different techniques to thicken acrylic paint using flour can enhance your artistic possibilities. Whether you choose to mix flour directly into the paint, create a flour paste, or make a flour gel medium, these methods offer versatility and control over the consistency of your acrylic paint. Additionally, using flour as a textured additive can add an extra layer of interest to your artwork. Remember to always test the consistency as you go and have fun exploring the possibilities!

Achieving Desired Viscosity: Using Flour to Adjust Acrylic Paint Thickness
When it comes to painting with acrylics, one of the key factors to consider is the viscosity or thickness of the paint. Depending on the technique and the desired outcome, you may need to adjust the viscosity of your acrylic paint. Fortunately, there are various methods to achieve the desired consistency, and one such method is by using flour.
Understanding Viscosity
Viscosity refers to the flow characteristics of a liquid, in this case, acrylic paint. Different painting techniques require different viscosities. For instance, if you’re looking to create thin glazes or transparent washes, you’ll need to thin down the paint. On the other hand, for impasto techniques that involve thick applications of paint, a thicker consistency is preferred.
Why Use Flour?
While there are commercially available mediums and additives to adjust the viscosity of acrylic paint, using flour can be a cost-effective and easily accessible alternative. Flour acts as a thickening agent when mixed with water and acrylic paint, allowing you to achieve the desired consistency without investing in additional products.
Steps to Adjust Acrylic Paint Thickness with Flour
Here’s a step-by-step guide on how to use flour to adjust the thickness of your acrylic paint:
- Gather your materials: You’ll need acrylic paint, all-purpose flour, a palette knife, a mixing palette or disposable plate, and water.
- Start with a small amount of paint: Begin by squeezing a small amount of acrylic paint onto your mixing palette or disposable plate. It’s always easier to add more paint if needed.
- Add flour gradually: Using your palette knife, add a small amount of flour to the paint. Start with a teaspoon of flour and mix it thoroughly with the paint. Observe the consistency and determine if further adjustments are necessary.
- Check the consistency: After thoroughly mixing the flour with the paint, check the consistency by lifting the palette knife or brush. If the paint runs off the palette knife or brush too quickly, add a bit more flour. If the paint is too thick and doesn’t flow easily, add a few drops of water to thin it down.
- Mix thoroughly: Once you’ve made any necessary adjustments, mix the paint and flour mixture thoroughly to ensure an even distribution.
- Test on a surface: Before proceeding with your artwork, it’s always a good idea to test the consistency on a surface similar to what you’ll be painting on. This will allow you to make any final adjustments if needed.
Considerations and Tips
While using flour to adjust acrylic paint thickness is a convenient method, there are a few considerations and tips to keep in mind:
- Use all-purpose flour: Opt for all-purpose flour as it blends easily with acrylic paint. Avoid using self-rising flour or any flour with additives.
- Add flour gradually: It’s important to add flour gradually to avoid over-thickening the paint. Remember, you can always add more, but it’s challenging to thin it down once it becomes too thick.
- Mix thoroughly: Take your time to mix the paint and flour mixture thoroughly to ensure a consistent texture. Any lumps or uneven distribution may affect the paint’s performance.
- Experiment and practice: Achieving the desired viscosity is often a matter of experimentation and practice. Don’t be afraid to try different ratios of flour and paint to find what works best for your specific needs.
Summary
Adjusting the viscosity of acrylic paint is essential for various painting techniques. By using flour as a thickening agent, you can easily modify the consistency of your acrylic paint. Remember to add the flour gradually, mix thoroughly, and test on a surface before applying it to your artwork. With practice, you’ll be able to achieve the desired viscosity and enhance your acrylic painting experience.
Flour Power: Tips and Tricks for Thickening Acrylic Paint
When it comes to acrylic painting, achieving the right consistency and texture of paint is crucial for creating depth and dimension in your artwork. Sometimes, you may find that your acrylic paint is too thin and lacks the desired thickness. In such cases, you can turn to a readily available household ingredient – flour. Yes, you heard it right! Flour can be used as a simple and effective thickening agent for your acrylic paint. In this section, we will explore some tips and tricks on how to use flour to thicken acrylic paint.
1. Choosing the Right Flour
Not all flours are created equal when it comes to thickening acrylic paint. It is important to choose the right type of flour to ensure optimal results. All-purpose flour or wheat flour are commonly used for this purpose. These types of flours have a fine texture and can easily blend with the acrylic paint without leaving any lumps or clumps.
2. Mixing the Flour
The next step is to mix the flour with your acrylic paint. Start by adding a small amount of flour to your paint palette or container. Gradually add more flour while stirring continuously until you achieve the desired thickness. It is important to add the flour slowly to avoid adding too much and making the paint too thick. Remember, you can always add more flour if needed, but it is difficult to thin down an overly thickened paint.
3. Testing the Consistency
Once you have mixed the flour with your acrylic paint, it is important to test the consistency before applying it to your artwork. Take a small amount of the thickened paint and apply it to a test surface or canvas. Observe the texture and thickness of the paint. If it is too thick, you can add a few drops of water to thin it down. On the other hand, if it is not thick enough, you can add more flour and remix until you achieve the desired consistency.
4. Applying the Thickened Paint
Now that you have successfully thickened your acrylic paint using flour, you can start applying it to your artwork. Use a palette knife or a brush to apply the paint onto the canvas. The thickened paint will allow you to create textured effects, add dimension, and enhance the overall visual impact of your artwork. Experiment with different application techniques and layering to achieve the desired artistic effect.
5. Precautions and Considerations
While using flour to thicken acrylic paint can be a great technique, it is important to keep a few precautions and considerations in mind:
- Avoid adding too much flour at once, as it can make the paint too thick and difficult to work with.
- Always test the consistency of the paint on a separate surface before applying it to your artwork.
- Flour may affect the drying time of the paint, so be mindful of this when planning your painting process.
- Keep in mind that thickened paint may have a slightly different color compared to the original acrylic paint.
- Clean your brushes and palette knives thoroughly after using flour in your acrylic paint to prevent any residual flour from affecting future paint mixtures.
In summary, flour can be a handy and cost-effective solution for thickening acrylic paint. By following the tips and tricks mentioned above, you can easily achieve the desired thickness and texture in your artwork. Remember to experiment and have fun with this technique to explore the endless possibilities of acrylic painting!
FAQs
1. How can I make acrylic paint thicker using flour?
To make acrylic paint thicker with flour, follow these steps: mix equal parts of flour and water to create a paste. Slowly add the paste to your acrylic paint, stirring continuously until you reach the desired consistency. Keep in mind that using flour may alter the drying time and finish of your paint, so test it out beforehand.
2. What are some alternatives to using flour to thicken acrylic paint?
If you prefer not to use flour, you can try other substances like cornstarch or use a commercial acrylic gel medium. These alternatives can also help you achieve a thicker consistency in your acrylic paint.
3. Can I add too much flour to my acrylic paint?
Yes, adding too much flour to your acrylic paint can affect its drying time and application. It may also lead to a lumpy texture in the paint. It is recommended to add the flour gradually and test the consistency as you go along to avoid over-thickening the paint.
Conclusion
In conclusion, if you’re looking to make your acrylic paint thicker using flour, it can be a cost-effective and accessible solution. By adding small amounts of flour and mixing thoroughly, you can achieve a thicker consistency that is ideal for impasto techniques or creating texture in your artwork. However, it’s important to note that using flour may alter the drying time and longevity of your paint. It’s always recommended to test your mixture on a small surface before applying it to your entire painting. Experimentation and finding the right balance of flour and paint will help you achieve your desired results.
Remember, when using flour to thicken acrylic paint, it’s crucial to ensure that the flour is completely incorporated to avoid clumps or lumps in your mixture. Additionally, be mindful that the use of flour may affect the archival quality of your artwork, so it’s best to reserve this technique for non-professional or temporary projects. Overall, adding flour to acrylic paint can offer versatility, allowing you to explore various techniques and textures in your paintings.