
If you are looking to add a vibrant and long-lasting touch to your ceramic creations, baking acrylic paint onto ceramic is a great technique to explore. By carefully following a few simple steps, you can achieve a beautifully painted ceramic piece that is not only decorative but also durable. In this article, we will guide you through the process of baking acrylic paint onto ceramic, from the necessary materials to the step-by-step instructions. Let’s dive in and unleash your creativity!
Before you start the baking process, it is essential to gather all the materials you will need. These include ceramic pieces, acrylic paint, paintbrushes, a clean cloth, a baking sheet, an oven, and an oven thermometer. Once you have everything ready, you can begin the exciting process of painting and baking your ceramic creations.
The first step is to clean your ceramic pieces thoroughly. Make sure they are free from any dirt, dust, or grease. This will ensure that the paint adheres properly to the surface and prevents any unwanted smudges or imperfections. Use a gentle cleanser and a clean cloth to clean the ceramic surface.
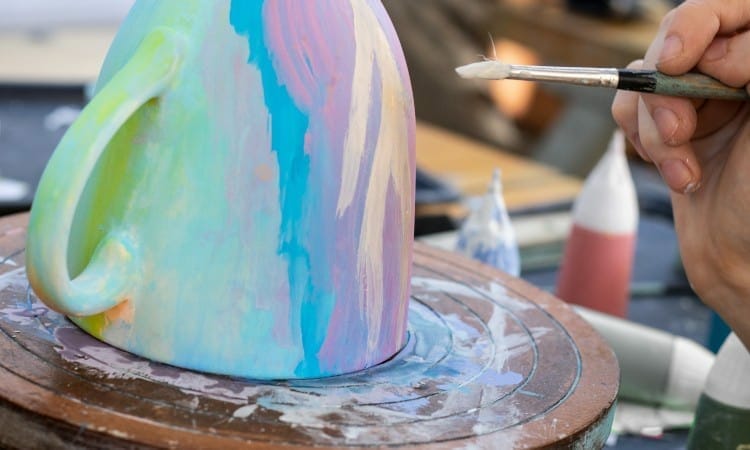
Next, it’s time to let your creativity shine! Use your chosen acrylic paint to carefully apply the design or pattern of your choice onto the ceramic surface. Take your time and use smooth brushstrokes to achieve a neat and even application. Allow the paint to dry completely before proceeding to the next step.
Once
Heat-Setting Acrylic Paint on Ceramic: A Step-by-Step Guide
Acrylic paint is a versatile medium that can be used on a variety of surfaces, including ceramics. However, to ensure that your painted ceramic pieces are durable and long-lasting, it is important to heat-set the acrylic paint. Heat-setting involves baking the ceramic in an oven to cure the paint and make it more resistant to chipping and fading.
Gather Your Materials
Before you begin, make sure you have all the necessary materials. You will need:
- Acrylic paint
- Ceramic object
- Paintbrushes
- Oven
- Aluminum foil
- Oven thermometer
- Oven mitts
Prepare Your Ceramic Object
Clean your ceramic object thoroughly with soap and water to remove any dirt, dust, or grease. Dry it completely before proceeding to the next step.
Apply Acrylic Paint
Using your paintbrushes, apply acrylic paint to your ceramic object. You can use a single color or create intricate designs with multiple colors. Allow the paint to dry completely before moving on to the next step.
Heat-Set the Paint
Preheat your oven to the temperature specified on the acrylic paint bottle. Place a piece of aluminum foil on the oven rack to protect it from any paint drips. Carefully place your painted ceramic object on top of the foil.
Insert an oven thermometer into the oven to ensure accurate temperature control. It is essential to maintain a consistent temperature throughout the heat-setting process.
Once the oven has reached the desired temperature, carefully place the rack with the ceramic object inside the oven. Set a timer according to the instructions provided by the acrylic paint manufacturer. Typically, heat-setting takes around 30 minutes to 1 hour.
During the heat-setting process, it is important to monitor the oven to prevent any accidents. Do not leave the oven unattended and use oven mitts when handling hot objects.
Cool Down and Test
After the recommended heat-setting time has passed, turn off the oven and allow the ceramic object to cool down inside the oven. Do not remove it immediately as sudden temperature changes can cause the paint to crack.
Once the ceramic object has cooled down completely, you can test the durability of the paint by gently rubbing it with a damp cloth. If the paint remains intact, congratulations! You have successfully heat-set the acrylic paint on your ceramic object.
In summary, heat-setting acrylic paint on ceramic is a simple yet crucial step to ensure the longevity of your painted pieces. By following this step-by-step guide, you can create beautiful and durable ceramic artworks that will withstand the test of time.
Best Tips and Tricks for Successfully Baking Acrylic Paint on Ceramic
Baking acrylic paint on ceramic is a popular method to ensure durability and longevity of your painted creations. Whether you’re painting ceramic plates, mugs, or other decorative items, following these tips and tricks will help you achieve the best results:
1. Choose the Right Paint and Surface
Not all acrylic paints are suitable for baking on ceramic. Make sure to use high-quality acrylic paints specifically designed for ceramics or glass. These paints are formulated to withstand high temperatures and adhere well to the surface.
Additionally, ensure that the ceramic surface is clean, dry, and free from any greasy residues. Clean the surface with rubbing alcohol before painting to remove any traces of dirt or oils.
2. Preheat the Oven
Before placing your painted ceramic items in the oven, preheat it to the recommended temperature specified by the paint manufacturer. Usually, this temperature ranges between 250 to 300 degrees Fahrenheit (120 to 150 degrees Celsius).
3. Cure the Paint
Place your painted ceramic items on a baking sheet lined with parchment paper or a silicone baking mat. Make sure not to overcrowd the items, as they need space for even heat circulation.
Once the oven has reached the desired temperature, carefully place the baking sheet with the ceramics inside. Allow the items to cure for the recommended time, which is typically around 30 minutes to 1 hour. Follow the specific instructions provided by the paint manufacturer for accurate curing times.
4. Keep a Thermometer Handy
It’s important to monitor the oven temperature throughout the curing process. Use an oven thermometer to ensure that the temperature remains consistent and within the recommended range. Fluctuations in temperature can affect the paint’s adhesion and durability.
5. Gradually Cool Down
After the recommended curing time has elapsed, turn off the oven and allow the ceramics to cool down gradually inside. Avoid removing them from the hot oven abruptly, as this can cause thermal shock and potentially damage the paint.
6. Hand Wash Only
Once the painted ceramics have cooled down completely, gently wash them by hand using mild dish soap and a soft sponge. Avoid abrasive scrubbers or harsh chemicals, as they can scratch or fade the paint. Handwashing will help preserve the paint and extend its lifespan.
7. Avoid Extreme Temperatures
While cured acrylic paint on ceramics is durable, it is still best to avoid exposing the items to extreme temperatures. Avoid using them in the microwave, dishwasher, or oven, as these can cause the paint to deteriorate over time.
By following these best tips and tricks, you can ensure the successful baking of acrylic paint on ceramic. Enjoy creating beautiful and long-lasting painted ceramic items!
The Benefits of Baking Acrylic Paint onto Ceramic Surfaces
Acrylic paint is a versatile medium that can be used on various surfaces, including ceramic. While air-drying acrylic paint is a common method, baking the painted ceramic surface has several advantages. In this section, we will explore the benefits of baking acrylic paint onto ceramic surfaces.
1. Increased Durability
When acrylic paint is baked onto ceramic, it creates a strong bond with the surface. This bond enhances the durability of the paint, making it more resistant to chipping, cracking, or peeling. Baked acrylic paint can withstand regular handling, making it ideal for functional ceramic items such as mugs, plates, and bowls.
2. Heat and Water Resistance
Baking acrylic paint on ceramic surfaces increases its heat and water resistance. The baking process allows the paint to cure fully, creating a barrier that protects the painted surface from moisture and heat damage. This makes baked acrylic paint suitable for ceramic items that may come into contact with hot liquids or require regular washing.
3. Vibrant and Long-Lasting Colors
Acrylic paint is known for its vibrant colors, and when baked onto ceramic surfaces, these colors become more vibrant and long-lasting. The baking process helps seal the pigments in the paint, preventing them from fading over time. Baked acrylic paint retains its original color intensity, adding visual appeal to ceramic items.
4. Easy Maintenance
Ceramic items with baked acrylic paint are easy to maintain. The baked surface is smooth and non-porous, making it resistant to stains and easy to clean. A simple wipe with a damp cloth is usually sufficient to keep the painted ceramic surface looking fresh and bright.
5. Versatility
Baked acrylic paint offers versatility in terms of surface finish. Depending on the desired effect, the artist can choose between glossy or matte finishes. Baking acrylic paint helps achieve a glossy finish by enhancing the paint’s reflective properties. On the other hand, if a matte finish is preferred, adding a matte sealant after baking can create the desired effect.
6. Time-Saving
Baking acrylic paint on ceramic surfaces can significantly reduce drying time compared to air-drying methods. While air-drying acrylic paint may take several days to fully cure, baking the painted ceramic piece accelerates the drying process, allowing for quicker project completion.
7. Reduced Smudging and Smearing
Once acrylic paint is baked onto ceramic surfaces, it becomes less prone to smudging or smearing. This is especially beneficial for functional ceramic items that are frequently handled or used, as the baked paint will stay in place without smudging or transferring onto other surfaces.
In summary, baking acrylic paint onto ceramic surfaces offers numerous benefits. It increases the durability of the paint, enhances its resistance to heat and water, and ensures vibrant and long-lasting colors. Baked acrylic paint is easy to maintain, provides versatility in surface finish, saves drying time, and reduces smudging and smearing. Whether you are a professional artist or a hobbyist, baking acrylic paint on ceramic surfaces can elevate your creations to a new level.
Exploring Different Techniques for Heat-Setting Acrylic Paint on Ceramic
Acrylic paint is a versatile medium that can be used on various surfaces, including ceramic. However, to ensure that the paint adheres properly and withstands wear and tear, heat-setting is often necessary. Heat-setting involves applying heat to the painted surface to bond the paint molecules to the ceramic surface, resulting in a durable finish. In this section, we will explore different techniques for heat-setting acrylic paint on ceramic.
1. Oven-Baking Method
The most common and effective technique for heat-setting acrylic paint on ceramic is by using the oven-baking method. To do this, follow these steps:
- Preheat your oven to a temperature recommended by the manufacturer of the acrylic paint (typically between 250-300 degrees Fahrenheit).
- Place the ceramic object with the painted surface facing up on a baking sheet lined with parchment paper or aluminum foil.
- Carefully place the baking sheet with the ceramic object in the preheated oven and bake for the recommended duration (usually around 30 minutes).
- After the baking time is complete, turn off the oven and let the ceramic object cool down completely before removing it.
It is important to note that the oven temperature and baking time may vary depending on the specific brand of acrylic paint you are using, so always refer to the manufacturer’s instructions for the best results.
2. Heat Gun Method
If you don’t have access to an oven or prefer a more controlled heating process, you can use a heat gun to heat-set acrylic paint on ceramic. Here’s how:
- Hold the heat gun at a safe distance from the painted surface, usually around 6-8 inches away.
- Move the heat gun in a slow, circular motion to evenly distribute the heat across the painted area.
- Continue heating the surface until the paint appears to be dry and has a glossy finish.
- Allow the ceramic object to cool down naturally before handling.
It is crucial to use caution when using a heat gun as excessive heat or direct contact with the paint can cause it to bubble or scorch. Always test the heat gun on a small, inconspicuous area before proceeding to prevent any damage to the painted surface.
3. Kiln-Firing Method
For professional ceramic artists or individuals with access to a kiln, kiln-firing is an excellent method for heat-setting acrylic paint on ceramic. This method provides the most durable and long-lasting results. Here’s what you need to do:
- Ensure that your ceramic object is clean and free from any dust or debris.
- Apply the acrylic paint to your ceramic surface using the desired technique.
- Place the painted ceramic object in a kiln and follow the firing instructions specific to your acrylic paint brand.
- Allow the kiln to heat up gradually according to the instructions to avoid thermal shock to the ceramic.
- Once the firing process is complete, let the ceramic object cool down inside the kiln before removing it.
It is important to note that kiln-firing can only be done if the acrylic paint you are using is specifically formulated for this purpose. Regular acrylic paints may not withstand the high temperatures of a kiln and could result in damage to the ceramic and the paint.
4. Sealing the Surface
After heat-setting the acrylic paint on ceramic, it is advisable to seal the surface with a clear sealer to provide additional protection and enhance the longevity of the paint. There are various sealers available, including spray sealers and brush-on sealers. Choose a sealer that is compatible with acrylic paint and follow the manufacturer’s instructions for application.
In summary, heat-setting acrylic paint on ceramic is essential to create a durable and long-lasting finish. The oven-baking method is the most common and convenient technique, but alternative methods like using a heat gun or kiln-firing can also yield excellent results. Remember to always follow the manufacturer’s instructions for the best outcomes and consider sealing the painted surface for added protection. With these techniques, you can confidently explore the world of decorative ceramics using acrylic paint.
Common Mistakes to Avoid When Baking Acrylic Paint onto Ceramic
When it comes to adding a colorful touch to ceramic objects, many artists and DIY enthusiasts turn to acrylic paint. Not only is acrylic paint versatile and available in a wide range of colors, but it can also be baked onto ceramic surfaces for a durable and long-lasting finish. However, there are some common mistakes that people make when attempting to bake acrylic paint onto ceramic. In this section, we will discuss these mistakes and provide helpful tips to ensure a successful outcome.
1. Using the Wrong Type of Acrylic Paint
Not all acrylic paints are suitable for baking onto ceramic surfaces. Using the wrong type of acrylic paint can result in poor adhesion, paint flaking off, or even toxic fumes when heated. It is important to choose acrylic paints specifically labeled as “oven-safe” or “ceramic paint.” These paints are formulated to withstand the high temperatures required for baking and create a strong bond with the ceramic surface.
2. Not Prepping the Surface Properly
Proper surface preparation is crucial for achieving a successful outcome when baking acrylic paint onto ceramic. Before applying the paint, make sure to clean the ceramic surface thoroughly. Any dirt, grease, or residue can interfere with the adherence of the paint. Use mild soap and water to clean the ceramic, and then wipe it dry with a lint-free cloth. For extra adhesion, you can also lightly sand the surface with fine-grit sandpaper.
3. Applying Paint Too Thickly
One common mistake is applying acrylic paint too thickly onto the ceramic surface. Thick layers of paint can prevent even heating and lead to cracking or bubbling during the baking process. It is best to apply thin and even coats of paint, allowing each layer to dry completely before applying the next. This will help the paint cure evenly and create a smooth and durable finish.
4. Incorrect Baking Time and Temperature
The baking time and temperature are crucial factors to consider when baking acrylic paint onto ceramic. It is important to follow the instructions provided by the manufacturer of the acrylic paint. Each brand may have different recommendations regarding the baking time and temperature. Failure to follow these instructions can result in the paint not fully adhering to the ceramic surface or even discoloration of the paint.
5. Not Allowing Sufficient Curing Time
After baking, it is essential to allow the painted ceramic object to cool and cure properly. Rushing this step can lead to premature damage to the paint. It is recommended to let the ceramic cool down in the oven after baking and then remove it once it is at room temperature. Give the paint at least 24 to 48 hours to cure fully before using or handling the object. This will ensure that the paint has hardened and stabilized.
In summary, when baking acrylic paint onto ceramic, it is crucial to choose the right type of acrylic paint, properly prep the surface, apply thin and even coats of paint, follow the recommended baking time and temperature, and allow sufficient curing time. By avoiding these common mistakes, you can achieve a beautiful and long-lasting finish on your ceramic creations.
FAQs
1. Can I bake acrylic paint onto ceramic?
Yes, you can bake acrylic paint onto ceramic. Make sure to clean and dry the ceramic surface before applying the acrylic paint. Once the paint is dry, place the ceramic in a cold oven, then heat it gradually to the recommended baking temperature. Allow the ceramic to cool completely before removing it from the oven.
2. What temperature and time should I use to bake acrylic paint onto ceramic?
The recommended temperature and time can vary depending on the specific brand of acrylic paint and ceramic. Generally, a temperature of 275°F to 300°F (135°C to 150°C) is suitable, and the baking time can range from 20 to 30 minutes. Always refer to the instructions provided by the paint manufacturer for the best results.
3. Is it necessary to seal the acrylic paint on ceramic after baking?
Sealing the acrylic paint on ceramic after baking is not necessary, but it can provide added protection and longevity to the painted surface. You can use a clear acrylic sealer or a varnish designed for ceramics. Apply a thin, even coat of sealer and allow it to dry completely before using or washing the ceramic.

Conclusion
In conclusion, baking acrylic paint onto ceramic is a popular technique to achieve long-lasting and durable artwork. By following the proper steps and using the right materials, you can create beautiful and vibrant designs that will stand the test of time. Remember to always clean and prepare your ceramic surface before applying acrylic paint to ensure maximum adhesion. Once your artwork is complete, carefully place the ceramic piece in a preheated oven and bake it according to the instructions. The baking process helps to bond the paint to the ceramic surface, resulting in a permanent and glossy finish. So go ahead, unleash your creativity, and enjoy the stunning results of baking acrylic paint onto ceramic!