
Yes, you can use HTV (heat transfer vinyl) on acrylic surfaces. It offers a versatile and creative way to personalize and enhance acrylic products. HTV allows you to apply vibrant and durable designs onto acrylic materials, making them stand out and adding a unique touch to your crafts. Whether you’re working on acrylic signage, home decor, or promotional items, HTV provides a convenient and effective solution for adding custom designs.
HTV vs. Acrylic: A Guide to Heat Transfer Vinyl on Acrylic Surfaces
When it comes to adding designs and graphics to acrylic surfaces, heat transfer vinyl (HTV) is a popular choice. HTV is a type of material that can be applied to various surfaces using heat and pressure. In this guide, we will explore the differences between HTV and acrylic and provide you with helpful tips on how to successfully apply HTV to acrylic surfaces.
1. Understanding Acrylic
Acrylic is a versatile material that is commonly used in many industries, including signage, display, and home decor. It is known for its clarity, durability, and lightweight nature. Acrylic surfaces can be smooth or textured, depending on the manufacturing process. Before applying HTV to acrylic, it is essential to understand the characteristics of the material.
2. Heat Transfer Vinyl (HTV)
HTV is a vinyl material that comes in various colors, finishes, and textures. It is specifically designed to be used with heat transfer applications. HTV has an adhesive backing that activates when heat and pressure are applied, allowing it to adhere to different surfaces, including acrylic. It is available in sheets or rolls and can be cut into designs using a vinyl cutter or craft knife.
3. Compatibility Between HTV and Acrylic
While HTV can be applied to a wide range of materials, including fabrics and metals, it is important to ensure compatibility with acrylic surfaces. Acrylic has a relatively low melting point compared to other materials, so it is crucial to use HTV that can withstand the heat required for application without damaging the acrylic.
When choosing HTV for acrylic surfaces, look for vinyl that is specifically labeled as suitable for acrylic. These types of HTV are formulated to withstand the heat required for application on acrylic without warping or melting the material. Always check the manufacturer’s instructions and recommended temperature settings for applying HTV to acrylic.
4. Preparing the Acrylic Surface
Before applying HTV to acrylic, it is essential to prepare the surface properly. Here are the steps to follow:
- Clean the surface: Use a mild soap or acrylic cleaner to remove any dirt, dust, or oils from the acrylic surface. Wipe it dry with a clean, lint-free cloth.
- Smooth out any imperfections: If the acrylic surface has any scratches or imperfections, use a fine-grit sandpaper to gently buff them out. Wipe away any debris with a clean cloth.
- Pre-heat the acrylic: To ensure optimal adhesion, pre-heat the acrylic surface using a heat gun or blow dryer. This helps to eliminate any moisture and allows the HTV to adhere better.
5. Applying HTV to Acrylic
Once the acrylic surface is prepared, it’s time to apply the HTV. Here are the steps to follow:
- Cut the HTV design: Use a vinyl cutter or craft knife to cut your desired design from the HTV sheet or roll. Make sure to mirror the design if necessary, especially if it includes text.
- Position the design on the acrylic: Carefully place the HTV design on the acrylic surface, ensuring proper alignment and positioning.
- Apply heat and pressure: Use a heat press machine or an iron set to the recommended temperature for applying HTV on acrylic. Apply heat and pressure evenly across the design for the recommended duration.
- Remove the backing: Once the HTV has cooled down, gently peel off the backing paper to reveal the completed design on the acrylic surface.
6. Caring for HTV on Acrylic
To ensure the longevity of your HTV design on acrylic, follow these care instructions:
- Avoid excessive heat: Avoid exposing the acrylic surface with HTV to high temperatures, such as direct sunlight or heat sources.
- Hand wash or gentle cycle: If the acrylic item with HTV is washable, hand wash it or use the gentle cycle in the washing machine to minimize stress on the HTV.
- Avoid abrasive cleaners: Use mild soap or acrylic cleaners when cleaning the acrylic surface. Avoid using abrasive cleaners or scrub brushes that can damage the HTV.
- Store properly: When not in use, store the acrylic item with HTV in a cool, dry place to prevent any potential damage. Tips and Tricks: How to Successfully Apply HTV on Acrylic Materials
- Start by cutting a piece of acrylic into your desired shape and size. You can use a laser cutter, a jigsaw, or even simple hand tools.
- Next, choose the HTV colors that match your design and cut them into the appropriate shapes using a cutting machine or scissors.
- Apply the HTV to the acrylic by using a heat press or an iron. Be sure to follow the manufacturer’s instructions for the correct temperature and pressing time.
- Allow the HTV to cool down, and then attach a keychain ring or a jump ring to complete your personalized acrylic keychain.
- Start by cutting two pieces of acrylic into identical shapes and sizes. These will be the front and back of your photo frame.
- Choose a design or pattern for your HTV. It could be a monogram, a quote, or even a graphic. Cut the HTV into the appropriate shape using a cutting machine or scissors.
- Place the HTV design on the front piece of acrylic and apply heat using a heat press or an iron.
- Once the HTV has adhered to the acrylic, place the second piece of acrylic on top to create a sandwich effect.
- Secure the two pieces of acrylic together by using screws or adhesive.
- Insert your favorite photo between the two acrylic pieces, and your personalized acrylic photo frame is ready to display!
- Start by cutting a piece of acrylic into your desired shape and size. Consider using a thicker acrylic for added durability.
- Design your signage using design software or choose pre-made HTV designs.
- Cut the HTV designs into the appropriate shapes using a cutting machine or scissors.
- Apply the HTV to the acrylic using a heat press or an iron.
- Once the HTV has adhered to the acrylic, you can mount or hang your personalized acrylic signage.
Acrylic materials are becoming increasingly popular in various crafts and DIY projects. They offer a sleek and modern look, making them a great choice for personalized items. One way to add a personal touch to acrylic materials is by using Heat Transfer Vinyl (HTV). HTV allows you to transfer designs, patterns, or text onto acrylic surfaces with ease. However, working with acrylic can be a bit tricky, and it requires some special techniques to ensure a successful application. In this section, we will discuss some useful tips and tricks to help you apply HTV on acrylic materials like a pro.
1. Prepare the Acrylic Surface
Before applying HTV on acrylic, it’s essential to properly prepare the surface. Start by cleaning the acrylic material with a mild soap or glass cleaner to remove any dust, dirt, or fingerprints. Make sure to dry it thoroughly before moving forward.
2. Choose the Right Type of HTV
Not all types of HTV are suitable for acrylic materials. It’s crucial to choose the right type that is designed for use on non-porous surfaces. Look for HTV specifically labeled for use on acrylic or glass. These types of HTV have a stronger adhesive that bonds well with the smooth surface of acrylic materials.
3. Test the Heat and Pressure Settings
Acrylic materials are sensitive to heat, so it’s essential to test the heat and pressure settings on a scrap piece or inconspicuous area before applying HTV to the main surface. Start with a lower temperature and gradually increase it until you find the optimal setting. Additionally, adjust the pressure of your heat press or iron to ensure proper adhesion without damaging the acrylic.
4. Use a Teflon Sheet or Parchment Paper
When applying HTV on acrylic, it’s advisable to use a Teflon sheet or parchment paper as a protective barrier between the heat source and the material. This prevents the acrylic from getting directly exposed to high temperatures, minimizing the risk of warping or melting.
5. Apply Even Heat and Pressure
For a successful HTV application on acrylic, it’s crucial to apply even heat and pressure. If using a heat press, make sure the pressure is evenly distributed across the entire surface. If using an iron, apply firm and consistent pressure while moving it in a circular motion to ensure even heat distribution.
6. Peel Hot or Cold?
When it comes to peeling the carrier sheet from the HTV, it can be done either hot or cold, depending on the type of vinyl and manufacturer’s instructions. Some HTV may require peeling while hot, while others may recommend waiting until it cools down. Follow the manufacturer’s guidelines to achieve the best results.
7. Allow Sufficient Cooling Time
After applying HTV on acrylic, allow sufficient cooling time before handling or using the item. This helps the adhesive fully bond with the surface, ensuring a long-lasting and durable application. Avoid putting any stress or pressure on the vinyl until it has completely cooled down.
8. Care Instructions
To prolong the life of your HTV on acrylic materials, it’s important to follow proper care instructions. Avoid using abrasive cleaners or scrubbing the vinyl too harshly, as it can damage the design. Instead, gently wipe the surface with a mild soap and soft cloth. Additionally, avoid exposing the item to extreme heat or direct sunlight for extended periods, as it can cause the vinyl to fade or peel.
By following these tips and tricks, you can achieve professional-looking results when applying HTV on acrylic materials. Remember to always test on a small area before applying the HTV to your main project, and follow the manufacturer’s instructions for the best outcome. With practice and patience, you’ll be able to create beautiful and personalized acrylic items that are sure to impress.
Best HTV Brands for Acrylic: Recommendations and Reviews
When it comes to working with acrylic, finding the right heat transfer vinyl (HTV) brand is essential. HTV is a type of material that can be applied to various surfaces using heat, allowing you to create customized designs on your acrylic projects. With so many brands available on the market, it can be challenging to determine which ones are the best for acrylic. In this section, we will explore some of the top HTV brands that are highly recommended for working with acrylic and provide reviews to help you make an informed decision.
1. Siser EasyWeed
Siser EasyWeed is a popular choice among crafters and professionals alike. It offers excellent adhesion and is known for its easy application process. The vinyl is thin and lightweight, making it ideal for working with acrylic surfaces. With a wide range of vibrant colors and a semi-gloss finish, Siser EasyWeed provides a professional and long-lasting result.
One of the standout features of Siser EasyWeed is its ability to adhere well to textured surfaces, including acrylic. This makes it an excellent choice for projects that require a durable and flexible vinyl. Whether you are creating signs, tumblers, or any other acrylic-based craft, Siser EasyWeed is a reliable option.
2. Cricut Everyday Iron-On
Cricut Everyday Iron-On is another top HTV brand that works exceptionally well with acrylic. It is compatible with both Cricut machines and other cutting machines, offering versatility to crafters of all levels. This HTV brand is known for its vibrant, fade-resistant colors and superior adhesion.
What sets Cricut Everyday Iron-On apart is its strong bond with acrylic surfaces. It adheres firmly, ensuring that your designs stay in place even with regular use or handling. The thinness of the vinyl allows for precise cutting, making it suitable for intricate designs. Whether you are personalizing acrylic keychains, phone cases, or home decor items, Cricut Everyday Iron-On delivers impressive results.
3. Thermoflex Plus
Thermoflex Plus is a premium HTV brand that is highly recommended for acrylic projects. It offers a soft, matte finish and is available in a wide range of vibrant colors. The vinyl is easy to cut and weed, making it a favorite among crafters who work with intricate designs.
One of the standout features of Thermoflex Plus is its durability. It is known for its excellent washability and longevity, making it suitable for acrylic items that require regular cleaning or exposure to moisture. Whether you are creating acrylic garments, accessories, or home decor pieces, Thermoflex Plus provides a high-quality vinyl that can withstand the test of time.
In summary, when it comes to choosing the best HTV brands for acrylic, it is important to consider factors such as adhesion, durability, and ease of use. Siser EasyWeed, Cricut Everyday Iron-On, and Thermoflex Plus are three highly recommended brands that offer excellent results on acrylic surfaces. Each brand has its own unique features and advantages, so it is worth experimenting with different options to find the one that best suits your specific project requirements. Happy crafting!
DIY Acrylic Projects: Incorporating HTV for Personalized Designs
Acrylic is a versatile material that can be used in a wide range of DIY projects. Its transparency, durability, and smooth surface make it an ideal canvas for creating personalized designs. One popular way to add a unique touch to acrylic projects is by incorporating HTV, or heat transfer vinyl. In this section, we will explore some exciting DIY acrylic projects and how you can use HTV to personalize them.
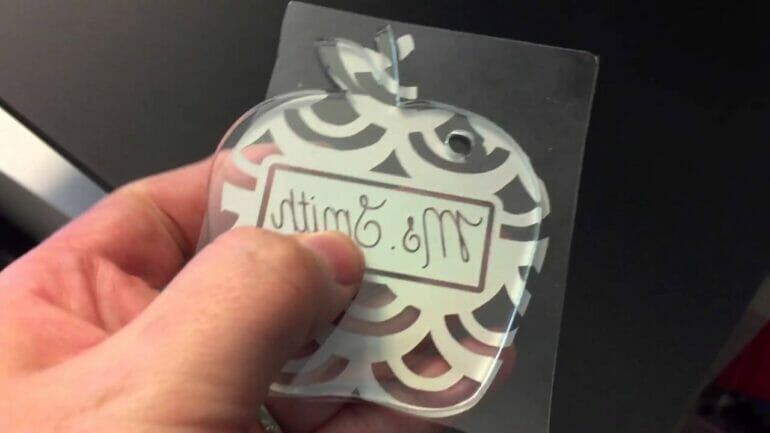
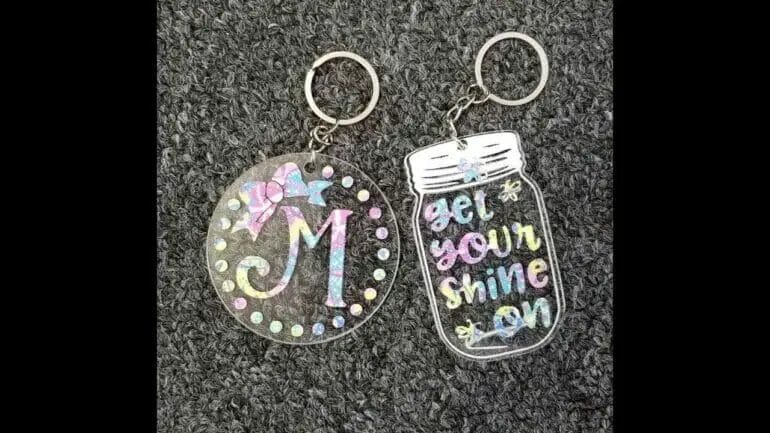
1. Acrylic Keychains
Acrylic keychains are a fun and practical project that you can easily make at home. With the addition of HTV, you can personalize your keychains with names, initials, or even custom designs. Here’s how you can do it:
This project allows you to create unique keychains for yourself, friends, or even as gifts for special occasions. The possibilities are endless!
2. Acrylic Photo Frames
Acrylic photo frames provide a modern and sleek way to display your favorite photos. By incorporating HTV, you can add a personal touch and make them even more special. Here’s how you can do it:
With HTV, you can easily change the design on your acrylic photo frames whenever you want, making it a versatile and customizable home decor item.
3. Acrylic Signage
Acrylic signage is a great way to add a personal touch to your home or business. Whether you want to display a motivational quote, a family name, or a business logo, HTV can help you achieve your desired look. Here’s how you can do it:
Acrylic signage adds a modern and professional look to any space, and with the addition of HTV, you can make it truly unique.
Summary
DIY acrylic projects offer endless possibilities for creativity and personalization. By incorporating HTV, you can take your projects to the next level and create truly unique designs. From keychains to photo frames and signage, acrylic and HTV make a perfect combination for personalized crafts. Get creative and have fun experimenting with different designs and ideas to make your acrylic projects stand out!
Troubleshooting Common Issues: HTV Application Challenges on Acrylic
In this section, we will explore some of the common challenges faced while applying Heat Transfer Vinyl (HTV) onto acrylic surfaces. Acrylic is a popular material used in various applications such as signage, displays, and crafts. However, when it comes to applying HTV, there are a few issues that might arise. Let’s take a look at these challenges and discuss possible solutions.
1. Adhesion Problems
One of the primary challenges when applying HTV on acrylic is ensuring proper adhesion. Acrylic surfaces have a smooth and non-porous texture, which makes it difficult for the HTV adhesive to bond effectively. As a result, the vinyl may not adhere properly or may peel off over time.
To overcome this issue, it is crucial to prepare the acrylic surface before applying HTV. Start by cleaning the surface thoroughly with a mild soap and warm water solution. Rinse well and allow it to dry completely. Next, use isopropyl alcohol to wipe the surface to remove any traces of oil, grease, or dirt. This step will help create a better bonding surface for the HTV adhesive.
Additionally, consider using a high-quality HTV that is specially formulated for acrylic surfaces. These HTV types often have stronger adhesives designed to bond effectively with smooth and non-porous materials like acrylic.
2. Bubble Formation
Another common issue when applying HTV on acrylic is the formation of bubbles or wrinkles. This can occur due to improper application techniques or air getting trapped underneath the vinyl. Bubbles not only affect the overall appearance of the design but can also lead to premature peeling or lifting of the vinyl.
To avoid bubble formation, start by applying the vinyl slowly and evenly onto the acrylic surface. Use a squeegee or a similar tool to smooth out the vinyl as you go, eliminating any air pockets. Work from one end to the other, applying pressure to ensure good contact between the HTV and acrylic.
If bubbles do occur, gently lift the affected area and smooth it out with the squeegee. Take care not to stretch or distort the vinyl while doing so. Applying heat with a heat press or a hairdryer can also help in reactivating the adhesive and allowing the vinyl to adhere more securely.
3. Heat Compatibility
Acrylic has a relatively low melting point compared to other materials. This can pose a challenge when using a heat press or iron for HTV application, as excessive heat can cause the acrylic surface to warp or melt.
To overcome this issue, it is important to use a heat press or iron with adjustable temperature settings. Start with a lower temperature and gradually increase it to find the optimal heat level that allows the HTV to adhere without causing damage to the acrylic.
Additionally, consider using a heat transfer pillow or a pressing pad to distribute the heat evenly and minimize direct contact between the heat source and the acrylic surface. This will help prevent localized overheating and reduce the risk of damage to the acrylic.
4. Longevity and Durability
Ensuring the longevity and durability of the HTV on acrylic is essential, especially when the material is subject to outdoor conditions or frequent handling. Acrylic surfaces exposed to UV rays, extreme temperatures, or moisture may experience fading, peeling, or cracking of the HTV over time.
To enhance the longevity of the HTV on acrylic, consider using UV-resistant and weatherproof HTV products. These specialized vinyls are designed to withstand outdoor conditions, resist fading, and maintain their vibrant colors for an extended period. It is also important to follow proper care instructions, such as avoiding abrasive cleaners and excessive rubbing, to prevent premature wear and tear of the HTV.
Summary
Applying HTV on acrylic surfaces can present some challenges, such as adhesion problems, bubble formation, heat compatibility, and ensuring longevity. However, by following the right techniques and using appropriate materials, these challenges can be overcome. Cleaning and prepping the acrylic surface, using high-quality HTV, applying the vinyl carefully, and considering heat compatibility are essential steps in achieving successful HTV application on acrylic. Additionally, using UV-resistant and weatherproof HTV products can help enhance the durability of the vinyl and ensure it withstands outdoor conditions effectively.
FAQs
Can I use HTV on acrylic?
Yes, you can use Heat Transfer Vinyl (HTV) on acrylic surfaces. However, it is important to note that acrylic has a low melting point, so you need to be cautious while applying heat. Use a low heat setting and apply the HTV with a heat press or a household iron using gentle pressure.
Do I need to pre-wash fabric before applying HTV?
Yes, it is recommended to pre-wash fabric before applying HTV. This helps to remove any chemicals or residue that might interfere with the adhesive. Make sure to follow the fabric’s specific care instructions while washing and drying.
Can I layer HTV designs?
Yes, you can layer HTV designs to create multi-colored or intricate designs. Start with the bottom layer, pressing it onto the fabric as recommended. Then, layer the additional colors or designs on top, ensuring each layer is pressed separately. Remember to adjust the heat and pressure settings accordingly for each layer.
Conclusion
In conclusion, while heat transfer vinyl (HTV) is commonly used on fabrics, it is not recommended to use it directly on acrylic materials. The nature of acrylic, being a synthetic fiber, can make it prone to melting or warping under high heat. This can result in a poor application of the HTV or even damage to the acrylic material itself.
However, there are alternative methods to personalize acrylic items such as laser engraving or screen printing. These methods provide a more durable and long-lasting customization option for acrylic surfaces.
It’s always important to consider the compatibility of materials and techniques to achieve the desired results without compromising the quality or integrity of the product.