
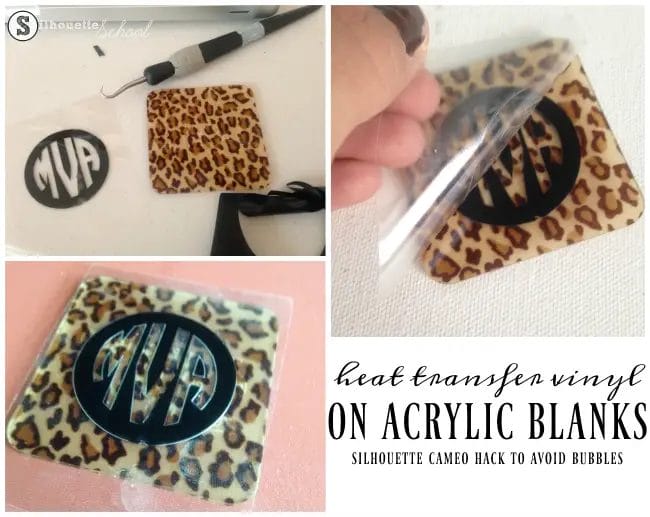
Yes, you can use iron-on vinyl on acrylic surfaces. Iron-on vinyl, also known as heat transfer vinyl (HTV), can be applied to various materials including acrylic. It provides a convenient and durable way to personalize and decorate acrylic items such as tumblers, signs, and more. By using heat and pressure from an iron or heat press, the vinyl adheres to the acrylic surface, creating a permanent bond. Make sure to follow the instructions provided by the vinyl manufacturer for best results.

Using Iron-On Vinyl on Acrylic: A Step-by-Step Guide
Iron-on vinyl is a versatile material that can be used to add personalized designs and patterns to various fabrics and surfaces. One such surface is acrylic, a durable and transparent material commonly used in crafting and DIY projects. In this guide, we will walk you through the process of using iron-on vinyl on acrylic, allowing you to create custom designs on this unique material.
Materials You Will Need
- Acrylic sheet
- Iron-on vinyl
- Craft cutting machine or scissors
- Iron or heat press
- Teflon sheet or parchment paper
- Weeding tool
- Lint-free cloth
Step 1: Prepare Your Design
The first step is to prepare your design using a design software or application. You can choose from a wide range of pre-made designs or create your own. Keep in mind that intricate designs may be more challenging to cut and apply, so it’s best to start with simpler designs if you’re a beginner.
Step 2: Cut the Vinyl
Once you have your design ready, it’s time to cut the vinyl. If you have a craft cutting machine like a Cricut or Silhouette, simply load the vinyl onto the cutting mat and let the machine do the work. If you don’t have a cutting machine, you can cut the vinyl manually using a pair of scissors. Make sure to cut the vinyl slightly larger than your design to allow for proper alignment.
Step 3: Weed the Vinyl
After cutting the vinyl, it’s time to weed out the excess material. Use a weeding tool to carefully remove the unwanted parts of the design, leaving only the desired image or pattern on the vinyl. Take your time and be gentle to avoid any accidental tears or damages to the vinyl.
Step 4: Prepare the Acrylic
Before applying the vinyl, make sure the acrylic surface is clean and free from any dust or debris. Use a lint-free cloth to wipe the surface and ensure a smooth and even application. If needed, you can also use rubbing alcohol to remove any stubborn dirt or fingerprints.
Step 5: Apply the Vinyl
Now it’s time to apply the vinyl to the acrylic. Place the cut vinyl on the desired area of the acrylic, ensuring proper alignment and positioning. If you’re using an iron, set it to the appropriate temperature for the vinyl type (refer to the manufacturer’s instructions) and apply gentle pressure over the vinyl using smooth, circular motions. If you have a heat press, follow the recommended settings for your specific vinyl and acrylic combination.
Step 6: Remove the Transfer Paper
Once you have applied heat to the vinyl, carefully peel away the transfer paper while the vinyl is still warm. Start at one corner and slowly peel back at a 45-degree angle, ensuring that the vinyl adheres to the acrylic surface. If any part of the vinyl starts to lift, place the transfer paper back down and apply more heat until it is fully secured.
Step 7: Allow the Vinyl to Set
After removing the transfer paper, allow the vinyl to cool and set on the acrylic surface. Avoid touching or manipulating the vinyl until it has fully cooled down to ensure a strong and long-lasting bond. This curing process usually takes a few hours, but refer to the vinyl manufacturer’s instructions for specific guidelines.
Step 8: Enjoy Your Custom Acrylic Piece
Once the vinyl has fully set, you can enjoy your custom acrylic piece. Whether you’re creating personalized signs, keychains, or home decor items, using iron-on vinyl on acrylic opens up a world of creative possibilities. Experiment with different colors, designs, and finishes to create unique and eye-catching projects that showcase your personal style.
In summary, using iron-on vinyl on acrylic is a straightforward process that allows you to add custom designs and patterns to this versatile material. By following these step-by-step instructions, you can create personalized acrylic pieces that are sure to impress.
Tips and Tricks for Successfully Applying Iron-On Vinyl to Acrylic
Iron-on vinyl is a popular choice for adding personalized designs and patterns to various surfaces, and acrylic is no exception. Applying iron-on vinyl to acrylic can be a bit tricky, but with the right techniques and precautions, you can achieve fantastic results. In this section, we will discuss some useful tips and tricks to help you successfully apply iron-on vinyl to acrylic.
1. Choose the Right Type of Acrylic
Before you begin, it’s essential to select the appropriate type of acrylic for your project. Not all acrylic materials are suitable for heat transfer applications. Look for acrylic sheets or items that are heat-resistant and have a smooth surface. This will ensure better adhesion and prevent any bubbling or warping during the application process.
2. Clean and Prep the Acrylic Surface
Properly cleaning and prepping the acrylic surface is crucial for the iron-on vinyl to adhere correctly. Begin by wiping the surface with a mild soap and water solution or isopropyl alcohol to remove any dust, dirt, or oils. Make sure to dry the surface thoroughly before moving on to the next step.
3. Test Heat Settings and Vinyl Placement
Before applying the iron-on vinyl to the acrylic, it’s always a good idea to perform a test on a small, inconspicuous area. This will help you determine the optimal heat settings for your iron or heat press and ensure that the vinyl adheres properly without damaging the acrylic. Additionally, use a ruler or tape to mark the desired placement of the vinyl to achieve accurate and straight alignment.
4. Use a Teflon Sheet or Parchment Paper
To protect both the iron-on vinyl and the acrylic surface during the heat application process, it’s recommended to use a Teflon sheet or parchment paper. Place the Teflon sheet or parchment paper over the vinyl design before applying heat. This will prevent direct contact between the iron or heat press and the vinyl, reducing the risk of scorching or melting.
5. Apply Heat Evenly and Firmly
When applying heat to the iron-on vinyl, ensure that the heat is distributed evenly across the entire design. Use moderate pressure and move the iron or heat press in a consistent motion to avoid overheating or underheating certain areas. Be patient and take your time to ensure that the vinyl properly adheres to the acrylic surface.
6. Allow Sufficient Cooling Time
Once you have applied the heat and the vinyl has adhered to the acrylic, it’s crucial to allow sufficient cooling time before handling the item. This will ensure that the adhesive has fully set and will prevent any accidental peeling or lifting of the vinyl. Follow the manufacturer’s instructions for the recommended cooling time.
7. Avoid Excessive Heat or Pressure
While it’s important to apply sufficient heat and pressure for the vinyl to adhere, it’s equally crucial to avoid excessive heat or pressure. Too much heat can cause the acrylic to warp or deform, while excessive pressure can result in the vinyl becoming distorted or damaged. Follow the recommended heat and pressure guidelines for your specific iron-on vinyl and acrylic material.
8. Seal the Vinyl (Optional)
If you want to add an extra layer of protection to your iron-on vinyl design on acrylic, consider sealing it with a clear sealant or varnish. This will help protect the vinyl from peeling, scratching, or fading over time, especially if the acrylic item will be frequently handled or exposed to moisture.
By following these tips and tricks, you can achieve professional-looking results when applying iron-on vinyl to acrylic. Remember to always read and follow the manufacturer’s instructions for your specific materials and equipment to ensure the best outcome. With a little practice and patience, you’ll be able to create stunning and personalized creations on acrylic surfaces.
Best Practices for Heat Transfer Vinyl on Acrylic Projects
Heat transfer vinyl (HTV) is a popular method for adding designs and graphics to various materials, including acrylic. When applied correctly, HTV can create vibrant and durable designs on acrylic surfaces. To ensure the best results, it is important to follow some best practices when working with HTV on acrylic projects. In this section, we will outline some key tips and guidelines for achieving optimal results with HTV on acrylic surfaces.
1. Choose the Right Type of HTV
Not all HTV is suitable for acrylic projects. It is crucial to select a type of HTV that is specifically designed for use on acrylic and other hard surfaces. Look for HTV that is labeled as “adhesive” or “permanent” for the best results. These types of HTV have a stronger adhesive and are better suited for long-lasting applications on acrylic.
2. Prepare the Acrylic Surface
Before applying HTV, it is essential to properly prepare the acrylic surface. Start by cleaning the surface with a mild soap and water solution to remove any dirt, dust, or oils. Avoid using harsh chemicals or abrasive cleaners that could damage or scratch the acrylic. Once the surface is clean, wipe it dry with a lint-free cloth.
3. Use Proper Heat and Pressure
The application of heat and pressure is crucial for bonding the HTV to the acrylic. Follow the manufacturer’s instructions for the recommended heat settings and pressing time. It is usually recommended to use a heat press machine for consistent and even heat distribution. Apply firm and even pressure during the pressing process to ensure proper adhesion.
4. Test for Compatibility
Before applying HTV to the entire acrylic surface, it is advisable to perform a small test on a scrap piece of acrylic. This will help you ensure that the HTV adheres properly and does not cause any damage or discoloration to the acrylic. Test different heat settings and pressing times to determine the optimal conditions for your specific acrylic material.
5. Avoid Overheating
Overheating the acrylic can result in warping, melting, or discoloration. Be cautious not to apply excessive heat during the pressing process. Start with a lower heat setting and gradually increase if necessary. It is better to apply multiple shorter presses than one extended press with high heat to minimize the risk of overheating the acrylic.
6. Allow Sufficient Cooling Time
After applying the HTV, it is crucial to allow sufficient cooling time before handling or moving the acrylic project. Rushing the cooling process can lead to premature lifting or peeling of the HTV. Follow the manufacturer’s instructions for the recommended cooling time, which is typically a few seconds to a minute.
7. Store and Care for Acrylic Projects with HTV
To preserve the longevity of acrylic projects with HTV, it is important to store and care for them properly. Avoid stacking or placing heavy objects on top of the project to prevent any potential damage to the HTV. Clean the project with a soft cloth or gentle cleaner, avoiding any abrasive materials that could scratch the acrylic or peel the HTV.
In summary, achieving successful results with HTV on acrylic projects requires choosing the right type of HTV, preparing the acrylic surface properly, using proper heat and pressure, testing for compatibility, avoiding overheating, allowing sufficient cooling time, and storing and caring for the project appropriately. By following these best practices, you can create stunning and long-lasting designs on acrylic surfaces using heat transfer vinyl.
Exploring Different Types of Iron-On Vinyl for Acrylic Surfaces
When it comes to adding a personal touch to acrylic surfaces, iron-on vinyl is a popular choice. This versatile material allows you to create customized designs and patterns that adhere to acrylic surfaces with the help of heat. However, not all iron-on vinyl is created equal, and understanding the different types available can help you choose the right one for your project.
1. Standard Iron-On Vinyl
Standard iron-on vinyl is a great option for beginners and those looking for a budget-friendly choice. It is typically made of a single layer of vinyl that is coated with an adhesive on one side. This type of iron-on vinyl works well on acrylic surfaces and can be easily cut using a cutting machine or even by hand. It is available in a wide range of colors and finishes, allowing you to create vibrant designs on your acrylic projects.
2. Glitter Iron-On Vinyl
If you want to add a touch of sparkle and shine to your acrylic surfaces, glitter iron-on vinyl is the way to go. This type of vinyl features tiny particles of glitter embedded in the material, giving your designs a dazzling effect. Glitter iron-on vinyl is available in various colors and is perfect for adding some glam to your acrylic projects.
3. Foil Iron-On Vinyl
For a metallic or reflective finish, foil iron-on vinyl is an excellent choice. This type of vinyl features a thin layer of metallic foil on top of the adhesive coating. When heat is applied, the foil adheres to the acrylic surface, creating a stunning metallic effect. Foil iron-on vinyl comes in a range of metallic colors, allowing you to add a touch of sophistication to your acrylic projects.
4. Patterned Iron-On Vinyl
If you want to take your acrylic projects to the next level, consider using patterned iron-on vinyl. This type of vinyl features pre-designed patterns and prints that can be easily transferred onto acrylic surfaces. Patterned iron-on vinyl allows you to create intricate and detailed designs without the need for complex cutting or layering. It is available in a variety of styles, including florals, geometrics, and even seasonal themes.
5. Holographic Iron-On Vinyl
For a truly eye-catching effect, holographic iron-on vinyl is an excellent choice. This type of vinyl features a prismatic, iridescent finish that shimmers and changes color when exposed to light. Holographic iron-on vinyl is available in a range of vibrant colors and adds a captivating touch to any acrylic project. Whether you’re creating personalized acrylic keychains or adding accents to acrylic signs, holographic iron-on vinyl is sure to make a statement.
In summary, iron-on vinyl is a fantastic option for adding personalized designs to acrylic surfaces. Whether you prefer the simplicity of standard vinyl or the sparkle of glitter vinyl, there is a type of iron-on vinyl that will suit your needs. Consider the different types of iron-on vinyl mentioned above and choose the one that best complements your acrylic project. With the right vinyl and a bit of creativity, you can transform plain acrylic surfaces into stunning personalized creations.
Customizing Acrylic with Iron-On Vinyl: Creative Ideas and Inspiration
Acrylic is a versatile and beautiful material that can be used in various DIY projects. Whether you’re creating personalized gifts, home decor, or even customizing accessories, acrylic provides a sleek and modern look. One way to make your acrylic creations truly unique is by adding iron-on vinyl. With a wide range of colors and patterns available, iron-on vinyl allows you to customize your acrylic items in endless ways. In this section, we will explore creative ideas and inspiration for customizing acrylic with iron-on vinyl.
1. Personalized Acrylic Keychains
Keychains are a practical and popular item that can be easily customized with iron-on vinyl. You can create personalized keychains by cutting out shapes or letters from the iron-on vinyl and applying them to the acrylic. Whether you want to add initials, names, or even meaningful symbols, iron-on vinyl allows you to create one-of-a-kind keychains that reflect your style and personality.
2. Custom Acrylic Tumblers
Tumblers are not only functional but also provide a great canvas for customization. With iron-on vinyl, you can easily transform plain acrylic tumblers into eye-catching and personalized drinkware. Consider adding quotes, patterns, or even images to make your tumblers stand out. The heat transfer properties of the iron-on vinyl ensure a durable and long-lasting design that won’t fade or peel off.
3. Decorative Acrylic Signs
Acrylic signs can add a touch of elegance and sophistication to any space. By incorporating iron-on vinyl, you can elevate the look of your acrylic signs even further. Whether you want to create motivational quotes, welcome signs, or directional signage, iron-on vinyl offers a wide range of options. You can experiment with different fonts, sizes, and colors to achieve the desired aesthetic for your acrylic signs.
4. Customized Acrylic Jewelry
If you’re a fan of unique and personalized jewelry, then customizing acrylic with iron-on vinyl is the perfect way to add a personal touch. You can create statement earrings, necklaces, or even bracelets by using iron-on vinyl to cut out intricate designs or patterns. The lightweight nature of acrylic makes it comfortable to wear, and the iron-on vinyl ensures that your creations are durable and eye-catching.
5. Acrylic Photo Frames
Preserving cherished memories in beautifully designed photo frames is always a delightful way to showcase your favorite photos. With acrylic photo frames, you can take it a step further by customizing them with iron-on vinyl. Add names, dates, or even captions to make your photo frames truly special. The transparency of the acrylic material adds a modern and sleek touch, while the iron-on vinyl adds a personal and sentimental element.
6. Personalized Acrylic Ornaments
During the holiday season, personalized ornaments make a meaningful gift or a special addition to your own tree. Acrylic ornaments can be customized with iron-on vinyl to create unique designs, including names, monograms, or festive patterns. The lightweight and durable nature of acrylic make it perfect for hanging on the tree year after year.
7. Customized Acrylic Phone Cases
Your phone case is an accessory that you carry with you every day, so why not make it personalized and stylish? With iron-on vinyl, you can easily customize acrylic phone cases with initials, names, or even trendy designs. The heat transfer properties of the iron-on vinyl ensure that your design stays intact, even with everyday use.
In summary, customizing acrylic with iron-on vinyl offers endless creative possibilities. From personalized keychains and tumblers to decorative signs and jewelry, you can add a personal touch to various acrylic items. The durability and versatility of iron-on vinyl make it a great choice for customizing acrylic in a way that reflects your style and personality.
FAQs
Can you use iron-on vinyl on acrylic?
No, iron-on vinyl is not suitable for use on acrylic. Acrylic is a type of plastic that can melt or warp when exposed to high heat, which is necessary for ironing on vinyl. It is best to use other adhesive methods, such as glue or tape, to attach vinyl to acrylic surfaces.
Conclusion
In conclusion, while iron-on vinyl is commonly used on fabrics, it may not be the optimal choice for applying designs and decals on acrylic surfaces. Iron-on vinyl requires heat to bond with the material, and acrylic can warp or melt under high temperatures. Additionally, acrylic surfaces are typically smooth and non-porous, which can make it difficult for the adhesive in iron-on vinyl to stick securely.
If you are looking to personalize your acrylic items, consider using alternative methods such as acrylic paints, adhesive vinyl, or etching. These methods provide better adhesion and durability when applied to acrylic surfaces, ensuring your designs withstand the test of time. Remember to clean and prepare the acrylic surface properly before applying any type of decoration to achieve the best results.
So, while iron-on vinyl is a versatile option for many projects, it is advisable to explore other suitable options when working with acrylic surfaces to ensure the longevity and aesthetics of your designs.