
Are you looking to add a personal touch to your Yeti cooler? Painting your Yeti cooler is a fun and creative way to make it stand out from the crowd. Whether you want to display your favorite design, show off team spirit, or simply add a splash of color, painting your Yeti cooler allows you to express your unique style. In this article, we will guide you through the steps to paint your Yeti cooler with ease and achieve a professional-looking finish.
The first step in painting your Yeti cooler is to gather all the necessary supplies. You will need a clean and dry Yeti cooler, sandpaper or a sanding block, a primer specifically designed for the material of your cooler, acrylic or spray paint in your desired colors, painter’s tape, a paintbrush or foam brush, and a clear sealant to protect the paint.
Before you begin painting, it’s important to thoroughly clean and dry your Yeti cooler. Use a mild detergent and water to remove any dirt, grease, or residue. Once it’s clean, lightly sand the surface of the cooler to create a rough texture that will help the primer and paint adhere better.
Next, apply a coat of primer to the surface of your Yeti cooler. Make sure to choose a primer that is suitable for the material of your cooler, whether it’s plastic, stainless steel, or another type. The primer will create a smooth and even base for

Preparing Your Yeti Cooler for Painting
When it comes to personalizing your Yeti cooler, painting it can be a fun and creative way to make it stand out. However, before you start painting, it’s important to properly prepare your cooler to ensure a smooth and long-lasting finish. In this section, we will outline the steps you need to take to prepare your Yeti cooler for painting.
Gather the Necessary Materials
Before you begin, gather all the materials you will need for the painting process. This includes:
- Yeti cooler
- Sandpaper (medium and fine-grit)
- Painter’s tape
- Tack cloth
- Primer spray paint
- Acrylic or enamel paint
- Clear coat spray paint (optional)
- Drop cloth or newspaper
- Protective gloves
- Mask or respirator
Clean the Surface
Before you can start painting, it’s crucial to clean the surface of your Yeti cooler thoroughly. Remove any dirt, grime, or stickers using warm soapy water and a sponge. Rinse the cooler with clean water and dry it off completely using a towel.
Sand the Surface
To ensure good adhesion of the paint, you’ll need to sand the surface of the cooler. Start by using medium-grit sandpaper to rough up the existing finish. This will help the primer and paint adhere better. Once you’ve sanded the entire surface, switch to a finer-grit sandpaper and go over it again to smooth out any rough areas.
Apply Painter’s Tape
Using painter’s tape, carefully mask off any areas of the cooler that you don’t want to paint. This may include handles, latches, or logos. Make sure the tape adheres well to the surface to prevent any paint from bleeding through.
Protect Surrounding Areas
Before you begin painting, it’s important to protect the surrounding areas to avoid any accidental overspray. Lay down a drop cloth or cover the surrounding surfaces with newspaper to catch any paint particles.
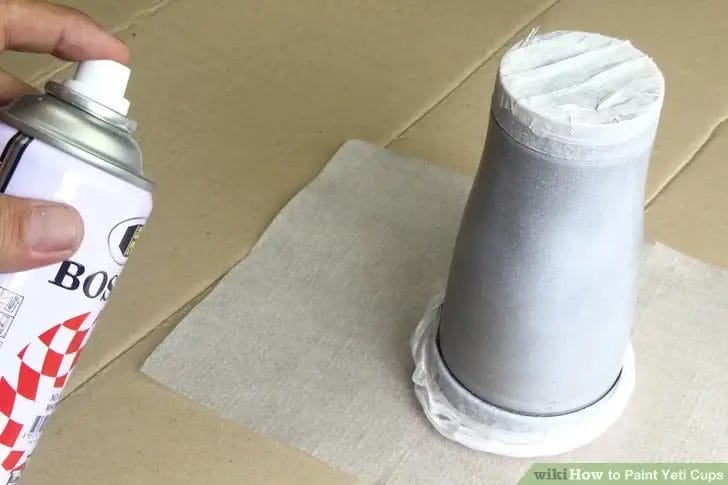
Prime the Cooler
Applying a coat of primer to your cooler will help the paint adhere better and provide a smoother finish. Shake the primer can well and hold it approximately 8-12 inches away from the cooler. Apply an even coat of primer, making sure to cover the entire surface. Allow the primer to dry completely according to the manufacturer’s instructions.
Paint the Cooler
Once the primer is dry, it’s time to paint your cooler. Choose the desired color of acrylic or enamel paint and shake the can thoroughly. Hold the paint can the same distance from the cooler as before and apply an even layer of paint. Allow the first coat to dry completely, and then apply additional coats as needed to achieve the desired color and coverage.
Optional: Apply Clear Coat
If you want to add an extra layer of protection and shine to your painted cooler, you can apply a clear coat spray paint. This will help seal the paint and protect it from scratches and fading. Follow the instructions on the can and apply the clear coat evenly, allowing it to dry completely between coats.
Final Touches
After the paint and clear coat have dried, carefully remove the painter’s tape and inspect the cooler for any touch-ups or imperfections. If needed, use a small paintbrush to fix any areas that require attention. Once you’re satisfied with the results, your Yeti cooler is ready to be used and admired.
In summary, preparing your Yeti cooler for painting involves cleaning the surface, sanding it to create texture, applying painter’s tape to mask off areas, protecting surrounding surfaces, priming the cooler, painting it with your desired color, and optionally applying a clear coat for extra protection and shine. By following these steps, you can transform your plain cooler into a personalized work of art.
Step-by-Step Guide to Painting Your Yeti Cooler
If you’re looking to add a personal touch to your Yeti cooler, painting it is a great way to do so. Not only does it allow you to customize the cooler to your own style, but it also adds a layer of protection to the exterior. In this guide, we’ll walk you through the step-by-step process of painting your Yeti cooler.
Materials Needed
Before you begin, gather the following materials:
- Yeti cooler
- Paint primer
- Paint of your choice (acrylic or spray paint)
- Paintbrushes or spray paint applicator
- Painter’s tape
- Sandpaper
- Clear coat sealant (optional)
- Drop cloth or newspaper
- Gloves
- Mask
Step 1: Prep the Cooler
Start by cleaning the cooler thoroughly to remove any dirt, dust, or residue. Use warm soapy water and a sponge or cloth to scrub the surface. Rinse off the soap and allow the cooler to dry completely. Once dry, use sandpaper to lightly sand the exterior. This will help the paint adhere better.
Step 2: Apply the Primer
Apply a coat of paint primer to the cooler. This will create a smooth base for the paint and help it adhere better. Use a paintbrush or spray paint applicator to evenly distribute the primer. Allow the primer to dry according to the manufacturer’s instructions.
Step 3: Tape off Areas
If you want to create designs or patterns on your cooler, use painter’s tape to mask off the areas you want to remain unpainted. Ensure the tape is firmly pressed down to prevent any paint from bleeding through.
Step 4: Paint the Cooler
Now it’s time to paint your cooler. If you’re using acrylic paint, apply it with a paintbrush, using even strokes to cover the entire surface. If you prefer a smoother finish, opt for spray paint and follow the instructions on the can. Apply multiple coats, allowing each coat to dry before applying the next. This will ensure a vibrant and long-lasting finish.
Step 5: Remove the Tape
Once the paint has dried completely, carefully remove the painter’s tape to reveal your design. Take your time to avoid peeling off any paint with the tape.
Step 6: Apply a Clear Coat (Optional)
If you want to add an extra layer of protection to your painted cooler, you can apply a clear coat sealant. This will help to prevent scratches and chipping. Make sure to choose a clear coat that is suitable for the type of paint you used. Apply the clear coat according to the manufacturer’s instructions and allow it to dry completely.
Step 7: Enjoy Your Customized Cooler
Once the clear coat has dried, your painted Yeti cooler is ready to use. Show off your unique design and enjoy the personalized touch you’ve added to your cooler.
Summary
Painting your Yeti cooler is a fun and creative way to customize it to your own style. By following this step-by-step guide, you can achieve a professional-looking finish. Remember to prep the cooler, apply a primer, tape off areas for designs if desired, paint with multiple coats, remove the tape carefully, and consider applying a clear coat for added protection. Now you can proudly show off your customized cooler and enjoy its personalized look.
Tips for Properly Curing and Sealing Your Painted Yeti Cooler
So, you’ve just finished painting your beloved Yeti cooler and it looks absolutely stunning. Now comes the important step of properly curing and sealing the paint to ensure its longevity and durability. In this section, we will provide you with some tips and guidelines to help you achieve the best results.
1. Allow Sufficient Drying Time
Before attempting to cure or seal your painted Yeti cooler, it is crucial to allow the paint to fully dry. Depending on the type of paint you used, this can take anywhere from a few hours to several days. Refer to the paint manufacturer’s instructions for specific drying times. Rushing this step may result in uneven curing and a compromised finish.
2. Cure the Paint
Curing the paint involves allowing it to fully harden and bond to the surface. This step is essential for achieving a durable and long-lasting finish. Follow these guidelines:
- Place the painted Yeti cooler in a well-ventilated area where it won’t be disturbed.
- Avoid exposing the cooler to extreme temperatures or direct sunlight during the curing process.
- Allow the paint to cure for at least 72 hours. Some paints may require longer curing times, so consult the manufacturer’s instructions.
3. Use a Clear Coat Sealant
To provide an additional layer of protection and enhance the longevity of your painted Yeti cooler, consider applying a clear coat sealant. Here’s how to do it:
- Ensure that the painted surface is clean and free from any dust, debris, or fingerprints.
- Choose a clear coat sealant specifically formulated for outdoor use and compatible with the type of paint you used.
- Apply the sealant using a brush or spray, following the manufacturer’s instructions for the recommended number of coats and drying time between each coat.
- Allow the sealant to fully cure according to the manufacturer’s instructions before using your cooler.
4. Handle with Care
Even with proper curing and sealing, it is important to handle your painted Yeti cooler with care to avoid scratches or damage to the finish. Here are some tips:
- Avoid dragging or bumping the cooler against rough surfaces.
- Avoid using abrasive cleaners or scrubbing brushes that could scratch the paint.
- When transporting the cooler, use a padded or soft-sided cooler bag to provide extra protection.
5. Regular Maintenance
To keep your painted Yeti cooler looking its best for years to come, it’s important to perform regular maintenance. Here are some tips:
- Clean the surface with mild soap and water, using a soft cloth or sponge.
- Avoid using harsh chemicals or abrasive cleaning agents.
- Inspect the paint regularly for any signs of wear or damage. If necessary, touch up the paint or reapply a clear coat sealant to maintain the integrity of the finish.
Summary
Properly curing and sealing your painted Yeti cooler is paramount to ensure its longevity and durability. By allowing sufficient drying time, curing the paint, applying a clear coat sealant, handling with care, and performing regular maintenance, you can enjoy your beautifully painted cooler for years to come. Remember to always follow the manufacturer’s instructions and use products specifically designed for the type of paint you used.
Creative Ideas for Customizing Your Painted Yeti Cooler
Are you looking for a way to make your painted Yeti cooler truly unique and personalized? Look no further! In this section, we will explore some creative ideas for customizing your painted Yeti cooler to make it stand out from the crowd. Whether you’re using your cooler for tailgating, camping, or just hanging out with friends, these ideas will help you add a personal touch to your cooler.
1. Monogramming
Adding a monogram to your painted Yeti cooler is a classic and timeless way to customize it. You can choose to monogram your initials, your name, or even a special word or phrase that holds significance to you. There are various methods for adding monograms, such as using vinyl decals, stencils, or even painting them by hand. This simple addition will instantly elevate the look of your cooler.
2. Outdoor-themed Designs
If you’re a nature lover or an outdoor enthusiast, consider customizing your painted Yeti cooler with outdoor-themed designs. You can opt for designs inspired by wildlife, landscapes, or even specific outdoor activities such as fishing, hiking, or camping. Adding these elements to your cooler will not only make it visually appealing but also reflect your personal interests and passions.
3. Sports Team Logos
Show your team spirit by adding your favorite sports team’s logo to your painted Yeti cooler. Whether you’re a football, basketball, baseball, or hockey fan, displaying your team’s logo will make your cooler a conversation starter at any event. You can either use vinyl decals or stencils to achieve a professional-looking finish. Don’t forget to add your team’s colors to complete the look!
4. Travel-inspired Themes
If you’re a travel enthusiast, why not showcase your love for exploration on your painted Yeti cooler? Consider designing your cooler with travel-inspired themes such as maps, landmarks, or passport stamps. These designs will not only add a unique touch to your cooler but also remind you of your favorite travel memories every time you use it.
5. Personalized Photos
Add a personal touch to your painted Yeti cooler by incorporating your own photos. You can choose to display photos of your family, friends, pets, or even scenic views from your favorite vacations. To achieve this, you can use decoupage techniques or transfer the photos onto the cooler’s surface. This customization idea will undoubtedly make your cooler one-of-a-kind.
6. Inspirational Quotes
Inspire yourself and others by adding inspirational quotes to your painted Yeti cooler. Choose quotes that resonate with you or motivate you to stay positive and adventurous. You can use vinyl lettering or stencils to ensure clean and professional-looking text. Every time you reach for a cold beverage, you’ll also be reminded of the inspiring words on your cooler.
7. Themed Designs
Get creative and design your painted Yeti cooler around a specific theme. Whether it’s a tropical paradise, a retro style, or a particular season, let your imagination run wild. You can incorporate various elements such as colors, patterns, and symbols to bring your chosen theme to life. Be bold and make your cooler the highlight of any gathering.
These are just a few of the many creative ideas for customizing your painted Yeti cooler. Remember, the possibilities are endless when it comes to adding a personal touch to your cooler. Get inspired, gather your supplies, and let your creativity shine!
FAQs
How to paint a Yeti cooler?
To paint a Yeti cooler, start by thoroughly cleaning it with soap and water. Use sandpaper to roughen the surface and create better adhesion. Apply a primer designed for use on metal surfaces, and let it dry completely. Then, apply multiple thin coats of a high-quality spray paint, allowing each coat to dry before applying the next. Finish with a clear coat for added protection.
Can I use regular spray paint on a Yeti cooler?
No, regular spray paint may not adhere well to the surface of a Yeti cooler. It is recommended to use a spray paint specifically designed for use on metal surfaces, such as an enamel or acrylic-based paint. These paints offer better adhesion and durability.
Do I need to seal the painted surface of the Yeti cooler?
Yes, it is recommended to seal the painted surface of the Yeti cooler with a clear coat. This will provide an additional layer of protection, preventing the paint from chipping or peeling. Make sure to choose a clear coat specifically designed for outdoor use and compatible with the type of paint you used.
Conclusion
In conclusion, painting a Yeti cooler can be a fun and creative way to personalize your cooler and make it stand out from the crowd. By following the step-by-step instructions and using the right materials, you can transform your plain cooler into a work of art. Remember to clean and prepare the surface properly before painting and use high-quality, durable paint for long-lasting results. Whether you choose to paint a unique design, your favorite sports team logo, or a vibrant pattern, the possibilities are endless. So go ahead and unleash your creativity, and enjoy your custom-painted Yeti cooler on your next outdoor adventure!