
Yes, you can apply a clear coat over acrylic enamel paint. Clear coating provides an extra layer of protection and enhances the shine of the underlying paint. It helps to prevent scratches, chipping, and fading, while also providing additional durability. By applying a clear coat, you can achieve a glossy and professional finish on your acrylic enamel painted surface. It is essential to choose a compatible clear coat and follow the manufacturer’s instructions for optimal results.
Enhancing Durability: The Benefits of Clear Coating Acrylic Enamel
Acrylic enamel is a popular choice for painting various surfaces due to its durability and versatility. However, to further enhance its longevity and protect it from wear and tear, applying a clear coat is highly recommended.
A clear coat acts as a protective layer, forming a barrier between the painted surface and external elements such as UV rays, dirt, moisture, and chemicals. By adding this additional layer of protection, you can significantly extend the lifespan of your acrylic enamel paint job.
Let’s delve deeper into the benefits of clear coating acrylic enamel:
1. Increased Resistance to Scratches and Abrasions
Clear coating your acrylic enamel paint provides an extra level of resistance against scratches, scuffs, and abrasions. This is particularly beneficial for surfaces that are prone to daily use or high traffic, such as automotive finishes, furniture, or kitchen cabinets. The clear coat forms a tough barrier that shields the underlying paint from everyday wear and tear, ensuring it remains intact and looking new for an extended period.
2. Protection against UV Rays
Exposure to sunlight over time can cause the color of acrylic enamel paint to fade or change. UV rays can also degrade the paint, causing it to become brittle and crack. By clear coating the surface, you create a protective shield that blocks harmful UV rays, preserving the vibrancy and integrity of the paint color and finish.
3. Resistance to Chemicals and Stains
Acrylic enamel paint is known for its resistance to many chemicals and stains, but adding a clear coat takes this protection to the next level. The clear coat acts as a barrier against substances like gasoline, oil, solvents, and household cleaning agents, preventing them from penetrating the paint layer and causing damage. This makes clear-coated acrylic enamel an excellent choice for surfaces exposed to potential chemical spills or regular cleaning.
4. Easy Maintenance and Cleaning
Clear-coated acrylic enamel surfaces are easier to clean and maintain compared to unpainted surfaces. The smooth and non-porous nature of the clear coat allows dirt, grime, and contaminants to be wiped away effortlessly. Regular cleaning becomes a breeze, and the clear coat helps prevent stains and stubborn marks from setting in, ensuring your painted surfaces remain pristine for longer.
5. Enhanced Gloss and Shine
Applying a clear coat on top of acrylic enamel paint can enhance the gloss and shine of the finished surface. The clear coat acts as a magnifying layer, intensifying the depth and luster of the underlying paint. This added shine can give your painted surfaces a professional and polished appearance, making them stand out and catch the eye.
In summary, clear coating acrylic enamel paint provides numerous benefits, including increased durability, resistance to scratches and abrasions, protection against UV rays, resistance to chemicals and stains, easy maintenance and cleaning, and enhanced gloss and shine. By investing in a clear coat, you can ensure that your acrylic enamel paint job remains vibrant and protected for years to come.
Step-by-Step Guide: How to Apply a Clear Coat Over Acrylic Enamel
Applying a clear coat over acrylic enamel is an essential step in achieving a glossy and protective finish for your painted surfaces. Whether you are working on a car, furniture, or any other project, a clear coat can enhance the durability and appearance of your paint job. In this section, we will provide you with a step-by-step guide on how to apply a clear coat over acrylic enamel.
Materials You Will Need:
- Acrylic enamel paint
- Clear coat
- Sandpaper (fine grit)
- Tack cloth
- Masking tape
- Spray gun or paint brush
- Air compressor (if using a spray gun)
Step 1: Prepare the Surface
The first step is to ensure that the surface is clean and free from any dirt, grease, or debris. Use a mild detergent or automotive cleaner to clean the surface thoroughly. After cleaning, rinse the surface with water and allow it to dry completely.
Step 2: Sand the Surface
Next, sand the painted surface using fine-grit sandpaper. This will create a smooth and slightly rough surface for the clear coat to adhere to. Sand in a circular motion to avoid creating deep scratches. After sanding, wipe away any sanding dust with a tack cloth.
Step 3: Mask off Surrounding Areas
If there are any areas that you do not want to be coated with clear coat, such as trim or windows, use masking tape to carefully cover and protect those areas.
Step 4: Mix the Clear Coat
Follow the manufacturer’s instructions to mix the clear coat. This may involve adding a hardener or catalyst to the clear coat. Ensure that the clear coat is thoroughly mixed for best results.
Step 5: Apply the Clear Coat
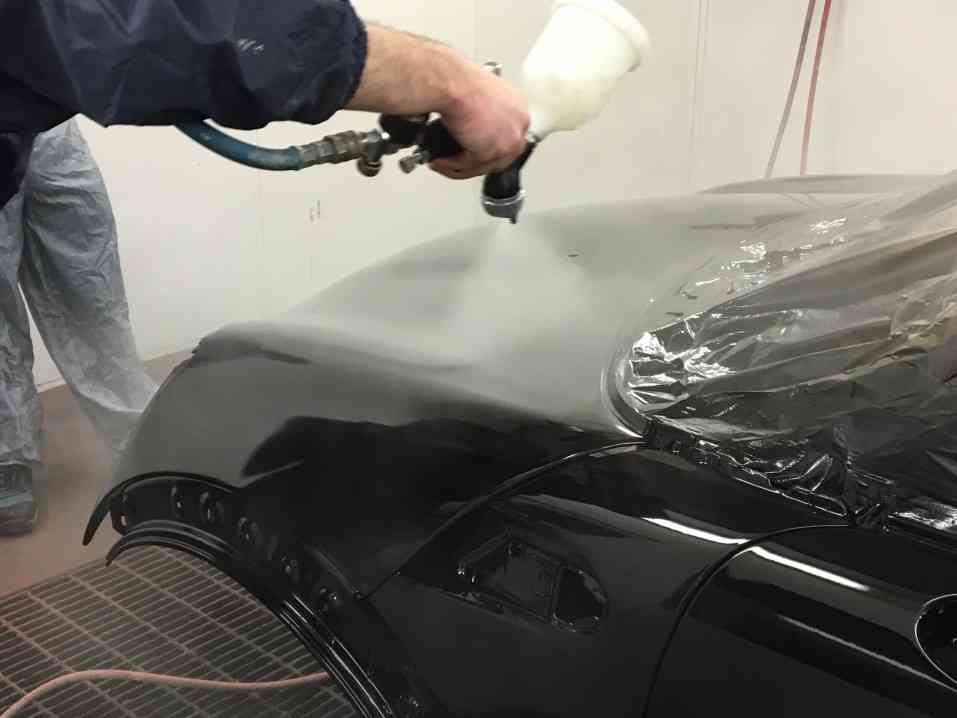
If you are using a spray gun, connect it to an air compressor and adjust the pressure according to the manufacturer’s recommendations. Hold the spray gun about 6-8 inches away from the surface and apply a light, even coat of clear coat. Start from the top and work your way down, using smooth and overlapping strokes. Allow the clear coat to dry for the specified time.
If you are using a paint brush, dip the brush into the clear coat and apply it in thin, even strokes. Work in small sections at a time to avoid visible brush marks. Allow the clear coat to dry between coats.
Step 6: Apply Additional Coats
Depending on the desired level of gloss and protection, you may need to apply multiple coats of clear coat. Follow the manufacturer’s instructions for drying times between coats and ensure that each coat is applied evenly and smoothly.
Step 7: Final Touches
After applying the final coat, allow the clear coat to dry completely according to the manufacturer’s instructions. Once dry, carefully remove the masking tape. Inspect the surface for any imperfections and make any necessary touch-ups.
Step 8: Curing Time
The clear coat will require curing time to fully harden and provide maximum protection. Refer to the manufacturer’s instructions for the recommended curing time. Avoid exposing the newly coated surface to extreme temperatures or harsh chemicals during the curing process.
Step 9: Enjoy the Results
Once the clear coat has fully cured, you can enjoy the glossy and durable finish it provides. The clear coat will enhance the color and depth of the underlying acrylic enamel paint, while also providing protection against UV rays, scratches, and other environmental factors.
In summary, applying a clear coat over acrylic enamel is a straightforward process that involves preparing the surface, sanding, masking off areas, mixing the clear coat, applying it in thin and even coats, and allowing it to dry and cure. By following these steps, you can achieve a professional-looking finish that will protect your painted surfaces for years to come.
Achieving a Professional Finish: Tips and Tricks for Clear Coating Acrylic Enamel
Clear coating is an essential step in the process of applying acrylic enamel to achieve a professional and glossy finish. It not only enhances the appearance of the painted surface but also provides protection against scratches, UV rays, and other environmental factors. In this section, we will discuss some valuable tips and tricks for clear coating acrylic enamel to help you achieve a flawless and durable finish.
1. Surface Preparation
Before applying the clear coat, it is vital to prepare the surface properly. Start by cleaning the painted surface with soap and water to remove any dirt, grease, or contaminants. Then, use a mild abrasive, such as fine sandpaper or a scuff pad, to lightly sand the surface. This helps in creating a smooth and uniform texture, allowing the clear coat to adhere better.
2. Choose the Right Clear Coat
There are various types of clear coats available in the market, including spray cans, aerosols, and two-component systems. Consider the specific requirements of your project and choose a clear coat that is compatible with the acrylic enamel paint you have used. Two-component systems often provide a more durable and long-lasting finish but require careful mixing and application.
3. Follow Proper Mixing Ratios
If you opt for a two-component clear coat, it is crucial to follow the recommended mixing ratios. This ensures that the clear coat cures properly and provides optimal protection. Failure to follow the specified ratios can lead to issues such as improper drying, uneven gloss, or diminished durability.
4. Apply in Thin and Even Coats
When applying the clear coat, it is essential to achieve thin and even coats for a smooth and professional finish. Start by holding the spray can or gun about 6-8 inches away from the surface and apply the clear coat in sweeping motions. Avoid applying heavy coats as this can result in runs, drips, or orange peel texture. It is better to apply multiple thin coats, allowing each coat to dry before applying the next.
5. Beware of Dust and Debris
Dust and debris can easily ruin a clear coat finish. To minimize the risk, choose a clean and controlled environment for clear coating. Make sure the area is free from airborne contaminants and take measures to prevent dust from settling on the surface during the drying process. Using a tack cloth and working in a well-ventilated space can also help reduce the chances of imperfections.
6. Proper Drying and Curing
After applying the final coat of clear, allow sufficient time for drying and curing. Follow the manufacturer’s instructions regarding the drying time, as it can vary depending on the specific clear coat product. Avoid exposing the freshly coated surface to excessive heat, direct sunlight, or moisture during the initial curing period to prevent any potential damage.
7. Buffing and Polishing
Once the clear coat has fully cured, you can further enhance the gloss and smoothness by buffing and polishing the surface. Use a fine-grit compound or polish and a clean microfiber cloth to gently buff the clear coat in circular motions. This helps remove any minor imperfections, swirl marks, or haze, resulting in a flawless and high-gloss finish.
In summary, achieving a professional finish when clear coating acrylic enamel requires careful preparation, proper application techniques, and attention to detail. By following these tips and tricks, you can enhance the appearance and durability of your painted surface, ensuring a stunning and long-lasting result.
The Importance of Proper Preparation: Preparing the Surface for Clear Coating Acrylic Enamel
When it comes to achieving a professional and long-lasting finish, proper surface preparation is key. This is especially true when clear coating acrylic enamel, as any imperfections or contaminants on the surface can affect the final result. In this section, we will discuss the importance of preparing the surface before applying a clear coat of acrylic enamel.
Cleanliness and Removal of Contaminants
Before applying a clear coat, it is essential to ensure that the surface is clean and free from any contaminants. Dust, dirt, grease, and wax can all interfere with the adhesion of the clear coat and cause it to peel or bubble. To remove these contaminants, start by washing the surface with a mild detergent and water. Use a soft cloth or sponge to gently scrub away any dirt or grime. Rinse thoroughly and allow the surface to dry completely before proceeding.
In addition to cleaning, it may be necessary to remove any existing wax or grease buildup. This can be done by using a wax and grease remover specifically designed for automotive surfaces. Apply the remover to a clean cloth and wipe down the surface, paying close attention to areas where contaminants may be more concentrated, such as around door handles or on the hood and trunk.
Repairing Imperfections
Before clear coating, it is important to address any imperfections on the surface. This includes scratches, chips, and dings that may be present. These imperfections can show through the clear coat and compromise the overall appearance of the finish. To repair these issues, start by sanding the affected area with fine-grit sandpaper. This will smooth out the surface and provide a better base for the clear coat.
If the imperfections are deeper, such as deep scratches or chips, it may be necessary to use a body filler to level the surface. Apply the filler according to the manufacturer’s instructions and allow it to dry completely. Once dry, sand the filled area to achieve a smooth and even surface.
Sanding and Priming
In addition to addressing imperfections, sanding the entire surface is crucial for promoting adhesion of the clear coat. Use a fine-grit sandpaper to lightly sand the surface, creating a slightly rough texture. This will help the clear coat adhere better and ensure a more durable finish.
After sanding, it is recommended to apply a primer before clear coating. The primer will further enhance adhesion and create a uniform surface for the clear coat. Choose a primer that is compatible with acrylic enamel and follow the manufacturer’s instructions for application. Allow the primer to dry completely before proceeding with the clear coat.
Applying the Clear Coat
Once the surface is properly cleaned, repaired, sanded, and primed, it is time to apply the clear coat. Use a high-quality acrylic enamel clear coat that is specifically formulated for automotive use. Follow the manufacturer’s instructions for application, including the recommended number of coats and drying times.
When applying the clear coat, it is important to work in a well-ventilated area and wear proper safety equipment, such as a respirator and gloves. Apply the clear coat in thin, even layers, allowing each coat to dry before applying the next. This will help prevent runs or drips and ensure a smooth and glossy finish.
Summary
Proper surface preparation is essential when clear coating acrylic enamel. It involves cleaning the surface and removing any contaminants, repairing imperfections, sanding, priming, and finally applying the clear coat. By following these steps, you can achieve a professional and long-lasting finish that enhances the appearance and durability of your acrylic enamel coating.
Long-lasting Protection: Clear Coating as a Shield for Acrylic Enamel Paint
Acrylic enamel paint is a popular choice for various projects due to its durability, versatility, and vibrant colors. However, to ensure the longevity and protection of your painted surface, applying a clear coating is highly recommended. In this section, we will delve into the benefits and importance of using a clear coating as a shield for acrylic enamel paint.
1. Enhanced Durability
One of the primary advantages of applying a clear coating over acrylic enamel paint is that it enhances the durability of the paint job. The clear coat acts as a protective layer that shields the paint from external factors such as UV rays, dirt, dust, moisture, and chemicals. This added layer of protection not only preserves the color and finish of the paint but also helps prevent fading, chipping, and peeling over time.
2. Increased Weather Resistance
Exposure to harsh weather conditions can take a toll on acrylic enamel paint. However, by applying a clear coating, you can significantly increase its weather resistance. The clear coat acts as a barrier against rain, snow, sunlight, and extreme temperatures, preventing the paint from deteriorating or fading prematurely. This ensures that your painted surface remains vibrant and intact for an extended period, no matter the climate.
3. Improved Scratch and Abrasion Resistance
Everyday wear and tear can cause scratches and abrasions on painted surfaces. By applying a clear coating, you add an extra layer of protection that improves scratch and abrasion resistance. The clear coat acts as a sacrificial layer, absorbing the brunt of any physical impact, preventing the acrylic enamel paint from getting damaged. This is particularly beneficial for surfaces that experience high traffic or are prone to accidental bumps and scratches.
4. Easy Maintenance
Another advantage of using a clear coating on acrylic enamel paint is that it makes maintenance a breeze. The protective layer repels dirt and grime, making it easier to clean the painted surface. Regular cleaning with mild soap and water is usually sufficient to keep the paint looking fresh and vibrant. Additionally, the clear coat also prevents stains from penetrating the paint, ensuring that your surface remains stain-free and easy to maintain.
5. Glossy Finish
Adding a clear coating to acrylic enamel paint can enhance the overall appearance of your project by providing a glossy finish. The clear coat enhances the depth and shine of the paint, giving it a sleek and professional look. Whether you’re painting a car, furniture, or any other item, the glossy finish adds a touch of elegance and sophistication.
In summary, applying a clear coating over acrylic enamel paint offers numerous benefits, including enhanced durability, increased weather resistance, improved scratch and abrasion resistance, easy maintenance, and a glossy finish. By investing a little extra time and effort into applying a clear coat, you can significantly prolong the life of your acrylic enamel paint and ensure that your project remains vibrant and protected for years to come.
FAQs
Can you clear coat over acrylic enamel?
Yes, you can clear coat over acrylic enamel. Clear coat helps protect the paint and gives it a glossy finish. Make sure to properly prepare the surface and apply the clear coat evenly for the best results.
How long does it take for acrylic enamel to dry?
The drying time for acrylic enamel can vary depending on factors such as temperature and humidity. Generally, it takes about 1-2 hours for the paint to dry to the touch and 24 hours for it to fully cure. It’s important to avoid touching or exposing the paint to moisture during the drying process.
Can you use acrylic enamel on wood surfaces?
Yes, acrylic enamel can be used on wood surfaces. However, it’s important to prepare the wood properly by sanding and cleaning it before applying the paint. Additionally, using a primer specifically designed for wood can help improve adhesion and durability of the paint.
Conclusion
In conclusion, clear coating over acrylic enamel is a viable option to enhance the durability and aesthetics of your paint job. By applying a clear coat, you can protect the underlying acrylic enamel from damage caused by UV rays, scratches, and general wear and tear. This additional layer not only adds a glossy finish to your painted surface but also improves its longevity.
It is important to follow the proper preparation and application techniques when clear coating over acrylic enamel. Ensure that the enamel has cured completely before applying the clear coat, and use compatible products for optimal adhesion and compatibility. Properly ventilate the area and apply thin, even coats to achieve a smooth and flawless finish.
By clear coating over acrylic enamel, you can achieve a high-quality, professional-looking paint job that will stand the test of time.