
Polishing acrylic edges is crucial to achieve a professional and flawless finish in various projects, from crafting to home improvement. By using the right techniques, you can enhance the transparency and shine of the acrylic, making it look polished and refined. Whether you are working with acrylic sheets, countertops, or furniture, this guide will provide you with step-by-step instructions on how to effectively polish acrylic edges. Discover the secrets to achieving a smooth and glossy surface that will dazzle and impress.
Essential Tools for Polishing Acrylic Edges
Polishing acrylic edges is an important step in achieving a professional and polished look for your acrylic projects. Whether you are working on DIY projects or commercial applications, having the right tools is crucial to ensure a smooth and seamless finish. In this section, we will explore the essential tools you need to effectively polish acrylic edges.
1. Sandpaper
Starting with coarse-grit sandpaper is essential to remove any rough edges or imperfections on the acrylic. It is recommended to begin with a grit size of around 120 and gradually work your way up to finer grits for a smoother finish. Silicon carbide sandpaper is the preferred choice for acrylic polishing due to its durability and ability to produce a uniform surface.
2. Buffing Wheel
Using a buffing wheel or a polishing pad is an efficient way to achieve a high-gloss finish on acrylic edges. Attach the buffing wheel to a rotary tool or a bench grinder and apply a polishing compound to the wheel. Move the acrylic edge against the spinning wheel, applying gentle pressure for a consistent shine. Be cautious not to overheat the acrylic, as it can cause damage.
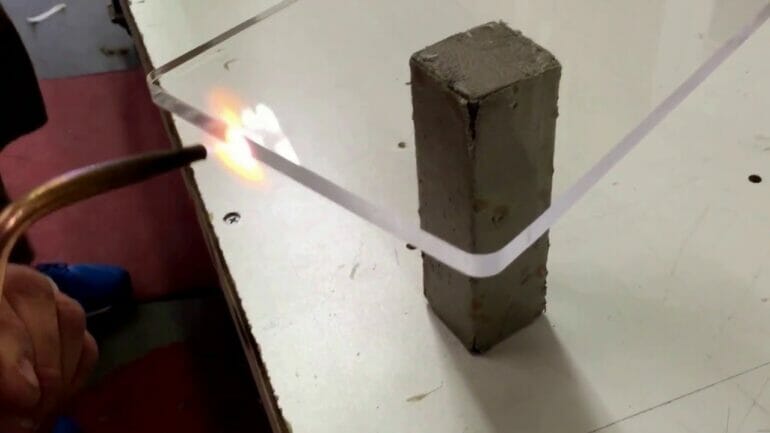
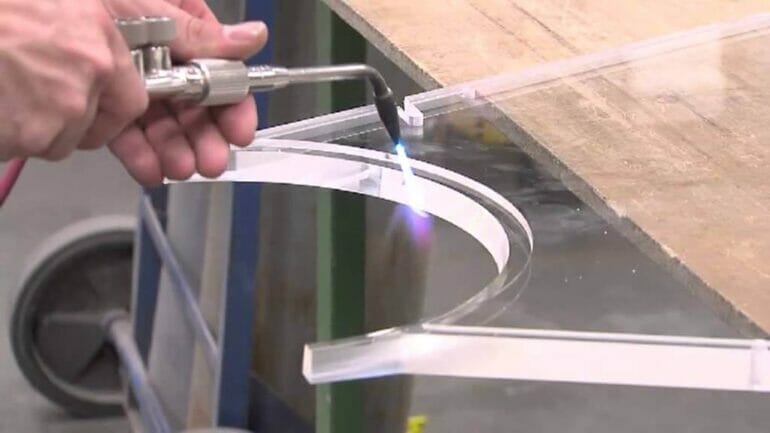
3. Flame Polisher
A flame polisher is a specialized tool that uses a controlled flame to melt and smooth the edges of acrylic. It is ideal for achieving a crystal-clear finish on acrylic edges. The flame polisher heats the edges of the acrylic, creating a molten surface that quickly solidifies, resulting in a glossy and polished look. Follow the manufacturer’s instructions for safe usage of the flame polisher.
4. Acrylic Edge Scraper
An acrylic edge scraper is a handheld tool specifically designed to remove burrs and rough edges from acrylic. It features a sharp blade that smoothly shaves off excess material, leaving behind a clean and polished edge. The acrylic edge scraper is an excellent tool for fine-tuning the acrylic edges before the final polishing process.
5. Polishing Compound
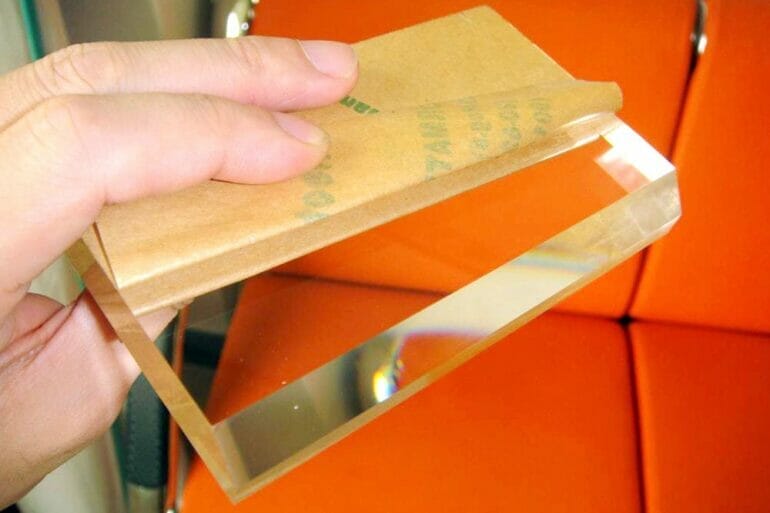
A polishing compound is a paste or liquid that helps in the polishing process by removing scratches, reducing haze, and enhancing the overall clarity of acrylic edges. Apply the polishing compound onto a soft cloth or polishing pad and gently rub it onto the acrylic surface in a circular motion. This step helps to achieve a smooth and glossy finish.
6. Microfiber Cloth
After the polishing process, it is essential to clean the acrylic edges thoroughly to remove any residue or particles. A microfiber cloth is ideal for this task, as it is soft and lint-free, preventing any scratches or damage to the polished surface. Wipe the acrylic edges gently with the microfiber cloth to ensure a flawless finish.
Summary
Polishing acrylic edges requires the right tools to achieve a professional and polished look. Starting with coarse-grit sandpaper, you can gradually work your way up to finer grits. A buffing wheel or polishing pad coupled with a polishing compound helps in achieving a high-gloss finish. A flame polisher is ideal for creating a crystal-clear look. An acrylic edge scraper allows for fine-tuning the edges before polishing. Finally, a microfiber cloth is essential for cleaning and maintaining the polished surface. With these essential tools, you can elevate your acrylic projects to the next level.
Step-by-step guide to polishing acrylic edges
Acrylic is a versatile and popular material used in various industries, including signage, architectural projects, and crafts. One of the essential steps in working with acrylic is polishing the edges to achieve a smooth and finished look. In this section, we will provide you with a step-by-step guide on how to polish acrylic edges effectively.
Materials required:
- Acrylic piece with rough edges
- Sandpaper (grit ranging from 220 to 1200)
- Microfiber cloth
- Polishing compound
- Electric sander (optional)
- Water source (preferably a sink or bucket)
Step 1: Start with coarse sandpaper
Begin the process by using the coarsest sandpaper, such as 220 grit. It helps to remove any large imperfections, burrs, or sharp edges. Wet the sandpaper or dip it in water to lubricate the surface, preventing heat buildup. Gently sand the rough edges in a circular motion, applying even pressure. Keep wetting the sandpaper as needed to ensure smooth sanding.
Step 2: Switch to finer grits
Once the rough edges are sanded down, switch to a finer grit sandpaper, such as 400 or 600 grit. Repeat the sanding process, focusing on smoothing out the edges further. This step helps in removing any visible scratches left by the coarse sandpaper. Continue wet sanding until the edges feel smooth to the touch.
Step 3: Progress to even finer grits
To achieve a polished finish, progress to even finer grit sandpaper, such as 800 or 1200 grit. Repeat the sanding process, ensuring you cover the entire edge. This step further smoothens the surface and eliminates any remaining scratches or imperfections. Regularly wet the sandpaper to maintain a lubricated surface and prevent overheating.
Step 4: Buff the edges
After sanding with the finest grit sandpaper, it’s time to buff the acrylic edges. Apply a small amount of polishing compound onto a microfiber cloth. With gentle pressure, rub the cloth against the edges of the acrylic in a circular motion. This process helps to remove any fine scratches and brings out the shine in the material. Continue buffing until the edges are glossy and smooth.
Step 5: Optional: Use an electric sander
If you have access to an electric sander, you can expedite the sanding process. Attach a fine grit sandpaper to the electric sander and follow the same circular motion technique. Be cautious not to apply too much pressure or hold the sander in one spot for too long, as it can melt or deform the acrylic. Remember to use a lubricant, such as water, to prevent the acrylic from overheating.
Step 6: Clean the acrylic
After polishing the edges, it’s essential to clean the acrylic piece thoroughly. Rinse it under running water to remove any debris or leftover polishing compound. Wipe it dry with a clean microfiber cloth to avoid water spots.
Step 7: Final inspection
Once the acrylic piece is dry, inspect the edges for any remaining imperfections or scratches. If needed, repeat the polishing process with a finer grit sandpaper and buff again with a polishing compound until you achieve the desired result.
In summary, polishing acrylic edges is a straightforward process that involves progressively sanding the rough edges using finer grit sandpaper and then buffing with a polishing compound. Remember to keep the surface lubricated with water or a suitable lubricant to prevent overheating and ensure a smooth finish. With proper care and attention to detail, you can achieve professional-looking acrylic edges for your projects.
Common Mistakes to Avoid While Polishing Acrylic Edges
Acrylic, also known as plexiglass, is a popular material used in various industries due to its versatility and durability. As with any material, proper finishing and polishing are essential to achieve a professional and polished look. However, there are some common mistakes that people make while polishing acrylic edges that can result in unsightly blemishes or even damage to the material. In this section, we will discuss these mistakes and how to avoid them to ensure a flawless finish.
1. Using the wrong polishing tools
One of the most common mistakes is using inappropriate tools for polishing acrylic edges. Abrasive materials like rough sandpaper or metal polishing compounds can cause scratches or damage the surface of the acrylic. It is important to use the right tools specifically designed for acrylic polishing, such as a microfiber cloth or a soft cotton polishing wheel.
2. Applying too much pressure
Another mistake is applying excessive pressure while polishing acrylic edges. Acrylic is a relatively soft material, and too much pressure can cause the edges to become deformed or even crack. It is important to apply gentle and even pressure to avoid any damage. Let the polishing tools do the work and avoid forcing the material against the polishing surface.
3. Skipping the proper preparation
Proper preparation is crucial for achieving a smooth and polished finish. Skipping the preparation steps can result in a lackluster appearance and uneven surface. Before polishing, make sure to clean the acrylic edges thoroughly to remove any dirt or dust particles. Use a mild soap solution and a soft cloth to gently clean the surface. Additionally, ensure that the edges are properly sanded and smoothed before proceeding with the polishing process.
4. Neglecting the importance of proper technique
Polishing acrylic edges requires a specific technique to achieve the desired results. It is important to use circular motions while polishing to evenly distribute the polishing compound and avoid creating streaks or uneven patches. Take your time and be patient during the process to ensure a flawless finish.
5. Overlooking the need for multiple polishing stages
Acrylic edges may require multiple polishing stages to achieve the desired level of smoothness and shine. Some individuals make the mistake of assuming that a single round of polishing is sufficient. However, depending on the initial condition of the edges and the desired outcome, it may be necessary to repeat the polishing process with finer polishing compounds to achieve the best results.
6. Not using a finishing compound
A finishing compound is an essential component of the acrylic polishing process. It helps to remove any remaining fine scratches or imperfections and provides a clear and glossy finish. Some people overlook the importance of using a finishing compound, resulting in an incomplete or less polished look. Make sure to apply a small amount of finishing compound and follow the instructions carefully for the best outcome.
7. Failing to protect the polished edges
Once the acrylic edges are polished to perfection, it is crucial to protect them from potential damage. Neglecting to use protective methods, such as applying a clear sealant or edge protectors, can result in scratches or dents. Take the necessary precautions to ensure that the polished edges remain pristine and maintain their polished appearance for an extended period.
In summary, polishing acrylic edges requires attention to detail and the use of appropriate tools and techniques. By avoiding these common mistakes, you can achieve a flawless and professional finish. Remember to use the right tools, apply gentle pressure, properly prepare the edges, use the correct technique, perform multiple polishing stages if necessary, use a finishing compound, and protect the polished edges. With proper care and attention, your acrylic edges will have a polished look that enhances the overall aesthetic appeal of your project.
Best Polishing Techniques for Achieving a Smooth Finish
When it comes to achieving a smooth and polished finish, there are several techniques that can help you achieve the desired results. Whether you are working on a woodworking project, metalwork, or even polishing your car, using the right techniques can make all the difference. In this section, we will explore some of the best polishing techniques that can help you achieve a smooth finish.
1. Sanding
Sanding is a fundamental step in the polishing process. It involves using sandpaper or abrasive pads to remove any imperfections or rough surfaces from the material. The key to successful sanding is to start with a coarse grit and gradually progress to finer grits. This allows you to gradually smooth out the surface while removing any scratches or marks left behind by the previous grit.
Using a back-and-forth or circular motion, sand the material gently, applying steady pressure. Be sure to keep the sanding surface flat and even to avoid creating uneven areas. Remember to always sand in the direction of the grain or pattern to achieve the best results.
2. Polishing Compounds
Polishing compounds are abrasive substances that help remove fine scratches, swirl marks, and dullness from the surface. They come in different forms, such as pastes, creams, or powders, and are available in various grit levels, ranging from coarse to fine.
To use a polishing compound, apply a small amount onto a soft cloth or polishing pad. Gently rub the compound onto the surface using circular motions. Allow the compound to sit for a few minutes, then buff it off using a clean cloth. Repeat the process if necessary until the desired level of smoothness is achieved.
3. Buffing
Buffing is a technique that involves using a buffing wheel or pad to create a high shine and smooth finish on the material. Buffing can be done by hand or with the help of a power tool, such as a rotary buffer.
To buff by hand, apply a small amount of polishing compound onto the surface and rub it in using circular motions. Then, use a clean cloth or buffing pad to buff the surface until a high shine is achieved.
If using a power tool, attach a buffing pad to the rotary buffer and apply the polishing compound onto the surface. Hold the buffer at a slight angle and move it across the surface in a slow, overlapping motion. Be careful not to apply too much pressure, as this can cause damage to the material. Continue buffing until a smooth and shiny finish is attained.
4. Diamond Polishing
Diamond polishing is a technique often used for polishing hard materials such as granite, marble, or concrete. It involves using diamond-impregnated pads or discs to grind and polish the surface.
Start with a coarse diamond pad and gradually work your way up to finer grits. Use water as a lubricant to prevent overheating and to help flush away any debris. Move the diamond pad in a back-and-forth or circular motion, covering the entire surface evenly. Repeat the process with each finer grit until the desired level of smoothness and shine is achieved.
5. Waxing
Waxing is a final step that adds an extra layer of protection and enhances the shine of the polished surface. It is commonly used on materials such as wood, metal, and automobiles.
To wax the surface, apply a thin, even layer of wax using a soft cloth or applicator pad. Allow the wax to dry for a few minutes, then buff it off using a clean cloth. This will leave behind a smooth, glossy finish that helps protect the material from moisture, UV rays, and other environmental factors.
Summary
Achieving a smooth finish requires the right techniques and attention to detail. Starting with sanding to remove imperfections, using polishing compounds to refine the surface, and buffing or diamond polishing to create a high shine, all contribute to a smooth and polished finish. Finally, applying wax adds an extra layer of protection and enhances the overall appearance. By employing these techniques, you can ensure that your finished project or product has a professional and flawless look.
Tips for Maintaining Polished Acrylic Edges
Acrylic is a versatile and popular material used in various applications, from signage to furniture. One of the key features of acrylic is its smooth and polished edges, which can enhance the overall aesthetic appeal of the finished product. However, over time, the edges of acrylic can become dull or scratched, diminishing its visual appeal. To ensure that your acrylic edges remain polished and pristine, here are some helpful tips:
1. Proper Handling and Storage
When working with acrylic, it’s important to handle it with care. Avoid placing excessive pressure on the edges, as this can cause cracks or chips. Always use both hands when lifting or moving acrylic sheets to distribute the weight evenly and reduce the risk of damage. Additionally, store acrylic sheets in a cool, dry place away from direct sunlight to prevent warping or discoloration.
2. Avoid Harsh Cleaning Agents
When it comes to cleaning acrylic edges, it’s crucial to avoid using harsh chemicals or abrasive cleaners. These can cause surface damage, leaving scratches or cloudiness on the edges. Instead, opt for a mild soap or acrylic cleaner specifically designed for acrylic surfaces. Gently wipe the edges with a soft, lint-free cloth or sponge in a circular motion to remove any dirt or residue.
3. Regular Dusting and Maintenance
To maintain the polished appearance of acrylic edges, it’s important to regularly dust and clean them. Dust particles and debris can accumulate on the edges, making them appear dull or dirty. Use a clean, dry microfiber cloth or an acrylic cleaning brush to gently remove any dust or debris from the edges. Avoid applying excessive pressure, as this can cause scratches.
4. Use a Plastic Polish
If the edges of your acrylic start to lose their shine or develop small scratches, you can restore their appearance using a plastic polish. Choose a non-abrasive plastic polish specifically formulated for acrylic surfaces. Apply a small amount of the polish to a soft cloth and gently buff the edges in a circular motion. This will help to remove fine scratches and restore the glossy finish.
5. Protective Film or Edge Banding
To prevent scratches or scuffs on the edges of acrylic, consider using a protective film or edge banding. These protective measures can add an extra layer of defense against everyday wear and tear. The film can be easily applied to the edges, acting as a shield against scratches, while edge banding provides a decorative and protective cover.
6. Professional Restoration
If your acrylic edges have significant damage or are heavily scratched, it may be best to seek professional help for restoration. Professional acrylic polishing services can effectively remove scratches, restore the original finish, and bring back the polished look to your acrylic edges.
Summary
Maintaining polished acrylic edges is essential for preserving the visual appeal of acrylic products. By following these tips for proper handling, cleaning, and maintenance, you can keep your acrylic edges looking polished and pristine for a long time. Remember to handle acrylic with care, avoid harsh cleaning agents, regularly dust and clean the edges, consider using a plastic polish or protective measures, and seek professional restoration when needed. With these tips, you can ensure that your acrylic edges always maintain their glossy finish and enhance the overall beauty of your projects.
FAQs
How do I polish acrylic edges?
To polish acrylic edges, start by sanding them with progressively finer grit sandpaper. Then, use a buffing wheel or a handheld buffer with a polishing compound to achieve a smooth and shiny finish. Finally, clean the acrylic with a mild soap and water solution to remove any residue.
Conclusion
In conclusion, learning how to polish acrylic edges can greatly enhance the overall appearance of your acrylic projects. By following the proper techniques and using the right tools, you can achieve smooth and glossy edges that will elevate the visual appeal of your finished pieces.
Remember to start with coarse sandpaper to remove any rough edges, then gradually move to finer grits for a smoother finish. Using a polishing compound and a buffing wheel can help to bring out a high shine on the acrylic edges. Regular maintenance and cleaning will also ensure that your polished acrylic edges remain pristine and flawless for years to come.
Whether you are working on acrylic displays, signage, or DIY projects, taking the time to polish the edges will make a significant difference in the overall quality and professionalism of your work. So, grab your sandpaper, polishing compound, and buffing wheel, and enjoy creating beautifully polished acrylic edges.