
If you are looking for a way to machine acrylic, you have come to the right place. Acrylic, also known as Plexiglass, is a versatile and durable material that can be used in various applications. However, machining acrylic requires some specific techniques to ensure clean cuts and smooth edges. In this guide, we will discuss the steps and techniques involved in machining acrylic, including selecting the right tools, preparing the material, and executing the cutting process. Whether you are a DIY enthusiast or a professional, these tips will help you achieve accurate and professional-looking results when machining acrylic.
Choosing the Right Tools for Machining Acrylic
Machining acrylic requires careful selection of tools to ensure clean and accurate results. Acrylic, also known as Plexiglas or Perspex, is a versatile material commonly used in various industries for its transparency, durability, and ease of fabrication. Whether you’re a hobbyist or a professional, having the right tools at your disposal is crucial for achieving optimal results. In this section, we will discuss the key factors to consider when choosing tools for machining acrylic.
1. Cutting Tools
When it comes to cutting acrylic, using the correct tool is essential to prevent chipping, cracking, and melting. Here are some cutting tools commonly used for machining acrylic:
- Carbide Tipped Saw Blades: These blades are designed to handle the rigidity of acrylic, providing clean and precise cuts. They are available in various sizes and tooth configurations to suit different cutting requirements.
- Router Bits: Router bits with a high number of cutting edges and a low helix angle are recommended for cutting acrylic. These bits help reduce the risk of melting or chipping the material during the routing process.
- Score Knives: Score knives are used for creating deep grooves in the acrylic, allowing for neat and precise snapping. They are particularly useful for scoring straight lines or simple shapes.
2. Clamping and Fixturing
Proper clamping and fixturing techniques are essential for holding acrylic securely in place during machining. This ensures stability, prevents vibrations, and minimizes the risk of workpiece movement, which can lead to inaccuracies or damage. Consider the following options:
- Double-Sided Tape: Using double-sided tape is a simple and effective way to secure smaller pieces of acrylic to the work surface. It provides a strong bond while allowing easy removal without leaving residue.
- Clamps: Clamps are commonly used to hold larger acrylic sheets in place. Ensure that the clamps are positioned strategically to exert even pressure and distribute the load evenly across the workpiece.
- Jigs and Fixtures: Custom jigs and fixtures can be designed to securely hold and support acrylic during machining operations. They provide stability and repeatability, ensuring consistent results.
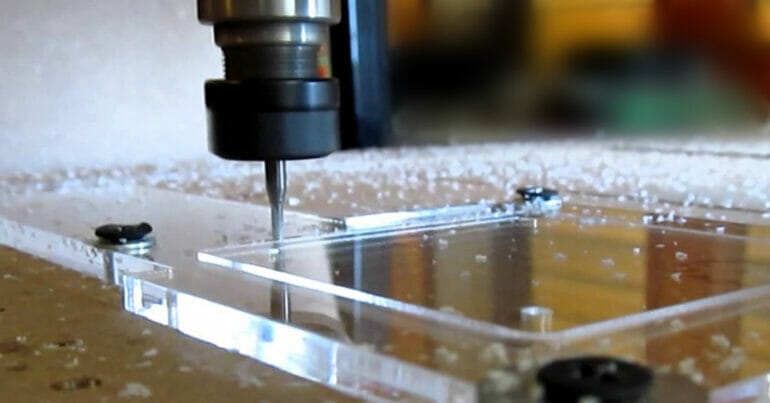
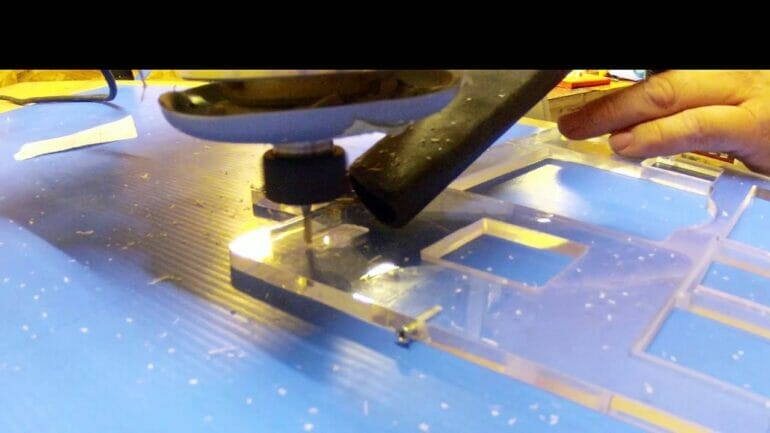
3. Drilling and Milling Tools
Drilling holes and milling acrylic requires specialized tools to prevent cracking and ensure precise results. Here are some tools commonly used for drilling and milling acrylic:
- Step Drills: Step drills provide a smooth and controlled drilling process, minimizing the risk of cracking or splintering. They are ideal for creating holes of various sizes without the need for multiple drill bits.
- End Mills: End mills with a high helix angle and a sharp cutting edge are suitable for milling acrylic. They help achieve clean and precise cuts, reducing the chances of melting or chipping.
- Countersink Bits: Countersink bits are useful for creating chamfered or countersunk holes in acrylic. They ensure a clean finish and eliminate the need for additional deburring or finishing processes.
4. Safety Equipment
Working with acrylic requires the use of appropriate safety equipment to protect yourself from potential hazards. Ensure that you have the following safety gear:
- Safety Glasses or Face Shield: Protect your eyes and face from flying debris, chips, and dust particles by wearing safety glasses or a face shield specifically designed for machining applications.
- Dust Extraction System: Acrylic machining produces fine dust particles that can be harmful when inhaled. Use a dust extraction system or a vacuum attachment to minimize dust exposure and maintain a clean working environment.
- Protective Gloves: Wear gloves to protect your hands from sharp edges, cuts, and splinters. Choose gloves that provide dexterity and a good grip to ensure safe handling of the acrylic.
In summary, choosing the right tools for machining acrylic is crucial for achieving clean, accurate, and safe results. Consider the cutting tools, clamping
Preparing and Measuring the Acrylic Sheet
Before working with acrylic sheets, it’s important to properly prepare and measure them to ensure accurate and precise cuts. Here are the steps to follow:
1. Gather the Necessary Tools
First, gather all the necessary tools and materials needed for the job. This may include:
- Acrylic sheet
- Measuring tape
- Straight edge or ruler
- Marker or pen
- Masking tape or painter’s tape
- Safety goggles
- Clamps (optional, for securing the acrylic sheet)
2. Measure and Mark the Acrylic Sheet
Place the acrylic sheet on a flat and stable surface. Use a measuring tape to determine the desired dimensions for your project. Measure the length and width of the sheet, and mark the measurements with a marker or pen.
For straight cuts, use a straight edge or ruler to connect the marked points and create a cutting line. Take your time to ensure the line is straight and accurate.
3. Secure the Acrylic Sheet (Optional)
If necessary, you can secure the acrylic sheet to the work surface using clamps. This will prevent the sheet from moving during the cutting process and help maintain accuracy.
Alternatively, you can use masking tape or painter’s tape to secure the sheet by placing strips across the cutting line. This can help prevent chipping or cracking of the acrylic during the cutting process.
4. Choose the Cutting Method
There are several methods you can use to cut an acrylic sheet, depending on the thickness and your available tools:
- Scoring and snapping: This method is suitable for thinner sheets. Score the sheet along the cutting line using a utility knife or acrylic scoring tool. Then, apply pressure on the scored line to snap the sheet along the desired cut.
- Circular saw or jigsaw: For thicker sheets, a circular saw or jigsaw with a fine-toothed blade designed for cutting acrylic can be used. Place the sheet on a stable surface and carefully cut along the marked line.
- Table saw or bandsaw: If you have access to a table saw or bandsaw with a blade suitable for acrylic, it can be used for precise and clean cuts. Ensure the sheet is properly supported and guided through the saw to maintain accuracy.
5. Cutting the Acrylic Sheet
When cutting the acrylic sheet, make sure to wear safety goggles to protect your eyes from any flying debris or shards. Start the cutting process slowly and steadily, applying gentle pressure to avoid chipping or cracking.
Always follow the manufacturer’s guidelines for the specific cutting method you are using, and take necessary safety precautions.
6. Remove any Protective Film
If your acrylic sheet has a protective film, carefully remove it after the cutting process is complete. This will reveal the clear and smooth surface of the sheet.
7. Clean and Polish the Cut Edges (Optional)
If desired, you can clean and polish the cut edges of the acrylic sheet for a finished look. This can be done using sandpaper or a specialized acrylic polishing compound.
Remember to handle the acrylic sheet with care to avoid scratching or damaging the surface.
By following these steps, you can properly prepare and measure the acrylic sheet for your project, ensuring precise cuts and a professional result.
Techniques for cutting acrylic with precision
Acrylic is a versatile material commonly used in various industries for its transparency, durability, and ease of fabrication. Whether you are a DIY enthusiast or a professional, cutting acrylic with precision is essential to achieve clean and accurate results. In this section, we will explore different techniques that can help you cut acrylic with accuracy and efficiency.
1. Score and Snap Method
The score and snap method is one of the simplest ways to cut acrylic. It involves scoring a straight line on the surface of the acrylic sheet using a scoring knife or a utility knife. Once the line is scored, you can snap the sheet along the scored line by applying gentle pressure on both sides of the cut. This technique is ideal for thinner acrylic sheets.
2. Table Saw
If you are dealing with thicker acrylic sheets or need more precise cuts, using a table saw can be a suitable option. Ensure that the table saw is equipped with a fine-toothed blade suitable for cutting acrylic. Set the blade height slightly higher than the thickness of the acrylic sheet to prevent chipping. Secure the sheet firmly and guide it through the saw, maintaining a steady pace for smooth and accurate cuts.
3. Laser Cutting
Laser cutting is a highly precise and efficient method for cutting acrylic. It utilizes a focused laser beam to melt or evaporate the acrylic material along the desired cutting path. Laser cutting allows for intricate designs and complex shapes with minimal material waste. However, laser cutting equipment can be expensive, making it more suitable for professional use or large-scale projects.
4. Router
A router is another tool that can be used to cut acrylic sheets with precision. Use a router bit specifically designed for acrylic to ensure clean and smooth cuts. Secure the acrylic sheet firmly and guide the router along the cutting path, maintaining a consistent speed and pressure. This method is particularly effective for curved or irregular cuts.
5. Bandsaw
A bandsaw equipped with a fine-toothed blade can also be used to cut acrylic. This method is ideal for cutting thicker acrylic sheets or creating intricate shapes. Adjust the blade tension and speed according to the thickness of the acrylic sheet. Ensure proper support and control while cutting to minimize vibrations and achieve accurate cuts.
6. Circular Saw
If you need to cut large acrylic sheets or make long straight cuts, a circular saw can be a suitable option. Use a fine-toothed blade designed for cutting plastics. Attach a guide rail or a straight edge to ensure a straight cutting line. Secure the acrylic sheet and guide the circular saw along the cutting path, maintaining a steady pace and applying even pressure.
In summary, cutting acrylic with precision requires the right tools and techniques. Whether you choose the score and snap method for thinner sheets or opt for tools like table saws, laser cutters, routers, bandsaws, or circular saws for thicker sheets or intricate designs, following proper safety measures and taking your time will help you achieve clean and accurate cuts. Choose the method that best suits your project requirements and always practice on scrap pieces before working on your final acrylic sheet.
Best Practices for Drilling Holes in Acrylic
When working with acrylic, it is important to follow best practices to ensure clean and accurate holes. Acrylic, also known as plexiglass, is a lightweight and durable material often used in DIY projects, signage, and various applications. Drilling holes in acrylic requires careful attention and the right techniques to avoid cracking or damaging the material. In this section, we will discuss the best practices to achieve successful results when drilling holes in acrylic.
1. Select the Right Drill Bit
The first step in drilling holes in acrylic is choosing the right drill bit. It is recommended to use a drill bit specifically designed for plastic or acrylic materials. These drill bits have a sharp point and a low spiral angle to prevent chipping and cracking. Avoid using regular metal drill bits, as they can cause damage to the acrylic.
2. Mark the Hole Placement
Before drilling, it is important to mark the exact placement of the holes on the acrylic surface. Use a ruler or measuring tape to measure and mark the desired hole locations. Double-check the measurements to ensure accuracy. You can use a pencil or a marker to make the marks, as they can easily be removed later.
3. Secure the Acrylic
For safe drilling, it is crucial to secure the acrylic sheet properly. Place the acrylic on a flat surface or a workbench, ensuring that it is stable and does not move during the drilling process. If needed, you can use clamps or a vice to hold the acrylic securely in place. This will prevent the material from vibrating or slipping, reducing the risk of cracks or damage.
4. Apply Tape to the Drilling Area
To minimize the risk of chipping or cracking, it is recommended to apply masking tape over the area where the hole will be drilled. This will act as a protective barrier and help prevent the acrylic from splintering. Make sure the tape is firmly pressed down to create a smooth surface for drilling.
5. Start with a Pilot Hole
When drilling holes in acrylic, it is best to start with a small pilot hole before drilling the final size. This will help guide the drill bit and prevent the acrylic from cracking. Use a drill bit that is slightly smaller than the desired hole size and carefully drill through the acrylic at a slow speed. Once the pilot hole is created, you can proceed to enlarge it to the desired size.
6. Use a Slow Speed and Gentle Pressure
When drilling acrylic, it is crucial to use a slow speed and apply gentle pressure. High speeds and excessive force can cause the acrylic to melt or crack. Set your drill to a low speed setting and let the drill bit do the work. Apply steady and even pressure to avoid overheating or damaging the acrylic.
7. Cool the Drill Bit
Acrylic generates heat when drilled, which can lead to melting or discoloration of the material. To prevent this, it is essential to cool the drill bit periodically during the drilling process. You can do this by dipping the drill bit in water or using a lubricant specifically designed for drilling acrylic. This will help dissipate the heat and ensure smooth drilling.
8. Clean and Deburr the Holes
Once the drilling is complete, remove the masking tape and inspect the holes for any debris or burrs. Use a deburring tool or a countersink bit to remove any rough edges or burrs around the holes. This will provide a clean and professional finish to your drilled holes.
9. Handle with Care
After drilling the holes, it is important to handle the acrylic with care to avoid any accidental damage. Avoid placing excessive pressure or force on the drilled areas. Clean the acrylic surface gently using a soft cloth and mild soap or acrylic cleaner, if needed.
Summary
Drilling holes in acrylic requires precision and attention to detail to prevent cracking or damaging the material. By following these best practices, you can achieve clean and accurate holes in acrylic. Remember to select the right drill bit, mark the hole placement accurately, secure the acrylic properly, apply tape to the drilling area, start with a pilot hole, use a slow speed and gentle pressure, cool the drill bit, clean and deburr the holes, and handle the acrylic with care. Following these steps will help you successfully drill holes in acrylic and create professional-looking results for your DIY projects or applications.
Polishing and Finishing Techniques for a Professional Look
When it comes to creating a professional look, the final touches are crucial. Whether you are working on a woodworking project, a piece of jewelry, or even a painting, the polishing and finishing techniques you use can make all the difference. In this section, we will explore some tried and true methods to help you achieve a polished and professional look for your creations.
1. Sanding
Sanding is an essential step in the finishing process. It helps to smooth out any rough surfaces, remove imperfections, and prepare the surface for further treatments. Start with a coarse-grit sandpaper to remove any large imperfections, and gradually work your way up to finer grits for a smoother finish. Remember to sand in the direction of the grain for wood projects.
2. Staining
If you are working with wood, staining can add depth and color to your project. Choose a stain that complements the type of wood you are using and apply it evenly with a brush or a cloth. Allow the stain to penetrate the wood for the recommended time, and then wipe off any excess. Multiple coats may be necessary for a deeper color, but be sure to let each coat dry before applying the next one.
3. Varnishing
Varnishing not only adds a protective layer to your project but also enhances its appearance. Choose a varnish that suits your needs, whether it’s a glossy, satin, or matte finish. Apply the varnish with a brush, following the direction of the grain. Allow each coat to dry thoroughly before sanding lightly with a fine-grit sandpaper and applying the next coat. Multiple coats may be required for a durable finish.
4. Polishing
Once the varnish has dried, polishing can give your project that final professional touch. There are various polishing methods depending on the material you are working with:
- For metal surfaces, you can use metal polish or a polishing compound to remove any tarnish or scratches. Apply the polish with a soft cloth and buff until you achieve the desired shine.
- For jewelry, a jewelry polishing cloth or a jewelry polishing compound can help restore the sparkle and shine. Gently rub the cloth or compound onto the jewelry until it shines.
- For painted surfaces, a polishing compound or a wax can be used to remove any imperfections and enhance the shine. Apply the compound or wax with a soft cloth and buff until you achieve a smooth and glossy finish.
5. Detailing
Don’t forget the importance of detailing in achieving a professional look. Pay attention to the small details, such as cleaning up any excess glue or paint, removing any visible seams, and ensuring that all edges are smooth and well-defined. Use appropriate tools, such as a chisel or sandpaper, to refine the details and create clean lines.
6. Final Inspection
Before considering your project complete, take the time to inspect it thoroughly. Look for any remaining imperfections, such as scratches, dents, or uneven finishes. Make any necessary touch-ups or adjustments to ensure a polished and professional look.
Summary
Polishing and finishing techniques play a vital role in achieving a professional look for your creations. From sanding and staining to varnishing and polishing, each step contributes to the overall appearance and quality of your project. Remember to pay attention to the details and conduct a final inspection to ensure a flawless finish. With these techniques in your toolkit, you can elevate your work to the next level and create a truly professional look.
Frequently Asked Questions
1. How do I machine acrylic?
When machining acrylic, it is important to use a high-speed router or a CNC machine with a sharp carbide or diamond cutting tool. Keep the speed and feed rate moderate to prevent melting or chipping. Use a lubricant or coolant to reduce heat buildup. Properly secure the acrylic sheet to prevent vibrations and ensure clean and precise cuts.
2. What precautions should I take when machining acrylic?
When machining acrylic, always wear safety goggles, gloves, and a dust mask to protect yourself from plastic shards and dust. Use proper ventilation to prevent the buildup of fumes. Avoid using excessive force or rapid movements, as it can lead to cracking or breaking of the acrylic. Regularly inspect and maintain your cutting tools for optimal performance.
3. What are the recommended cutting tools for acrylic machining?
For machining acrylic, it is recommended to use sharp carbide or diamond cutting tools specifically designed for cutting plastics. These tools provide clean and smooth cuts with minimal chipping or melting. Avoid using saw blades or tools with a high tooth count, as they can cause excessive heat generation and damage the acrylic.

Conclusion
In conclusion, learning how to machine acrylic can open up a world of possibilities for DIY enthusiasts and professionals alike. With the right tools and techniques, you can create precision cuts and intricate designs on acrylic surfaces. Whether you’re creating custom signage, prototypes, or decorative pieces, machining acrylic allows you to bring your ideas to life with clarity and durability.
By following the proper safety precautions and understanding the unique properties of acrylic, you can achieve smooth cuts and avoid melting or chipping. Practice and experimentation are key to mastering this skill, so don’t be discouraged by initial challenges. Keep pushing yourself to improve, and soon you’ll be able to create stunning acrylic projects with ease.