
Yes, you can put acrylic on an exposed nail bed. Acrylic nails are a popular choice for adding length and strength to your natural nails. They can be applied to the exposed nail bed to create a smooth and polished appearance. However, it is important to note that if you have an exposed nail bed due to an injury or infection, it is best to seek professional advice from a nail technician or a healthcare professional before applying acrylic nails. They will be able to assess the condition of your nail bed and provide appropriate recommendations.
Benefits of Using Acrylic for Nail Extensions
Acrylic nail extensions have gained significant popularity in recent years due to their versatility, durability, and aesthetic appeal. Whether you are a professional nail technician or someone who loves experimenting with different nail designs, acrylic nails offer numerous benefits that make them a top choice for nail extensions. In this section, we will explore the advantages of using acrylic for nail extensions.
1. Durability
One of the key benefits of using acrylic for nail extensions is their exceptional durability. Acrylic nails are strong and resistant to breaking or chipping, making them a long-lasting option. This durability is especially beneficial for individuals who have weak or brittle nails and struggle to maintain longer nails. With acrylic extensions, you can enjoy beautiful, strong nails that can withstand daily activities without worrying about constant repairs.
2. Versatility
Acrylic nails offer unparalleled versatility when it comes to nail designs. Whether you prefer a natural look or want to go all-out with vibrant colors and intricate patterns, acrylic nails can be customized to suit your preferences. Nail technicians can shape and mold acrylic extensions to create various nail shapes, including stiletto, coffin, almond, or square. Furthermore, acrylic nails can be easily painted, allowing you to experiment with different colors and nail art designs.
3. Easy Maintenance
Maintaining acrylic nail extensions is relatively simple and hassle-free. Unlike gel nails, acrylic nails do not require frequent curing under a UV or LED lamp. Once the acrylic is applied and cured, you can enjoy beautiful nails without the need for additional maintenance. Additionally, if an acrylic nail breaks or chips, it can be easily repaired by a professional nail technician without having to remove the entire set of extensions.
4. Customizable Length
Another advantage of using acrylic for nail extensions is the ability to customize the length of your nails. Whether you prefer shorter, more natural-looking nails or want to rock long, dramatic extensions, acrylic nails can be tailored to your desired length. This flexibility allows you to achieve the nail length that best complements your personal style and preferences.
5. Affordability
Compared to other nail extension options, acrylic nails are generally more affordable. Acrylic powder and liquid, the main components used in creating acrylic extensions, are readily available and cost-effective. This affordability makes acrylic nails a popular choice among individuals who want to enhance their nails without breaking the bank.
6. Quick Application
Acrylic nail extensions can be applied relatively quickly, making them a convenient option for those who are short on time. Nail technicians can expertly apply the acrylic mixture to your nails, shape them, and have them ready to go in a shorter amount of time compared to other extension methods.
7. Strengthens Natural Nails
Contrary to popular belief, acrylic nail extensions can actually help strengthen natural nails. The acrylic material acts as a protective layer that shields the natural nails from external damage, such as excessive moisture or harsh chemicals. This can be particularly beneficial for individuals who have weak or brittle nails and are looking for a solution that promotes nail health.
In summary, acrylic nail extensions offer a range of benefits that make them a popular choice among nail enthusiasts. Their durability, versatility, easy maintenance, customizable length, affordability, quick application, and nail-strengthening properties make acrylic nails an excellent option for anyone looking to enhance their nail game.
Step-by-Step Guide to Applying Acrylic on Exposed Nail Beds
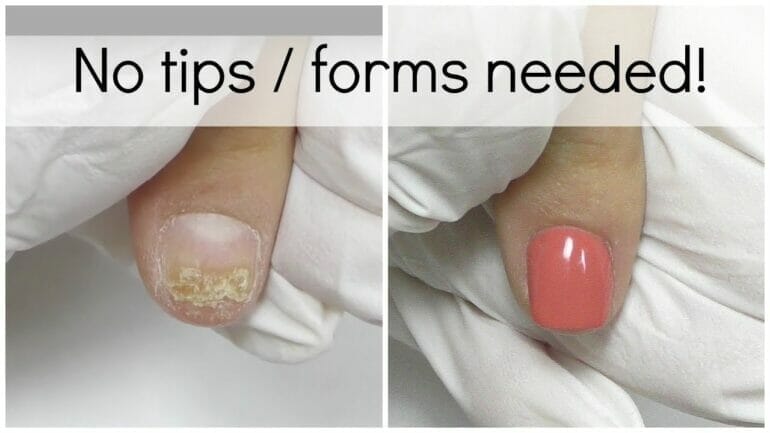
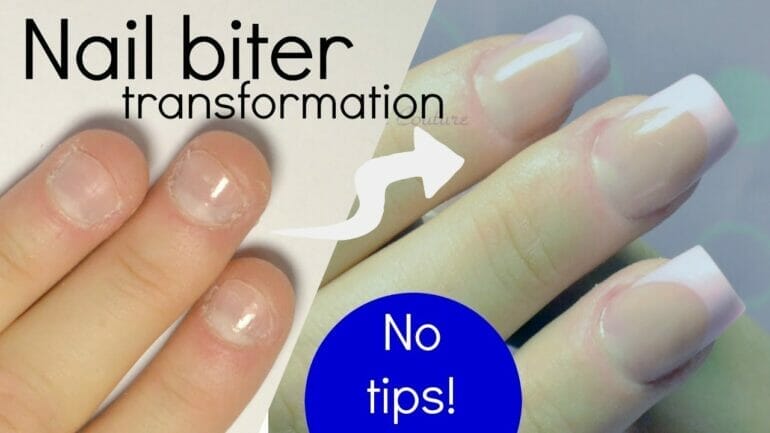
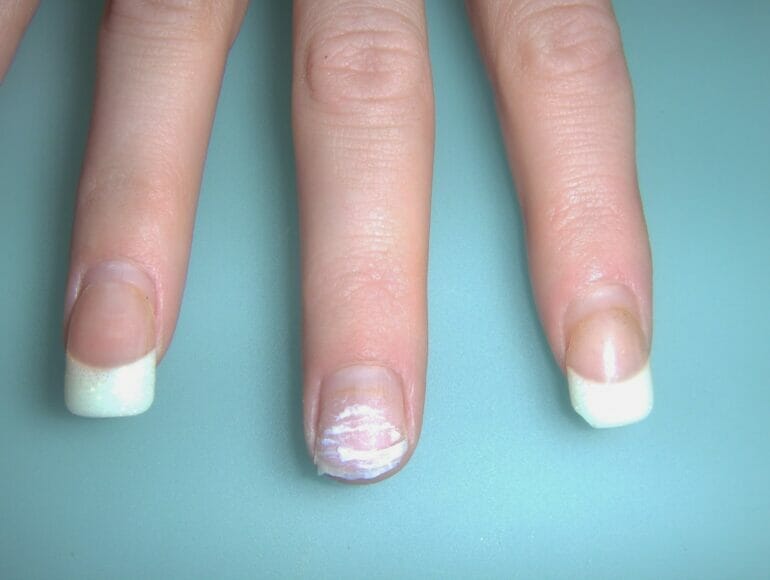
Exposing nail beds can be a common problem for many individuals. Whether it’s due to biting nails, removing gel polish improperly, or any other reason, having exposed nail beds can be uncomfortable and make your nails look less appealing. Luckily, applying acrylic on exposed nail beds can help protect and enhance the appearance of your nails. In this section, we will provide you with a step-by-step guide on how to apply acrylic on exposed nail beds.
Step 1: Prepare Your Nails
Before applying acrylic, it’s essential to prepare your nails properly to ensure the best results. Start by removing any existing nail polish using acetone or a nail polish remover. Next, use a cuticle pusher or orange stick to gently push back the cuticles and remove any excess skin around the nail bed. Trim and shape your nails using a nail file, and buff the surface of your nails to create a smooth base for the acrylic application.
Step 2: Gather Your Supplies
Make sure you have all the necessary supplies before starting the acrylic application process. You will need acrylic powder, acrylic liquid (monomer), a small glass dappen dish, a synthetic brush, a paper towel or lint-free cloth, a nail primer, and a UV or LED lamp (if you are using a gel acrylic system).
Step 3: Apply Nail Primer
Apply a thin coat of nail primer to each nail bed. Nail primer helps the acrylic adhere better to the nail and ensures a longer-lasting result. Allow the primer to dry completely before moving on to the next step.
Step 4: Mix Acrylic Powder and Liquid
Pour a small amount of acrylic liquid into the glass dappen dish, and dip the synthetic brush into the liquid. Wipe off any excess liquid on the rim of the dish. Then, dip the brush into the acrylic powder and create a small bead on the brush. Gently press the bead onto the exposed nail bed and start spreading it towards the tip of the nail, working in thin and even strokes. Repeat this process for each nail.
Step 5: Shape and File the Acrylic
Once the acrylic has dried and hardened, it’s time to shape and file the nails. Use a nail file to shape the acrylic to your desired length and shape. Be gentle and take your time to avoid damaging the acrylic or your natural nails. After shaping, use a buffer to smooth out any rough edges or imperfections.
Step 6: Apply Top Coat (Optional)
If you prefer a glossy finish or added protection, you can apply a top coat. This step is optional but can help prolong the durability and shine of your acrylic nails. Apply a thin layer of top coat and cure it under the UV or LED lamp (if using a gel acrylic system).
Step 7: Moisturize and Maintain
After completing the acrylic application, it’s crucial to moisturize your cuticles and nails regularly. Apply cuticle oil or a moisturizing nail cream to keep your nails and cuticles hydrated. Additionally, be gentle with your nails and avoid using them as tools to prevent any damage to the acrylic.
In summary, applying acrylic on exposed nail beds can help protect and enhance the appearance of your nails. By following this step-by-step guide, you can achieve beautiful and long-lasting acrylic nails. Remember to prepare your nails properly, gather all the necessary supplies, apply nail primer, mix the acrylic powder and liquid, shape and file the acrylic, optionally apply a top coat, and moisturize and maintain your nails regularly for optimal results.
Precautions to Take When Using Acrylic on Nail Beds
Acrylic nails are a popular choice for enhancing the appearance of natural nails. They offer length, strength, and a polished finish. However, it’s important to take certain precautions when using acrylic on nail beds to ensure the health and safety of your nails.
1. Protect the Nail Bed
Prior to applying acrylic, it is crucial to protect the nail bed to prevent damage. One way to do this is by applying a thin layer of petroleum jelly or a cuticle oil around the nails. This creates a barrier between the acrylic and the skin, reducing the risk of irritation or allergic reactions.
2. Ensure Proper Ventilation
Acrylic nails require the use of strong chemicals, such as acrylic liquid and powder. These chemicals can emit fumes that may be harmful if inhaled in excessive amounts. To minimize the risk, ensure that you’re working in a well-ventilated area. Open windows or use a fan to improve air circulation. Additionally, wearing a mask can provide an additional layer of protection.
3. Use High-Quality Products
The quality of the acrylic products used can greatly affect the overall result and the health of your nails. It’s important to choose products from reputable brands that are specifically designed for use on nail beds. Low-quality products may contain harsh chemicals or inadequate ingredients, which can lead to nail damage or allergies.
4. Avoid Overfilling
Overfilling the acrylic on the nail bed can result in added pressure and stress on the natural nail. This can lead to discomfort, pain, and even nail damage. It’s important to apply the acrylic in thin layers, ensuring that the natural nail is not overloaded with product.
5. Maintain Regular Nail Care Routine
While acrylic nails can enhance the appearance of your nails, it’s essential to maintain a regular nail care routine. Regularly clean your nails, moisturize your cuticles, and keep the nails well-trimmed. This helps to prevent the accumulation of dirt and bacteria, reducing the risk of infections or other nail-related issues.
6. Take Breaks Between Applications
Continuously wearing acrylic nails without breaks can weaken the natural nail bed. It’s important to give your nails a break between applications to allow them to breathe and recover. This break will promote healthy nail growth and prevent the nails from becoming weak or brittle.
7. Seek Professional Help
If you’re unsure about using acrylic on your nail beds or facing any issues related to acrylic nails, it’s always best to seek professional help. A licensed nail technician or a dermatologist can provide valuable guidance and assistance in maintaining the health and safety of your nails.
In summary, acrylic nails can be a great way to enhance the look of your natural nails. However, it’s crucial to take precautions to protect your nail beds. By following these guidelines and practicing proper nail care, you can enjoy beautiful acrylic nails while maintaining the health and safety of your natural nails.
Alternatives to Acrylic for Exposed Nail Beds
If you have exposed nail beds, you may be looking for alternatives to acrylic nails. While acrylic nails can provide a temporary solution for covering and protecting your nails, they may not be the best option for everyone. In this section, we will explore some alternative options that you can consider.
Gel Manicures
Gel manicures are a popular alternative to acrylic nails for exposed nail beds. Unlike acrylic nails, gel manicures do not require the use of harsh chemicals or strong adhesives. Instead, a gel polish is applied to your natural nails and cured under a UV or LED lamp. This process provides a durable and long-lasting manicure that can help protect your nails while allowing them to breathe.
One of the key benefits of gel manicures is their flexibility and natural-looking appearance. The gel polish is thinner and more flexible than acrylic, which means it can withstand everyday activities without easily chipping or breaking. Additionally, gel manicures can be easily removed at a salon or at home using acetone, minimizing the potential for damage to your natural nails.
Dip Powder Nails
An alternative to both acrylic and gel manicures is dip powder nails. This technique involves applying a base coat, dipping your nails into a colored powder, and sealing the powder with a top coat. The powder adheres to the base coat, creating a durable and long-lasting manicure.
Dip powder nails are known for their strength and longevity. They can withstand daily wear and tear, making them a great option for those with exposed nail beds. Additionally, dip powder nails do not require harsh chemicals or strong adhesives, making them a healthier alternative for your natural nails.
Nail Wraps
If you want to add some color or design to your nails without the use of acrylic, nail wraps can be a great option. Nail wraps are thin adhesive stickers that can be applied to your natural nails to create a variety of looks. They come in various designs, patterns, and colors, allowing you to express your personal style.
Nail wraps are easy to apply and remove, making them a convenient alternative to acrylic nails. They can be a temporary solution for covering and protecting exposed nail beds while allowing your natural nails to breathe and recover.
Nail Care and Maintenance
While considering alternatives to acrylic for exposed nail beds, it’s important to focus on nail care and maintenance. Taking care of your natural nails is essential for their health and appearance.
Make sure to keep your nails clean and dry to prevent bacteria or fungal infections. Avoid using your nails as tools to prevent breakage or damage. Moisturize your nails and cuticles regularly using a hydrating nail oil or cream.
Additionally, maintaining a healthy diet and lifestyle can contribute to strong and healthy nails. Consuming a balanced diet rich in vitamins and minerals, such as biotin, calcium, and iron, can promote nail growth and strength.
In summary
When it comes to alternatives to acrylic for exposed nail beds, there are several options to consider. Gel manicures, dip powder nails, and nail wraps can provide a temporary solution while allowing your natural nails to breathe and recover. However, it’s important to prioritize nail care and maintenance to ensure the health and strength of your natural nails.
How to Properly Remove Acrylic from Nail Beds
Acrylic nails are a popular choice for individuals who want to enhance the appearance of their natural nails. However, there may come a time when you want to remove the acrylic nails and give your nail beds a break. It’s important to follow the proper steps to safely and effectively remove the acrylic from your nail beds without causing any damage. In this section, we will discuss how to properly remove acrylic from nail beds.
Gather the necessary tools:
Before you begin the removal process, it’s important to gather all the necessary tools. You will need:
- Acetone or nail polish remover (preferably one that contains acetone)
- Cotton balls or pads
- Aluminum foil
- Orange stick or cuticle pusher
- Nail file or buffer
- Moisturizer or cuticle oil
Prepare your nails:
Start by trimming your acrylic nails down as much as possible using nail clippers. This will make the removal process easier and quicker.
Soak your nails:
Pour some acetone or nail polish remover into a small bowl. Soak cotton balls or pads in the acetone and place them directly on top of each nail. Wrap each finger with a small piece of aluminum foil to hold the cotton balls or pads in place.
Wait for the acrylic to loosen:
Allow the acetone-soaked cotton balls or pads to sit on your nails for about 10-15 minutes. This will help loosen the acrylic and make it easier to remove.
Remove the acrylic:
After the waiting period, remove the aluminum foil and gently start to lift off the acrylic nails using an orange stick or cuticle pusher. Be careful not to force the acrylic off, as this can cause damage to your natural nails.
Buff and file:
Once you have removed the acrylic nails, use a nail file or buffer to gently buff away any residue or remaining acrylic. This will help smooth out your natural nails and remove any rough edges.
Moisturize and nourish:
After removing the acrylic, it’s important to moisturize and nourish your nail beds. Apply a generous amount of moisturizer or cuticle oil to your nails and massage it in. This will help hydrate and strengthen your natural nails.
Take a break:
Now that you have successfully removed the acrylic from your nail beds, it’s a good idea to give your nails a break from any artificial enhancements. This will allow your natural nails to breathe and recover.
In summary, properly removing acrylic from nail beds requires gathering the necessary tools, preparing your nails, soaking them in acetone, waiting for the acrylic to loosen, gently removing the acrylic, buffing and filing any residue, moisturizing and nourishing your nails, and taking a break from artificial enhancements. By following these steps, you can safely and effectively remove acrylic nails without causing damage to your natural nails.
FAQs
Can you put acrylic on an exposed nail bed?
No, it is not recommended to put acrylic on an exposed nail bed. Acrylic nails require a healthy nail bed to properly adhere and provide a protective layer. Applying acrylic on an exposed nail bed can cause further damage and increase the risk of infection.
Conclusion
In conclusion, while applying acrylic directly on an exposed nail bed may seem like a quick fix, it is not recommended. The exposed nail bed is delicate and prone to infection, and covering it with acrylic can worsen the condition. It is crucial to prioritize the health and well-being of your nails.
Instead, if you have an exposed nail bed, it is best to seek professional help from a qualified nail technician or a dermatologist. They can guide you on the appropriate treatment and provide necessary care to ensure proper healing and prevent potential complications.
Remember, taking care of your nails and seeking professional advice is essential for maintaining healthy and beautiful nails in the long run.