
Looking to add a tropical touch to your acrylic paintings? Learn how to paint palm trees with ease and create stunning island-inspired artwork. With simple techniques and a few brushstrokes, you can capture the essence of these iconic trees on canvas. Whether you’re a beginner or an experienced artist, this step-by-step guide will help you master the art of painting palm trees and bring a slice of paradise to your artwork. So grab your paints and brushes, and let’s get started on this creative journey!

Step-by-step guide to painting realistic palm trees in acrylic
If you’re looking to add a touch of tropical paradise to your art, painting realistic palm trees in acrylic is a wonderful choice. With their iconic shape and vibrant green fronds, palm trees can instantly transport you to a sunny beach. In this step-by-step guide, we’ll take you through the process of creating a stunning palm tree painting.
Materials you’ll need:
Step 1: Prepare your surface
Start by preparing your canvas or painting surface. Make sure it’s clean and free from any dust or debris. If needed, apply a coat of gesso to prime the surface and create a smooth base for your painting.
Step 2: Sketch the palm tree
Using a pencil, lightly sketch the outline of the palm tree on your canvas. Pay attention to the overall shape and proportions of the tree. You can use a reference photo as a guide to ensure accuracy.
Step 3: Paint the trunk
Start by painting the trunk of the palm tree. Use a mixture of brown and a touch of yellow to create a warm, natural-looking color. Use a flat brush to apply the paint, following the contours of the trunk. Add texture and depth by varying the shades of brown and adding subtle highlights and shadows.
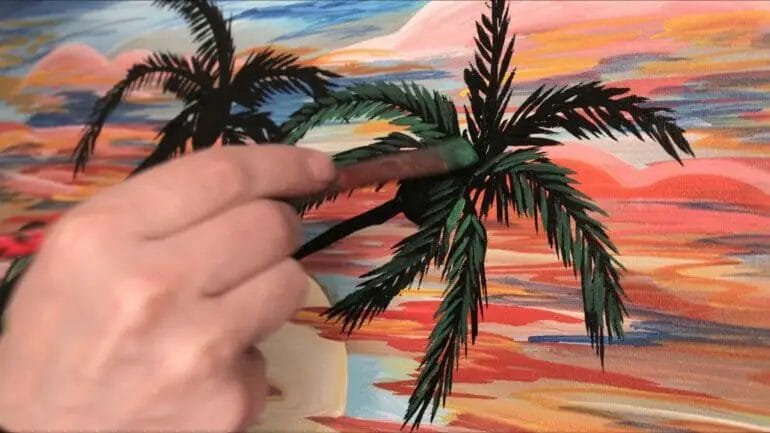
Step 4: Add the fronds
Now it’s time to paint the iconic fronds of the palm tree. Mix different shades of green using your acrylic paints. Start with a darker green for the base layer of the fronds. Use a round brush to paint the shape of the fronds, keeping them long and slender.
Once the base layer is dry, add lighter shades of green to create highlights and depth. Use quick, light strokes to mimic the texture of the palm fronds. Vary the direction and length of your brushstrokes to make the fronds look natural and realistic.
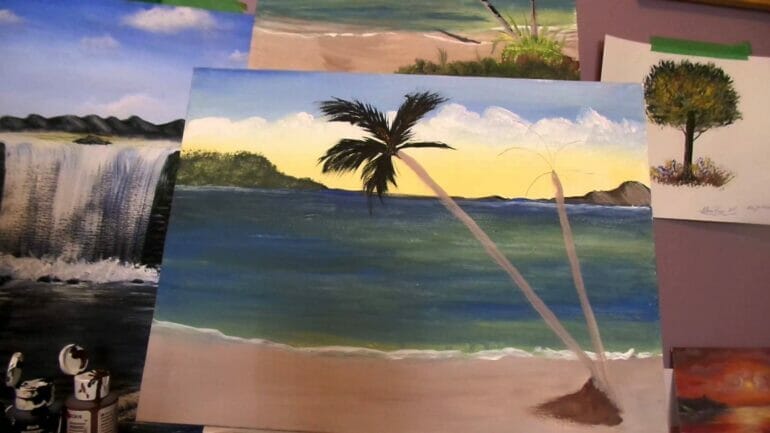
Step 5: Paint the background
While the palm tree dries, you can paint the background of your artwork. Choose a light blue color for the sky and a sandy color for the beach. Use a large flat brush to apply the paint in smooth, even strokes. Blend the colors to create a seamless transition between the sky and the beach.
Step 6: Final touches
Once your painting is dry, you can add some final touches to enhance the realism. Use a small round brush to add details such as coconuts, shadows, or highlights on the trunk. Don’t forget to add some texture to the sandy beach using a dry brush technique.
Summary
Painting realistic palm trees in acrylic can be a rewarding and enjoyable process. By following this step-by-step guide, you’ll be able to create a stunning tropical artwork that captures the essence of palm trees. Remember to take your time, experiment with different shades and brushstrokes, and most importantly, have fun!
Tips for Creating Depth and Texture in Palm Tree Paintings
Painting palm trees can be a delightful and rewarding experience. These beautiful trees evoke a sense of tropical paradise and provide a great opportunity to explore depth and texture in your artwork. Whether you are a beginner or an experienced artist, here are some tips to help you create realistic and visually engaging palm tree paintings.
1. Study and Observe Palm Trees
The first step in creating depth and texture in palm tree paintings is to study and observe palm trees in real life or through reference images. Take note of the various shapes, sizes, and textures of different palm tree species. Pay attention to how the leaves, trunk, and bark appear. Understanding the anatomy of palm trees will help you capture their unique characteristics accurately in your artwork.
2. Use Layering Techniques
Layering is an effective technique to add depth and dimension to your palm tree paintings. Start by creating a rough sketch of the palm tree’s structure and outline. Then, gradually build up layers of paint, starting with lighter colors and gradually adding darker tones. This technique allows you to create a sense of depth by adding shadows and highlights to different parts of the palm tree, such as the leaves and trunk.
3. Experiment with Brushstrokes
Varying your brushstrokes can enhance the texture of your palm tree painting. For the leaves, use thin, curved strokes to mimic their feathery appearance. Experiment with different brush sizes and shapes to create different leaf textures, such as fronds or fan-shaped leaves. For the trunk, consider using a dry brush technique to give it a rough and weathered look. Be mindful of the direction of your brushstrokes to create a sense of movement and realism.
4. Play with Colors and Tones
Adding depth to your palm tree paintings also involves playing with colors and tones. Palm trees are often associated with vibrant and lush environments, so consider using a variety of greens for the leaves. Mix different shades of green by combining yellows, blues, and browns to create a more realistic depiction of the foliage. Use lighter colors for areas that catch the light and darker tones for areas in shadow. This contrast will add depth and visual interest to your artwork.
5. Pay Attention to Details
Attention to detail is key when creating depth and texture in palm tree paintings. Take the time to add small details, such as the veins on the leaves, the rough texture of the bark, or the subtle highlights and shadows. These details can make a significant difference in the overall realism of your artwork. Use smaller brushes or even a fine-tip paintbrush to add these intricate details.
6. Create a Sense of Atmosphere
To further enhance the depth and realism of your palm tree painting, consider creating a sense of atmosphere. Use techniques such as blending or glazing to soften edges and create a hazy or foggy effect in the background. This will give the illusion of distance and depth, allowing the palm tree to stand out as the focal point of the painting.
7. Practice and Experiment
Lastly, practice and experimentation are crucial for improving your skills in creating depth and texture in palm tree paintings. Keep exploring different techniques, materials, and styles to find what works best for you. Take inspiration from other artists, attend workshops or classes, and most importantly, allow yourself to make mistakes and learn from them. With time and practice, you will develop your unique style and create stunning palm tree paintings with depth and texture.
In summary, creating depth and texture in palm tree paintings involves studying and observing palm trees, using layering techniques, experimenting with brushstrokes, playing with colors and tones, paying attention to details, creating a sense of atmosphere, and practicing regularly. By incorporating these tips into your artwork, you can bring your palm tree paintings to life and capture the beauty of these majestic trees.
Choosing the right color palette for vibrant palm tree artwork
When creating vibrant palm tree artwork, one of the key elements that can make or break the overall composition is the color palette. The right color palette can bring your artwork to life and evoke the tropical beauty and vibrancy of palm trees. In this section, we will explore some tips and considerations for selecting the perfect color palette for your vibrant palm tree artwork.
1. Consider the Mood
The first step in choosing the right color palette for your palm tree artwork is to consider the mood you want to convey. Are you aiming for a serene and peaceful scene, or a lively and energetic feel? The mood you want to create will play a crucial role in determining the colors you should use.
If you want to create a serene and peaceful scene, opt for softer and more muted colors such as pastel blues, greens, and yellows. These colors will give your artwork a calm and relaxing vibe. On the other hand, if you want to convey a lively and energetic feel, go for brighter and bolder colors like vibrant greens, blues, and oranges. These colors will add a sense of liveliness and excitement to your artwork.
2. Look to Nature
When it comes to choosing colors for palm tree artwork, nature itself can be a great source of inspiration. Take a close look at real palm trees and observe the colors that appear in their leaves, trunks, and surroundings. Notice how the colors change depending on the time of day and the lighting conditions.
Try to replicate these natural colors in your artwork to create a sense of authenticity. Use shades of green for the palm leaves, brown for the trunk, and various shades of blue for the sky and water. By incorporating these natural colors, you can make your palm tree artwork look more realistic and visually appealing.
3. Use Contrasting Colors
One effective way to make your vibrant palm tree artwork pop is to use contrasting colors. Contrasting colors create visual interest and help certain elements stand out. For example, if you have a bright green palm tree, consider using a complementary color like orange or yellow for the background. This will create a striking contrast and draw attention to the palm tree.
Additionally, using contrasting colors in your artwork can add depth and dimension. You can create a sense of distance by using lighter and cooler colors in the background, and darker and warmer colors in the foreground. This technique will make your palm tree artwork visually engaging and dynamic.
4. Experiment with Color Harmonies
Color harmonies, also known as color schemes, are combinations of colors that work well together. There are various color harmonies you can explore to find the perfect palette for your vibrant palm tree artwork.
One popular color harmony is the analogous scheme, which uses colors that are adjacent to each other on the color wheel. This scheme creates a harmonious and cohesive look. For example, you can use shades of green, yellow-green, and blue-green in your palm tree artwork.
Another option is the complementary scheme, which uses colors that are opposite each other on the color wheel. This scheme creates a vibrant and eye-catching effect. For instance, you can pair a green palm tree with a background in shades of orange or red.
5. Consider the Overall Composition
Lastly, when selecting the color palette for your vibrant palm tree artwork, consider the overall composition and balance of colors. Ensure that the colors you choose complement each other and work harmoniously within the artwork.
Pay attention to the distribution of colors throughout the composition. Avoid using too many intense or saturated colors in one area, as it can overwhelm the viewer. Instead, aim for a balanced distribution of colors, with variations in hue, saturation, and value.
In summary, choosing the right color palette is essential for creating vibrant palm tree artwork. Consider the mood you want to convey, look to nature for inspiration, use contrasting colors, experiment with color harmonies, and consider the overall composition. By following these tips, you can create stunning and visually captivating palm tree artwork that truly captures the essence of tropical beauty.
Enhancing your palm tree paintings with creative composition and lighting techniques
When it comes to capturing the beauty and essence of palm trees in your paintings, creative composition and lighting techniques can make all the difference. By strategically arranging the elements within your artwork and manipulating the light sources, you can bring your palm tree paintings to life with a sense of depth, realism, and aesthetic appeal. In this section, we will explore some effective ways to enhance your palm tree paintings through composition and lighting.
1. Choosing the right composition
Composition plays a vital role in creating a visually appealing painting. When working with palm trees, consider the following composition techniques:
- Rule of thirds: Divide your canvas into a 3×3 grid and position the main elements, such as the palm tree trunks or the horizon line, along these gridlines or at their intersections. This helps create a balanced and visually interesting composition.
- Leading lines: Utilize the naturally strong vertical lines of the palm tree trunks to guide the viewer’s gaze towards the focal point or other important elements in your painting.
- Foreground and background: Introduce elements in the foreground, such as foliage or rocks, to add depth to your painting and create a sense of distance. This can enhance the overall composition and make your palm trees stand out.
2. Manipulating lighting for dramatic effect
The right lighting can transform a simple palm tree painting into a captivating masterpiece. Consider these lighting techniques:
- Backlighting: Position the light source behind the palm trees to create a stunning silhouette effect. This technique adds drama and creates a sense of mystery and allure.
- Golden hour: Embrace the warm, soft light of the golden hour, which occurs during sunrise or sunset, to infuse your palm tree paintings with a beautiful glow. This lighting creates a peaceful and serene atmosphere.
- Play with shadows: Experiment with the interplay of light and shadows on the palm trees and surrounding elements. Shadows can add depth and dimensionality to your painting, making it more realistic and visually engaging.
3. Implementing perspective and scale
Incorporating perspective and scale can further enhance the impact of your palm tree paintings:
- Foreground details: By adding intricate details to elements in the foreground, such as the texture of the palm tree trunks or the patterns in the leaves, you can create a sense of realism and depth.
- Atmospheric perspective: Use lighter and cooler colors for objects in the distance to create a sense of depth and atmospheric perspective. This technique mimics the way distant objects appear more muted and less defined in reality.
- Size variation: Experiment with varying the size and scale of palm trees within your painting to create visual interest. This can help break up the monotony and add a dynamic element to your artwork.
By incorporating these creative composition and lighting techniques, you can elevate your palm tree paintings to new heights. Experiment with different approaches, and don’t be afraid to let your imagination and artistic instincts guide you. Remember, the key is to capture the essence and beauty of palm trees while adding your own unique artistic flair.
FAQs
1. How can I paint palm trees in acrylic?
To paint palm trees in acrylic, start by sketching the shape of the palm tree using a pencil. Then, use a fan brush or a small round brush to paint the trunk of the tree using brown or black paint. For the leaves, use a flat brush or a liner brush to create the palm fronds with various shades of green. Add details and highlights with lighter shades of green or white paint. Practice and experiment to achieve the desired effect.
2. What techniques can I use to create texture in palm tree paintings?
You can create texture in your palm tree paintings using various techniques. One method is to use a dry brush technique, where you load a small amount of paint onto a dry brush and lightly brush it over the canvas to create a textured effect. Another technique is to use palette knives or toothbrushes to apply paint in a stippling motion, creating a textured appearance for the palm fronds or trunk.
3. How can I add depth and dimension to my palm tree paintings?
To add depth and dimension to your palm tree paintings, you can use techniques such as shading and highlighting. Use darker shades of green for areas that are in shadow and lighter shades for areas that are hit by sunlight. Additionally, you can create a sense of depth by adding layers of overlapping palm fronds, gradually decreasing their size in the background to create a sense of distance.
Conclusion
In conclusion, learning how to paint palm trees in acrylic can be a fun and rewarding experience. By following the right techniques and practicing regularly, you can create vibrant and realistic palm tree paintings that will impress both yourself and others. Remember to start with a sketch, use a variety of brush sizes for different details, and layer your colors to achieve depth and dimension. Experiment with different styles and compositions to find your own unique artistic voice. With patience and perseverance, you can master the art of painting palm trees in acrylic and bring the beauty of the tropics to life on your canvas.