
If you’re looking to give your engine block a fresh coat of paint without the hassle of removing the entire engine, you’re in luck! With the right preparation and a few specialized tools, you can achieve a professional-looking finish right in your own garage.
First, start by thoroughly cleaning the engine block to remove any dirt, grease, or oil. Use a degreaser and a stiff brush to scrub away any stubborn grime.
Next, carefully tape off any areas you don’t want to paint, such as gaskets, sensors, or wiring harnesses. This will help ensure a clean and precise application.
Once the engine block is clean and taped off, apply a high-temperature engine paint. This type of paint is specifically designed to withstand the heat and wear that engines endure.
Use light, even strokes to apply the paint, allowing each coat to dry completely before applying the next. Multiple thin coats will give you a more durable and professional-looking finish.
After the final coat has dried, remove the tape and inspect the painted areas for any imperfections. Touch up as needed, and then let the paint cure according to the manufacturer’s instructions before starting the engine.
By following these steps, you can transform the look of your engine block without the need for a full engine removal. Enjoy the satisfaction of a job well done and the added aesthetics under the hood of your
Preparing the Engine Block for Painting
When it comes to restoring a classic car or giving your engine block a fresh new look, painting can make a big difference. However, before you dive into the painting process, it’s important to properly prepare the engine block. This will ensure that the paint adheres well and gives you a long-lasting, professional finish. In this section, we will guide you through the steps of preparing your engine block for painting.
Gather the necessary tools and materials
Before you start, make sure you have all the tools and materials you need for the job. This includes:
- Safety goggles and gloves
- Respirator mask
- Sandpaper (grit ranging from 320 to 1000)
- Paint stripper or degreaser
- Wire brush or steel wool
- Prep solvent or acetone
- Primer
- Engine enamel paint
- Clean lint-free cloths
- Masking tape and plastic sheeting
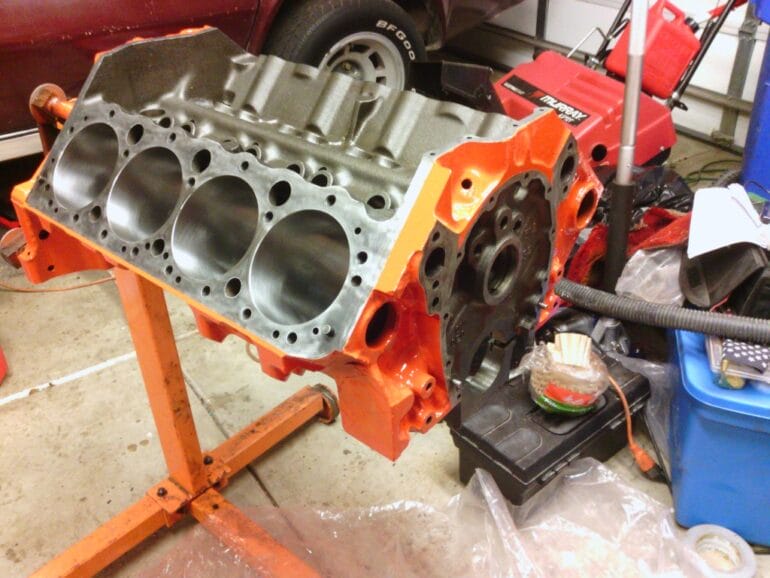
Clean and degrease the engine block
The first step in preparing the engine block for painting is to thoroughly clean and degrease it. Start by removing any loose debris or dirt using a brush or compressed air. Then, apply a paint stripper or degreaser to remove any existing paint, grease, or oil. Follow the manufacturer’s instructions and use a wire brush or steel wool to scrub away stubborn areas.
Sand the engine block
After the engine block is clean and dry, it’s time to sand it. Start with a coarse grit sandpaper (around 320) to remove any remaining paint or rust. Be sure to sand the entire surface evenly, paying attention to hard-to-reach areas. Once you’ve removed the old paint and rust, switch to a finer grit sandpaper (around 600 to 1000) to smooth out the surface and create a perfect canvas for the new paint.
Remove any remaining contaminants
After sanding, it’s important to remove any remaining contaminants from the surface of the engine block. Use a prep solvent or acetone and a clean lint-free cloth to wipe down the block. This will remove any oils, dust, or residue that could interfere with the adhesion of the paint.
Apply primer
Priming the engine block is essential to ensure proper adhesion and to create a solid base for the paint. Choose a high-quality primer specifically designed for engine blocks. Follow the manufacturer’s instructions for application, and make sure to apply thin, even coats. Allow the primer to dry completely before moving on to the next step.
Paint the engine block
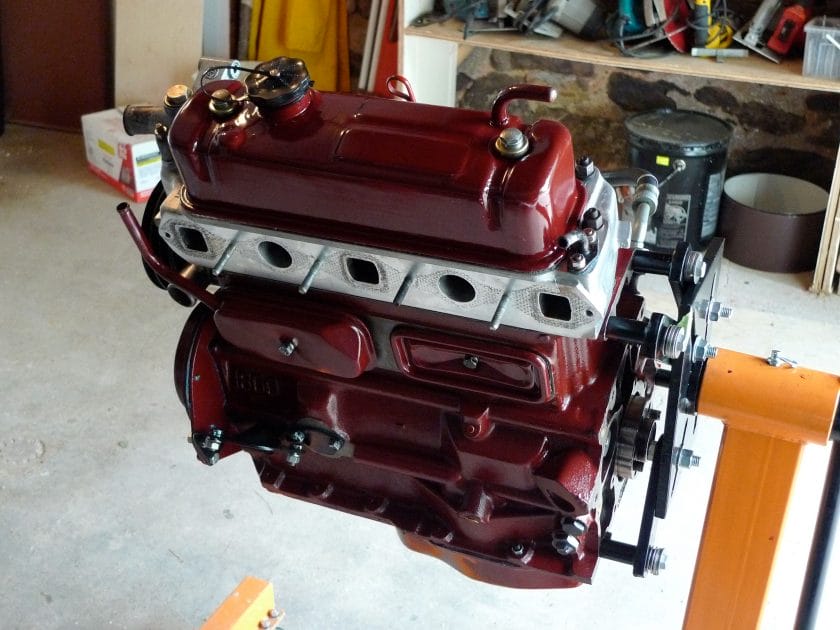
Now it’s time to apply the final coat of paint to your engine block. Choose an engine enamel paint that is heat-resistant and designed for automotive applications. Apply the paint in thin, even coats, using a paint sprayer or a brush. Make sure to cover the entire surface, and allow each coat to dry before applying the next. Repeat this process until you achieve the desired coverage and finish.
Clean up and remove masking
Once the paint has dried completely, it’s time to clean up and remove any masking tape or plastic sheeting. Carefully peel off the tape and plastic, taking care not to damage the freshly painted surface. Use a clean lint-free cloth and prep solvent or acetone to remove any adhesive residue or overspray.
Summary
Preparing the engine block for painting is a crucial step in achieving a professional finish. By following these steps and using the right tools and materials, you can ensure that the paint adheres well and provides long-lasting protection. Remember to clean and degrease the engine block, sand the surface, apply primer, and paint with care. With patience and attention to detail, you’ll be able to give your engine block a fresh new look that will make it stand out.
Choosing the Right Paint for an Engine Block
When it comes to painting an engine block, selecting the right paint is crucial to ensure both durability and aesthetics. The engine block is the heart of any vehicle’s powertrain, and it undergoes extreme conditions, including heat, oil, and vibrations. Therefore, it is essential to choose a paint that can withstand these harsh conditions and provide long-lasting protection.
Factors to Consider
Before selecting a paint for your engine block, there are several factors you should take into account:
- Heat Resistance: Engine blocks generate a significant amount of heat. Therefore, the paint you choose should have high-temperature resistance to prevent it from blistering or peeling under extreme heat.
- Chemical Resistance: The engine block is exposed to various chemicals, such as oil, coolant, and fuel. The paint should be resistant to these chemicals to prevent any damage or corrosion.
- Adhesion: The paint should have excellent adhesion properties to ensure it sticks well to the engine block’s surface. This will prevent flaking or chipping over time.
- Durability: As the engine block operates in a harsh environment, the paint should be durable enough to withstand vibrations, impacts, and other mechanical stresses.
- Appearance: While functionality is crucial, the appearance of the engine block also matters to many enthusiasts. Choose a paint that provides a smooth and glossy finish for an aesthetically pleasing look.
Types of Engine Block Paints
There are several types of paints available in the market specifically designed for engine blocks. Let’s explore some popular options:
- Engine Enamel Paint: Engine enamel paint is a popular choice due to its high heat resistance and durability. It is designed to withstand temperatures up to 500°F (260°C) or more, making it suitable for engine blocks. Engine enamel paints often come in a wide range of colors, allowing you to achieve the desired appearance.
- Epoxy Paint: Epoxy paint offers excellent chemical resistance, making it suitable for engine blocks that come into contact with oil, fuel, and other chemicals. Epoxy paints provide a durable and glossy finish, enhancing the engine block’s appearance.
- Ceramic Coating: Ceramic coatings are known for their exceptional heat resistance and insulation properties. They can withstand temperatures over 1,000°F (538°C) and provide excellent protection against heat, corrosion, and abrasion. While ceramic coatings are more expensive than other options, they offer long-lasting performance.
Preparation and Application
Before applying the paint to the engine block, proper surface preparation is crucial for optimal adhesion and longevity. Here are the steps you should follow:
- Clean the Surface: Remove any dirt, grease, or oil from the engine block surface. Use a degreaser or solvent to ensure a clean and oil-free surface.
- Sand the Surface: Lightly sand the engine block surface to promote adhesion. Use sandpaper with a grit between 320 and 400 for best results.
- Apply a Primer: Apply a high-quality primer specifically designed for engine blocks. The primer will improve adhesion and provide a smooth base for the paint.
- Apply the Paint: Follow the manufacturer’s instructions for applying the paint. Use multiple thin coats rather than a single thick coat for better coverage and durability. Allow each coat to dry before applying the next.
- Allow for Curing: After applying the final coat, allow the paint to cure completely before starting the engine or exposing it to extreme temperatures.
In summary, choosing the right paint for an engine block is crucial for both protection and aesthetics. Consider factors such as heat resistance, chemical resistance, adhesion, durability, and appearance when selecting a paint. Popular options include engine enamel paint, epoxy paint, and ceramic coatings. Proper surface preparation and application techniques are essential for achieving the best results. By selecting the right paint and following proper procedures, you can ensure a long-lasting and visually appealing finish for your engine block.
Steps to Paint an Engine Block without Removing It
In this section, we will discuss the step-by-step process of painting an engine block without removing it from the vehicle. Painting an engine block is a great way to enhance the overall look of your engine bay and protect the metal from rust and corrosion. Follow these steps to achieve a professional-looking finish:
1. Preparation
The first step in any painting project is proper preparation. Start by cleaning the engine block thoroughly to remove any dirt, grease, or oil. You can use a degreaser or engine cleaner for this purpose. Make sure to cover any sensitive components such as electrical connections, filters, and belts to protect them from overspray.
Next, lightly sand the surface of the engine block using fine-grit sandpaper. This will help the paint adhere better and provide a smoother finish. After sanding, wipe down the surface with a clean cloth to remove any dust or debris.
2. Masking
To ensure clean and precise paint lines, it’s important to mask off any areas that you don’t want to paint. This includes components like the intake manifold, headers, and other parts that are not part of the engine block. Use high-quality tape and plastic sheeting to cover these areas and create a barrier against overspray.
3. Prime the Surface
Before applying the paint, it’s recommended to apply a coat of primer to the engine block. Primer helps to create a smooth and even surface for the paint to adhere to, as well as providing additional corrosion protection.
Choose a high-quality automotive primer that is suitable for engine blocks. Apply the primer in thin, even coats, following the manufacturer’s instructions. Allow each coat to dry completely before applying the next one. It is usually recommended to apply at least two to three coats of primer.
4. Apply the Paint
Once the primer has dried, you can proceed with applying the paint. Select a high-temperature engine enamel paint that is designed to withstand the heat generated by the engine. This type of paint is available in various colors and finishes, allowing you to personalize the appearance of your engine block.
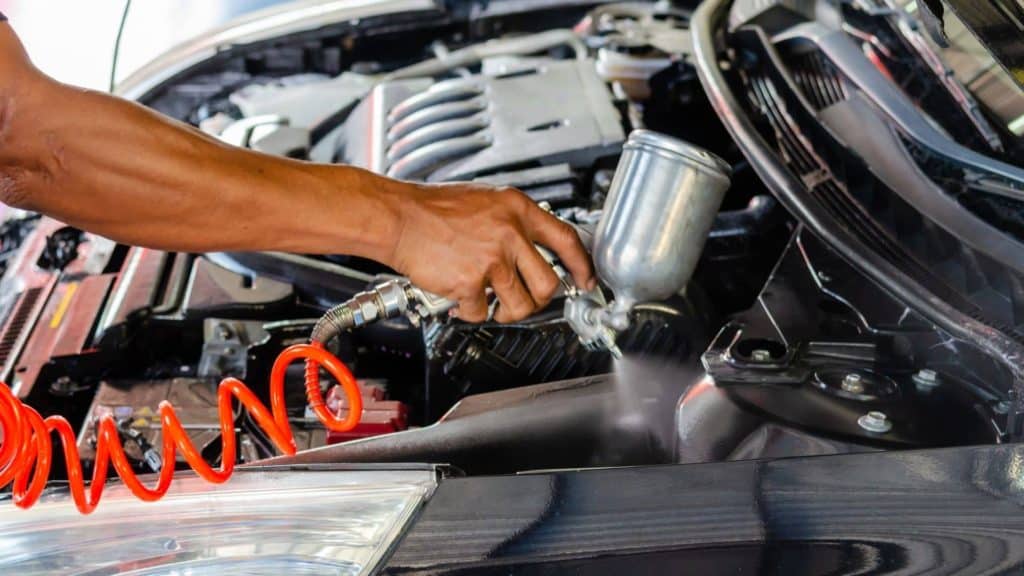
Using a spray gun or aerosol can, apply the paint in light, overlapping strokes. It’s essential to maintain a consistent distance from the surface to achieve an even coat. Apply multiple thin coats rather than one thick coat to avoid drips or runs. Allow each coat to dry according to the manufacturer’s instructions before applying the next one.
5. Finishing Touches
After applying the final coat of paint and allowing it to dry completely, you can remove the masking materials. Take care to remove the tape and plastic sheeting slowly and gently to avoid damaging the freshly painted surface.
If desired, you can further enhance the appearance of the engine block by applying a clear coat. This will provide an extra layer of protection and give the paint a glossy finish. Follow the same process as painting, applying thin, even coats and allowing each coat to dry before applying the next.
In summary, painting an engine block without removing it is a straightforward process that can be accomplished with the right preparation and tools. By following these steps, you can give your engine bay a fresh, customized look while providing long-lasting protection to the engine block.
Tips and Tricks for a Professional-Looking Paint Job on an Engine Block
Painting an engine block can be a great way to enhance its appearance and give it a professional look. Whether you’re restoring an old car or simply want to freshen up your engine, a well-executed paint job can make a significant difference. In this section, we’ll discuss some tips and tricks to help you achieve a professional-looking paint job on your engine block.
Gather the Right Tools and Materials
Before you begin painting your engine block, it’s essential to gather all the necessary tools and materials. This includes:
- Sandpaper or sanding blocks
- Masking tape and newspaper
- Primer
- High-heat engine paint
- Paint thinner or mineral spirits
- Clean cloth or rags
- Spray gun or aerosol can
Having the right tools and materials will ensure that you can complete the painting process smoothly and achieve the desired results.
Prepare the Engine Block
Proper preparation is crucial for a professional-looking paint job. Start by thoroughly cleaning the surface of the engine block. Use a degreaser or engine cleaner to remove any dirt, oil, or grease. Once the block is clean, sand it down with sandpaper or sanding blocks to create a smooth surface for the paint to adhere to. Wipe away any dust or debris with a clean cloth.
Mask Off Areas
Before you start painting, it’s important to mask off any areas that you don’t want to be painted. Use masking tape and newspaper to cover components such as spark plugs, intake manifold, and any other parts that should remain unpainted. This will help you achieve clean and precise paint lines.
Apply Primer
Priming the engine block is crucial as it helps the paint adhere better and provides a smooth surface. Choose a high-quality primer suitable for engine blocks and apply it evenly using a spray gun or aerosol can. Follow the manufacturer’s instructions to ensure proper application and drying time.
Apply Paint
Once the primer has dried, it’s time to apply the paint. High-heat engine paint is specifically designed to withstand the temperatures generated by the engine. Apply the paint in thin, even coats to achieve a smooth finish. Allow each coat to dry before applying the next one. This will help prevent drips and ensure good coverage.
Finishing Touches
After you’ve applied the desired number of paint coats and they are completely dry, remove the masking tape and newspaper carefully. Inspect the paint job for any imperfections or areas that require touch-ups. Use a small brush and matching paint to address any flaws and ensure a seamless finish.
Summary
Following these tips and tricks will help you achieve a professional-looking paint job on your engine block. Remember to gather the right tools and materials, prepare the engine block properly, mask off areas that should not be painted, apply primer for better adhesion, and apply the paint in thin, even coats. With attention to detail and proper technique, you can transform your engine block into a centerpiece of your vehicle.
FAQs
1. How can I paint an engine block without removing the engine?
To paint an engine block without removing the engine, first, clean the surface thoroughly with a degreaser. Next, mask off any areas you don’t want to paint. Apply a high-temperature engine paint using light, even coats. Allow the paint to dry between coats, and finally, cure it according to the manufacturer’s instructions.
2. Can I use regular spray paint to paint an engine block?
No, regular spray paint is not suitable for painting an engine block. Engine blocks are exposed to high temperatures, oil, and other harsh conditions. It is crucial to use high-temperature engine paint designed for this purpose to ensure proper adhesion and durability.
3. Do I need to sand the engine block before painting it?
Sanding the engine block before painting can improve adhesion and ensure a smoother finish. Use a fine-grit sandpaper to lightly scuff the surface. This will help the paint adhere better and create a better bond with the engine block.
Conclusion
In conclusion, painting an engine block without removing the engine can be a practical and cost-effective solution for enhancing its appearance. By following the proper steps and utilizing suitable paint and materials, you can achieve a professional-looking finish. It is crucial to thoroughly clean and prepare the surface, apply a high-temperature engine paint, and ensure adequate ventilation during the painting process.
Remember to protect surrounding components and take necessary precautions to prevent any damage or contamination. Regular maintenance and inspection of the engine block are still essential after painting to ensure its optimal performance. So, whether you’re restoring a classic car or simply want to give your engine a fresh look, painting the engine block without removing the engine is a viable option.