
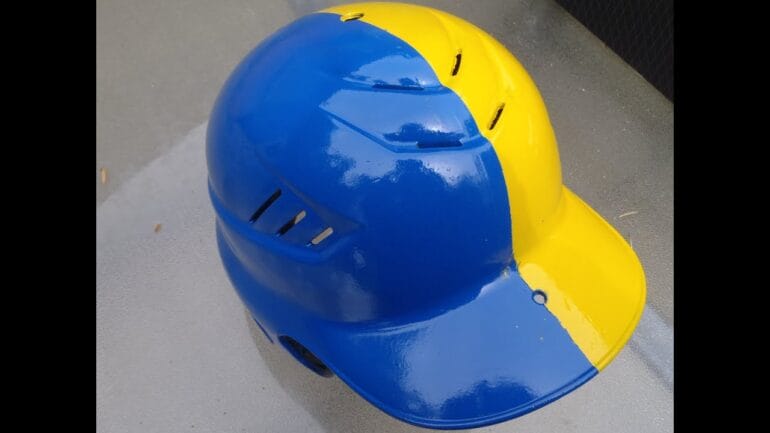
If you’re looking to customize your baseball helmet and give it a personal touch, painting is a great option.
Painting a baseball helmet allows you to express your individuality and show your team spirit. Whether you want to add your team’s logo or a unique design, painting is a fun and creative way to make your helmet stand out.
Before you start painting, it’s important to properly prepare the helmet’s surface. Clean the helmet thoroughly and make sure it’s free from any dirt or debris. Sanding the surface lightly can also help the paint adhere better.
Choose a high-quality paint that is suitable for the helmet’s material. It’s recommended to use paints specifically designed for plastics to ensure durability and a long-lasting finish. Apply several thin coats of paint, allowing each coat to dry thoroughly before applying the next.
Once the paint is dry, you can add any desired designs or logos using stencils or freehand techniques. It’s important to exercise caution and patience to achieve the desired results. After completing your design, allow the helmet to dry completely before using it.
Remember to follow any safety guidelines provided by the helmet manufacturer and consult with a professional if you’re unsure about the painting process. With proper preparation and technique, you’ll have a unique and eye-catching baseball helmet that reflects your style
Preparing the Helmet for Painting
Before you can start painting your helmet, it is important to properly prepare the surface to ensure the best results. Here are the steps to follow:
Gather the Necessary Supplies
Before you begin, make sure you have all the necessary supplies. This includes:
- Sandpaper
- Masking tape
- Primer
- Spray paint in your desired color
- Clean cloth
- Rubbing alcohol
- Newspaper or drop cloth to protect your work area
Remove any Existing Paint or Finish
If your helmet already has a paint or finish on it, you will need to remove it before applying a new coat. Start by gently sanding the surface of the helmet using sandpaper. Be sure to sand evenly and cover the entire surface. This will help the new paint adhere properly to the helmet.
Clean the Helmet
After sanding, use a clean cloth and rubbing alcohol to thoroughly clean the helmet. This will remove any dust, dirt, or oils that may be present on the surface. Ensure that the helmet is completely dry before proceeding to the next step.
Mask off any Areas You Don’t Want to Paint
Using masking tape, carefully cover any areas of the helmet that you do not want to paint. This can include vents, visor openings, or any other specific design elements. Make sure the tape is secure and properly aligned to achieve clean lines.
Apply Primer
Priming the helmet is an important step as it helps the paint adhere better and provides a smooth base for the color coat. Shake the primer can well and spray an even coat over the entire surface of the helmet. Allow the primer to dry completely according to the manufacturer’s instructions.
Sand the Primer
Once the primer has dried, use a fine-grit sandpaper to gently sand the surface. This will help remove any imperfections and create a smooth surface for the paint. Be careful not to sand too aggressively, as you don’t want to remove the primer completely.
Clean and Prepare for Painting
After sanding, clean the helmet again using a clean cloth and rubbing alcohol. This will remove any dust or sanding residue. Make sure the helmet is completely dry before proceeding.
Apply the Paint
Finally, it’s time to apply the paint. Shake the spray paint can well and hold it approximately 6-8 inches away from the helmet. Start with light, even coats, moving in a sweeping motion. Allow each coat to dry before applying the next. This will ensure a smooth and even finish.
In summary, preparing the helmet for painting involves gathering the necessary supplies, removing any existing paint or finish, cleaning the helmet, masking off areas that shouldn’t be painted, applying primer, sanding the primer, and finally, applying the paint. By following these steps, you can achieve a professional-looking paint job on your helmet.
Tips and Techniques for Painting a Baseball Helmet
Painting a baseball helmet can be a fun and rewarding project, whether you want to customize your own helmet or give new life to an old one. However, it requires some careful preparation and technique to ensure a professional-looking finish that will stand up to the rigors of the game. In this section, we will provide you with a guide on tips and techniques for painting a baseball helmet.
Choose the Right Paint
When it comes to painting a baseball helmet, it’s important to choose the right type of paint that will adhere well to the surface and withstand the impact of the game. Look for paint that is specifically designed for use on helmets, such as acrylic enamel or urethane paints. These paints are durable and flexible, which is essential for a helmet that needs to withstand repeated impact.
Clean and Prepare the Helmet
Before painting the helmet, it’s crucial to clean and prepare the surface to ensure proper adhesion of the paint. Start by removing any dirt, grease, or old paint from the helmet. You can use a mild soap and water solution or a helmet cleaner specifically designed for this purpose. Make sure to rinse the helmet thoroughly and allow it to dry completely before proceeding.
Once the helmet is clean, you may need to sand or scuff the surface lightly. This step is important if you are painting over an existing design or coating. Use fine-grit sandpaper or a scuff pad to create a slightly rough surface, which will help the new paint adhere better.
Apply Primer
Priming the helmet is an essential step to ensure better adhesion and a smoother finish. Choose a primer that is compatible with the type of paint you will be using. Apply a thin, even coat of primer to the entire surface of the helmet. Let the primer dry completely according to the manufacturer’s instructions before moving on to the next step.
Painting Techniques
Now that the helmet is properly prepared, it’s time to apply the paint. Here are some tips and techniques to help you achieve a professional-looking finish:
- Use thin coats: It’s better to apply multiple thin coats of paint rather than one thick coat. This helps prevent drips and allows for better adhesion.
- Allow sufficient drying time: Make sure each coat of paint is dry before applying the next. This will help prevent smudging or cracking of the paint.
- Work in a well-ventilated area: Painting in a well-ventilated area will help ensure proper airflow and prevent the buildup of fumes.
- Use even strokes: Apply the paint using smooth, even strokes. This will help achieve a seamless and professional-looking finish.
- Consider using stencils or masking tape: If you want to add designs or patterns to your helmet, using stencils or masking tape can help create crisp and clean lines.
Apply a Protective Clear Coat
Once the paint is completely dry, it’s a good idea to apply a clear coat to protect the finish and add extra durability. Look for a clear coat that is compatible with the type of paint you used. Apply a thin, even coat of clear coat, following the manufacturer’s instructions. Allow sufficient drying time before handling or using the helmet.
Summary
Painting a baseball helmet requires careful preparation and technique to ensure a professional-looking finish. Choose the right paint, clean and prepare the helmet, apply a primer, and use proper painting techniques to achieve the best results. Don’t forget to apply a protective clear coat to add durability and protect the finish. With these tips and techniques, you can give your baseball helmet a fresh new look that will withstand the demands of the game.
Adding Personalized Designs and Logos to Your Helmet
When it comes to helmets, functionality and safety are of utmost importance. However, there’s no reason why your helmet can’t also be a reflection of your personal style and identity. Customizing your helmet with personalized designs and logos is a great way to stand out and add a touch of uniqueness to your gear. In this section, we will explore different ways to add personalized designs and logos to your helmet.
1. Helmet Decals
One of the easiest and most cost-effective ways to personalize your helmet is by using decals. Decals are adhesive stickers that can be easily applied to the surface of your helmet. They come in various shapes, sizes, and designs, allowing you to choose the one that best represents your personality or interests. Whether you’re into sports, nature, or abstract art, there are decals available to suit every taste.
Applying helmet decals is a simple process. Make sure the surface of your helmet is clean and dry before applying the decal. Carefully peel off the backing paper and place the decal onto the desired location on your helmet. Smooth out any air bubbles or wrinkles using a credit card or another flat object. Once the decal is in place, press firmly to ensure it adheres properly. It’s important to note that some helmet manufacturers may have specific guidelines or restrictions when it comes to using decals, so it’s always a good idea to check with the manufacturer before applying any stickers to your helmet.
2. Airbrushing
If you’re looking for a more intricate and artistic customization option, airbrushing is the way to go. Airbrushing allows you to create stunning designs and graphics on your helmet using an airbrush gun and specialized paints. This technique gives you the freedom to fully customize your helmet with unique artwork, such as portraits, landscapes, or abstract patterns.
While airbrushing may require some artistic skills or the assistance of a professional artist, the results are truly one-of-a-kind. You can choose to have a specific design or theme in mind, or collaborate with the artist to create something that truly represents your personality. The process involves carefully spraying layers of paint onto the helmet to achieve the desired effect. Once the paint has dried, a clear protective coat is usually applied to ensure the longevity of the design.
3. Helmet Wraps
If you’re looking for a quick and reversible way to personalize your helmet, consider using helmet wraps. Helmet wraps are large adhesive vinyl sheets that can be applied to the entire surface of your helmet, transforming its appearance completely. These wraps come in a wide range of designs, patterns, and colors, allowing you to choose a style that suits your taste.
Applying a helmet wrap is a relatively simple process. Start by thoroughly cleaning the surface of your helmet to ensure good adhesion. Cut the wrap to size, leaving some overlap to cover the edges of the helmet. Peel off a small portion of the backing paper and align the wrap with the front of the helmet. Slowly peel off the backing paper while smoothing out the wrap with your hand or a squeegee to remove any air bubbles. Once the wrap is applied, trim off any excess material and heat it with a hairdryer to ensure a secure and tight fit. Helmet wraps are a great option if you want to change the look of your helmet frequently, as they can be easily removed without leaving any residue.
4. Custom Helmet Painting
If you’re looking for a truly unique and high-quality customization option, investing in a custom-painted helmet is the way to go. Custom helmet painting involves working with a skilled artist who specializes in helmet customization. The artist will work closely with you to understand your vision and create a design that represents your style and personality.
The process of custom helmet painting typically involves sanding and priming the helmet to create a smooth surface for painting. The artist will then apply multiple layers of paint, allowing each layer to dry before moving on to the next. This process helps to achieve depth and richness in the design. Once the painting is complete, a clear protective coat is usually applied to protect the artwork and give it a glossy finish.
Adding personalized designs and logos to your helmet is a fantastic way to make a statement and showcase your individuality. Whether you choose to use decals, airbrushing, helmet wraps, or opt for a custom-painted design, the options are endless. Just remember to follow any guidelines or recommendations provided by the helmet manufacturer to ensure the safety and integrity of your helmet. So go ahead, get creative, and make your helmet a true reflection of yourself
Proper Maintenance and Care for Painted Baseball Helmets
Baseball helmets are a crucial piece of equipment that protects players from potential head injuries. To enhance the appearance and style, many players choose to have their helmets painted with unique designs. However, painted helmets require proper maintenance and care to ensure their longevity and effectiveness. In this section, we will discuss the essential steps and tips for maintaining and caring for painted baseball helmets.
1. Avoid Harsh Chemicals and Abrasive Substances
When it comes to cleaning your painted baseball helmet, it is important to avoid using harsh chemicals or abrasive substances that may damage the paint or the helmet’s surface. Instead, opt for gentle cleaning solutions such as mild soap and water. Gently wipe the helmet with a soft cloth or sponge to remove any dirt or debris.
2. Handle with Care
Painted helmets are more delicate than their plain counterparts, so it’s essential to handle them with care. Avoid dropping or mishandling the helmet, as this can lead to chipping or scratching of the paint. When not in use, store the helmet in a safe and secure place, away from any potential hazards.
3. Regular Inspections
To ensure the paint and the helmet’s integrity, it is recommended to conduct regular inspections. Check for any signs of damage, such as cracks, chips, or peeling paint. If you notice any issues, it is best to address them promptly to prevent further damage.
4. Use Protective Equipment
During gameplay or practice, it’s crucial to wear additional protective gear, such as a helmet cover or a helmet bag, to prevent unnecessary damage to the painted surface. These accessories provide an extra layer of protection against scratches, scuffs, and other forms of wear and tear.
5. Avoid Excessive Exposure to Sunlight
Direct sunlight can fade the paint on your baseball helmet over time. Therefore, it is essential to minimize the helmet’s exposure to prolonged sunlight. When not in use, store the helmet in a cool, dry place away from direct sunlight or use a helmet bag that provides UV protection.
6. Touch-up Paint
If you encounter minor chips or scratches on your painted helmet, it is possible to touch up the damaged areas with matching paint. However, it is recommended to consult a professional helmet painter or the manufacturer for the appropriate touch-up paint and instructions.
7. Professional Maintenance
In case of significant damage or if the paint starts to deteriorate, it is best to seek professional help for helmet maintenance. Professional helmet painters have the expertise and tools necessary to restore the helmet’s original appearance while ensuring its safety and effectiveness.
In summary, proper maintenance and care are essential for preserving the longevity and appearance of painted baseball helmets. By avoiding harsh chemicals, handling the helmet with care, conducting regular inspections, using protective equipment, minimizing exposure to sunlight, and seeking professional maintenance when needed, you can ensure that your painted baseball helmet remains in optimal condition for years to come.
Frequently Asked Questions
1. How do I paint a baseball helmet?
To paint a baseball helmet, start by cleaning the helmet thoroughly with soap and water. Then, lightly sand the surface to create a better bond for the paint. Apply primer to the helmet and let it dry completely. Next, apply several coats of spray paint in your desired color, allowing each coat to dry between applications. Finally, apply a clear coat for protection and let it dry before using the helmet.
2. Can I use regular spray paint to paint a baseball helmet?
No, it is recommended to use a paint specifically designed for use on plastic or sports equipment. Regular spray paint may not adhere properly to the helmet’s surface and could peel or chip easily. Look for paint specifically labeled for use on helmets or sports equipment for the best results.
3. Should I remove the padding inside the helmet before painting?
It is generally recommended to remove the padding from the inside of the helmet before painting. This will ensure that the paint does not get onto the padding, which could affect its performance or comfort. Carefully remove the padding according to the helmet manufacturer’s instructions and reattach it after the painting process is complete.
Conclusion:
In conclusion, painting a baseball helmet is a fun and creative way to customize your gear and showcase your personal style. By following the step-by-step process outlined in this guide, you can easily transform an ordinary helmet into a unique piece of art. Remember to select high-quality paint and primers that are suitable for plastic surfaces and use proper safety precautions when dealing with chemicals. Whether you choose bold colors, intricate designs, or team logos, a freshly painted baseball helmet will not only enhance your on-field performance but also make you stand out as a player with a sense of style. So grab your paintbrushes and let your creativity shine!