
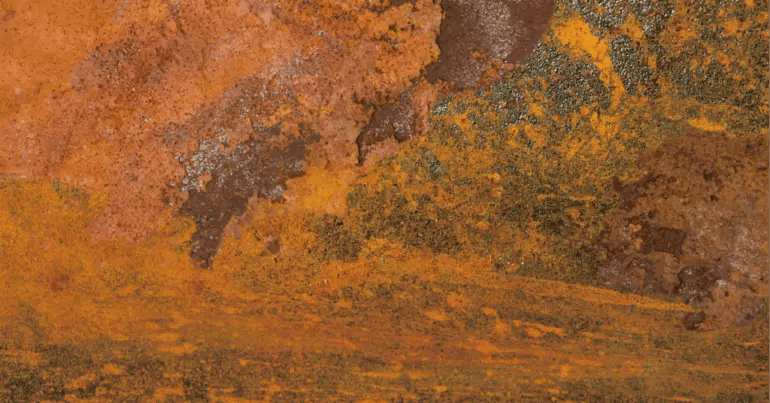
Creating a rust color with acrylic paint is a great way to add a unique and weathered look to your artwork. By using a few simple techniques and color mixing, you can achieve a realistic rust effect that will bring depth and character to your paintings. Whether you’re working on a landscape, still life, or abstract piece, mastering the art of rust color can elevate your artistic skills to the next level.
Start by selecting the right colors for your rust palette. Burnt sienna, raw sienna, raw umber, and orange are all excellent choices for achieving an authentic rust shade. Experiment with mixing different ratios of these colors until you find the perfect blend that captures the rusty, oxidized appearance you desire.
Next, consider the texture and surface of your artwork. Rust often appears in areas where metals have been exposed to moisture and air for an extended period. To mimic this effect, add texture to your painting surface using techniques like stippling, dry brushing, or layering paint with a palette knife.
When applying the rust color, focus on highlighting the areas where rust is most likely to accumulate, such as corners, edges, and crevices. Use a smaller brush to add finer details and create the illusion of rusted metal. Don’t be afraid to layer multiple shades of rust to achieve depth and dimension.
Lastly, don’t forget to experiment and have fun with your rust color. Rust doesn
Choosing the Right Acrylic Paint Colors for a Rust Effect: Tips and Suggestions
If you’re looking to add a realistic rust effect to your artwork or DIY projects, using acrylic paint is a great choice. Acrylic paint is versatile, easy to work with, and offers a wide range of colors to achieve the desired rust effect. In this section, we will provide you with some tips and suggestions on how to choose the right acrylic paint colors for a convincing rust effect.
1. Start with Earth Tones
When selecting acrylic paint colors for a rust effect, it’s best to start with earth tones. Look for colors like burnt sienna, raw umber, and yellow ochre. These colors mimic the natural hues found in rusted metal and serve as a solid foundation for creating a realistic effect.
2. Layering is Key
To achieve depth and texture in your rust effect, it’s important to layer different paint colors. Start with a base layer of a darker earth tone, such as burnt sienna or raw umber. Once the base layer is dry, add lighter shades of orange, brown, and yellow on top. Use a dry brush technique to apply these layers, allowing the base color to show through in places for a more authentic look.
3. Experiment with Oxide Colors
Another way to enhance the rust effect is by incorporating oxide colors into your palette. Oxide colors, such as iron oxide red and iron oxide yellow, closely resemble the hues found in rusted metal. Use these colors sparingly to add highlights and rust spots to your artwork. Apply them with a small brush or a sponge to create a textured appearance.
4. Consider Metallic Paints
If you want to add a metallic sheen or a hint of shimmer to your rust effect, consider incorporating metallic acrylic paints into your color palette. Copper, bronze, and gold metallic paints can add depth and richness to the overall appearance of rust. Use them sparingly as accents or for highlighting specific areas to create a more dynamic and visually interesting effect.
5. Play with Texture Mediums
To take your rust effect to the next level, consider using texture mediums in conjunction with your paint colors. Texture mediums, such as modeling paste or coarse pumice gel, can add texture and dimension to your artwork, mimicking the rough and corroded surface of rusted metal. Apply the texture medium with a palette knife or a brush, focusing on areas where rust would naturally occur.
6. Practice and Experiment
Creating a convincing rust effect with acrylic paint may require some practice and experimentation. Don’t be afraid to try different techniques, color combinations, and application methods. Take the time to study real rusted objects and observe the intricate details and color variations. This will help you develop your own unique approach to achieving a realistic rust effect.
In summary, when choosing acrylic paint colors for a rust effect, start with earth tones as a base, layer different colors to create depth, experiment with oxide colors for highlights, consider incorporating metallic paints for added dimension, and don’t forget to play with texture mediums to enhance the overall appearance. With practice and experimentation, you can achieve a convincing rust effect that will add visual interest and realism to your artwork or DIY projects.
Rust Effects Step-by-Step: A Beginner’s Guide to Painting Realistic Rust with Acrylics
If you are a beginner artist or someone who wants to add a touch of realism to your paintings, learning how to paint realistic rust can be a great skill to have. Rust adds texture and age to objects, giving them a weathered and worn look. In this guide, we will take you through a step-by-step process of creating realistic rust effects using acrylic paints.
Materials You Will Need
Before we get started, let’s gather the materials you will need for this tutorial:
- Canvas or painting surface
- Acrylic paints in colors like burnt sienna, raw umber, oxide red, and black
- Paintbrushes in various sizes, including a flat brush and a detail brush
- Palette or mixing tray
- Water jar for rinsing brushes
- Palette knife or old credit card for texture
Step 1: Prepare Your Surface
Start by preparing your canvas or painting surface. Make sure it is clean and free from any dust or debris. You can also apply a layer of gesso to create a smooth surface for your paint to adhere to.
Step 2: Base Coat
Apply a base coat of burnt sienna or raw umber to create the foundation for your rust effects. Use a flat brush to cover the entire surface evenly. Let the base coat dry completely before moving on to the next step.
Step 3: Adding Texture
Take your palette knife or old credit card and gently scrape it across the surface of your painting. This will create texture and simulate the roughness of rusted metal. You can also use a dry brush technique to add more texture by lightly dabbing the brush onto the surface.
Step 4: Layering Colors
Now it’s time to add the rust colors. Start with oxide red and apply it in random patches or streaks on the surface. Use a dry brush technique to blend the edges of the red with the base coat. Next, mix a small amount of black with the oxide red to create a darker shade of rust. Apply this mixture in the areas where you want the rust to appear deeper or more intense.
Step 5: Highlights and Shadows
To add depth and dimension to your rust effects, use a detail brush to paint highlights and shadows. Mix a lighter shade of rust by adding a touch of white to the oxide red. Apply this color to the raised areas of the texture to create highlights. For shadows, mix a small amount of black with the oxide red and apply it to the recessed areas.
Step 6: Finishing Touches
Once you are satisfied with the rust effects, you can add some final touches to enhance the realism. You can use a small amount of white paint to create highlights on the edges of the rusted areas. You can also add some specks of black or dark brown to simulate dirt or grime.
Summary
In this beginner’s guide, we have learned how to paint realistic rust effects using acrylic paints. By following these step-by-step instructions, you can add a touch of weathered and worn authenticity to your artwork. Remember to experiment and have fun with different colors and techniques to achieve the desired effect. Happy painting!
Enhancing Rust Texture: How to Add Depth and Dimension to Your Acrylic Rust Painting
Acrylic painting provides the perfect medium to explore texture and create stunning visual effects. One popular technique is to depict rust, which adds a touch of authenticity and depth to your artwork. In this section, we will delve into the process of enhancing rust texture in acrylic paintings, helping you add dimension and bring your artwork to life.
Gathering the Supplies
Before delving into the rust texture techniques, it’s important to gather the necessary supplies. Here are some essential items you’ll need:
- Acrylic paints in various rust colors (such as burnt sienna, raw umber, and orange)
- Paintbrushes in different sizes and shapes
- Palette or mixing tray
- Water container for cleaning brushes
- Canvas or painting surface
- Palette knife for creating texture
- Sponges or textured materials for additional effects
Creating a Base Layer
The first step in adding rust texture is to create a base layer on your canvas. Start by applying a layer of orange or a warm-toned color as the base. This serves as the foundation for your rust effect. Use a paintbrush or a sponge to apply the base color evenly across the canvas.
Building Layers of Rust
Once the base layer is dry, it’s time to build the layers of rust. Using a palette knife, mix different rust colors (such as burnt sienna and raw umber) with a small amount of water to create a paste-like consistency. Apply this mixture to specific areas of your canvas to mimic rust spots.
Remember, rust tends to accumulate in certain areas, such as corners, edges, or around metallic objects. Use the palette knife to create texture and apply the rust mixture strategically, focusing on these areas. You can also experiment with different patterns and shapes to achieve a realistic rust effect.
Adding Details and Highlights
To enhance the depth and dimension of your rust texture, it’s important to add details and highlights. Once the previous layers are completely dry, use a fine-tip paintbrush to add finer details, such as cracks, chips, or peeling paint.
Choose a lighter shade of rust or metallic color to create these highlights. Apply them sparingly to create a contrast between the rusted areas and the highlights, adding a realistic touch to your artwork.
Experimenting with Additional Techniques
While the previous steps provide a solid foundation for rust texture, don’t be afraid to experiment with additional techniques to enhance the overall effect. Here are a few ideas to consider:
- Using a sponge or textured material to create a mottled or rough surface
- Dry brushing technique to add a weathered and worn-out appearance
- Layering metallic paints over the rust texture to mimic metal oxidation
These techniques can add more complexity and visual interest to your acrylic rust painting, allowing you to create a truly unique and captivating artwork.
Sealing and Protecting Your Artwork
Once you are satisfied with the rust texture and overall appearance of your painting, it’s essential to protect it for longevity. Apply a layer of varnish or sealant to protect the artwork from dust, moisture, and UV damage.
Make sure to follow the instructions provided with the selected varnish or sealant, as application techniques may vary. Allow the artwork to dry completely before displaying or framing it to preserve its quality.
Summary
In summary, enhancing rust texture in acrylic paintings can add depth, dimension, and a touch of realism to your artwork. By following the steps outlined above and experimenting with different techniques, you can create stunning rust effects that captivate viewers and make your artwork truly stand out.
Remember to gather the necessary supplies, create a base layer, build layers of rust strategically, add details and highlights, and experiment with additional techniques. Finally, seal and protect your artwork for long-lasting beauty and enjoyment.
5. Incorporating Rust Into Mixed Media Art: Creative Ways to Use Acrylics for a Rusty Finish
When it comes to mixed media art, there are endless possibilities for creating unique and captivating pieces. One popular technique that artists often incorporate into their work is the use of rust. Rust can add a weathered and aged look to a piece, giving it a sense of history and character. In this section, we will explore creative ways to use acrylics to achieve a rusty finish in mixed media art.
1. Textured Base
Creating a textured base is the first step in achieving a realistic rust effect. Start by applying a layer of acrylic gesso to your canvas or substrate. Once dry, use a palette knife or texture paste to add texture to the surface. You can create texture by scraping the paste in different directions or using stencils to create patterns. Allow the texture to dry completely before moving on to the next step.
2. Metallic Base Layer
Before adding the rust effect, start by applying a metallic base layer to your textured surface. Choose metallic acrylic paints in shades of copper, bronze, or iron. Apply the metallic paint using a brush or sponge, ensuring even coverage across the entire surface. Allow the metallic base layer to dry before moving on.
3. Faux Rust Technique
To create a faux rust effect, you will need a combination of acrylic paints in earthy tones such as burnt sienna, raw umber, and rust red. Begin by dabbing small amounts of these colors onto your canvas or substrate. Use a dry brush or sponge to lightly blend and feather the colors together, creating a mottled and rusty appearance. Add more layers of color and blend until you achieve the desired rusty effect.
4. Oxidization Effects
To add depth and realism to your rusted surface, consider incorporating oxidization effects. Use a small brush to apply a mixture of water and salt to areas where you want the rust to appear more pronounced. Allow the salt to dry and then apply additional layers of rust-colored paint, allowing it to pool and settle in the textured areas. This will create the appearance of rusted metal with oxidization marks.
5. Patina Finishing Touches
To complete the rusty look, consider adding patina finishing touches. Patina is a greenish-blue layer that forms on copper or bronze when exposed to the elements over time. Mix a small amount of green and blue acrylic paint with water to create a thin wash. Apply the wash to areas where you want the patina to appear, using a sponge or brush. Use a paper towel or sponge to gently blot and blend the wash, creating a subtle patina effect.
6. Sealing and Protecting
Once you are satisfied with your rusty finish, it is important to seal and protect your mixed media artwork. Apply a clear acrylic varnish or medium to seal the surface and protect it from fading or damage. Follow the manufacturer’s instructions for application and drying times.
In summary, incorporating rust into mixed media art can add a unique and captivating element to your creations. By using acrylics in creative ways, you can achieve a realistic and textured rusty finish. Remember to start with a textured base, apply a metallic base layer, use a faux rust technique, add oxidization effects, incorporate patina finishing touches, and seal and protect your artwork. With these techniques, you can create stunning mixed media pieces that evoke a sense of age and history.
FAQs
1. How can I make a rust color with acrylic paint?
To make a rust color with acrylic paint, mix equal parts of brown and orange paint. Then add a small amount of red paint to the mixture. Adjust the colors as needed to achieve the desired shade of rust. You can also experiment with adding small quantities of yellow or black paint to further customize the color.
2. Can I use water to thin acrylic paint?
Yes, you can use water to thin acrylic paint. Add a small amount of water to the paint and mix it thoroughly until you achieve the desired consistency. Be careful not to add too much water, as it can affect the paint’s adhesion and coverage.
3. How long does acrylic paint take to dry?
The drying time of acrylic paint depends on various factors such as the thickness of the paint layer, humidity, and temperature. Generally, acrylic paint dries within 20-30 minutes. However, thicker layers may take a few hours or even days to completely dry. You can use a hairdryer or fan to speed up the drying process.
Conclusion
In conclusion, creating a rust color with acrylic paint is a simple and versatile technique that can add depth and texture to your artwork. By blending earth tones such as burnt sienna, raw umber, and orange, you can achieve a realistic rust hue. Experimenting with different ratios and layering techniques will allow you to achieve various levels of intensity and oxidation. Whether you’re painting a weathered metal object or adding an aged effect to a landscape, the ability to create a rust color with acrylic paint gives you endless opportunities for creativity and expression. So, grab your brushes and start exploring the fascinating world of rust-inspired art!