
Looking for creative ways to decorate acrylic ornaments? Look no further! Whether you’re a crafting enthusiast or a DIY beginner, decorating acrylic ornaments is a fun and easy way to add a personalized touch to your holiday decor. From glitter and paint to ribbons and beads, the possibilities are endless when it comes to transforming plain acrylic ornaments into beautiful works of art. Get ready to unleash your creativity and create stunning ornaments that will impress your friends and family!
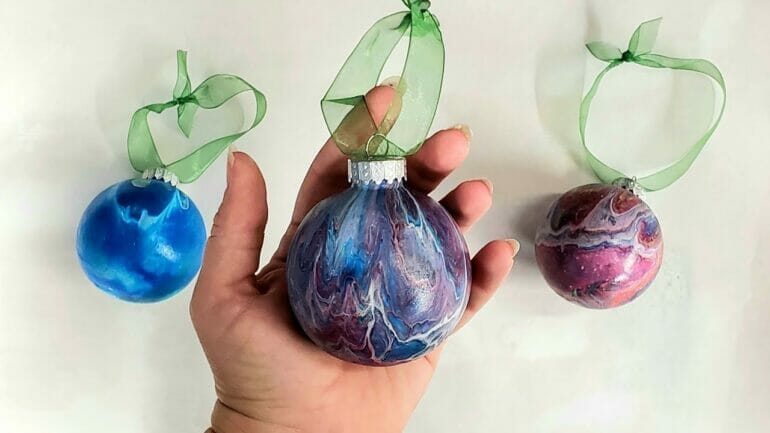
One popular technique for decorating acrylic ornaments is to use paint. Acrylic paints work best on these ornaments, as they adhere well and dry quickly. You can choose from a wide range of colors and use brushes or sponges to create different effects. Whether you prefer bold and vibrant colors or soft and pastel shades, painting your acrylic ornaments is a versatile and enjoyable way to express your creativity.
If you’re looking to add some sparkle and shimmer to your acrylic ornaments, consider using glitter. You can apply glitter directly to the surface of the ornament using glue or a clear adhesive. For a more subtle effect, mix the glitter with a clear varnish or paint and apply it to the ornament. The result is a dazzling ornament that will catch the light and add a touch of glamour to your holiday decorations.
Ribbons and bows are another popular option for decorating acrylic ornaments. You can tie a colorful ribbon around the top of the ornament to create a festive look. Alternatively, you can glue or
Step-by-Step Guide to Decorating Acrylic Ornaments
Acrylic ornaments are a popular choice for holiday decorations due to their durability and versatility. They can be customized to fit any theme or style, making them the perfect addition to your Christmas tree or holiday decor. If you’re looking to add a personal touch to your acrylic ornaments, here’s a step-by-step guide to help you decorate them with ease.
Materials You’ll Need:
- Acrylic ornaments
- Paint pens or acrylic paint
- Paintbrushes
- Glitter or sequins
- Ribbon or string
- Hot glue gun
Step 1: Choose Your Design
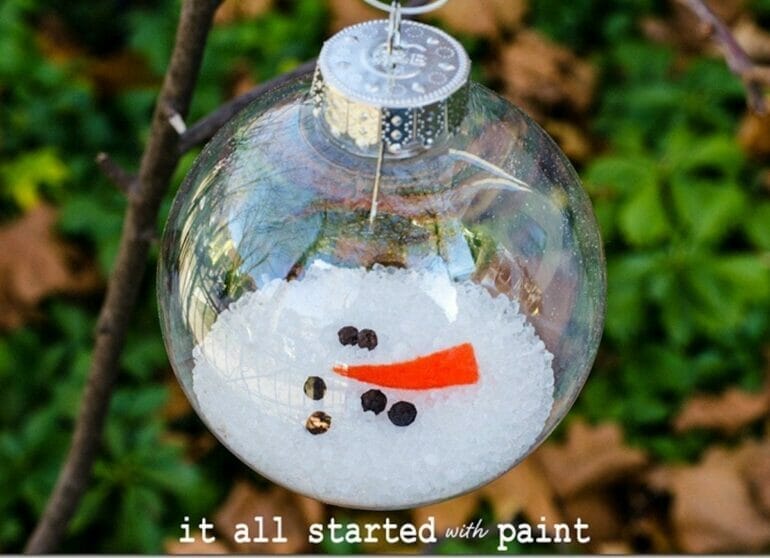
Before you start decorating, decide on the design or theme you want for your acrylic ornaments. It could be traditional holiday motifs like snowflakes or reindeer, or you can get creative and go for personalized designs or patterns. Sketch out your ideas on paper to have a clear vision of how you want your ornaments to look.
Step 2: Prepare Your Work Area
Set up a clean and well-lit workspace where you can comfortably work on your acrylic ornaments. Lay down a protective surface such as a plastic tablecloth or newspaper to prevent any paint or glitter from damaging your work surface.
Step 3: Paint the Base Coat
If you want to paint the entire surface of your acrylic ornaments, start by applying a base coat of acrylic paint using a paintbrush. Choose a color that complements your design. Allow the base coat to dry completely before moving on to the next step.
Step 4: Add Details
Using paint pens or fine-tipped brushes, add intricate details to your acrylic ornaments. This is where you can let your creativity shine! Draw patterns, write personalized messages, or create designs that reflect your personal style. Take your time and be patient to ensure precision and accuracy.
Step 5: Embellish with Glitter or Sequins
If you want to add some sparkle to your ornaments, apply a thin layer of craft glue or use a hot glue gun to attach glitter or sequins to specific areas of your design. Sprinkle the glitter or sequins over the glued areas and gently tap off any excess. Allow the glue to dry completely before adding any other embellishments.
Step 6: Attach Ribbon or String
To hang your acrylic ornaments, cut a length of ribbon or string and create a loop. Use a hot glue gun to attach the loop to the top of the ornament. Make sure the glue has dried completely before handling the ornament.
Step 7: Let Everything Dry
Once you have finished decorating your acrylic ornaments, set them aside in a safe place to dry completely. Avoid touching or moving them while the paint, glue, or glitter is still wet to prevent smudging or smearing.
Step 8: Display and Enjoy
After the ornaments have dried, you can proudly display them on your Christmas tree, wreaths, garlands, or anywhere else you want to add a festive touch. Admire your handiwork and enjoy the personalized charm they bring to your holiday decor.
In summary, decorating acrylic ornaments is a fun and creative way to add a personal touch to your holiday decor. With a few simple materials and a little bit of imagination, you can transform plain acrylic ornaments into festive works of art. Follow this step-by-step guide to unleash your creativity and create beautiful decorations that will impress your friends and family.

Top Tips for Painting and Adding Patterns to Acrylic Ornaments
Acrylic ornaments are a popular choice when it comes to decorating for the holidays or creating personalized gifts. These clear ornaments provide a blank canvas for you to paint and add patterns, allowing you to unleash your creativity. Whether you are a beginner or an experienced artist, here are some top tips to help you achieve stunning results when painting and adding patterns to acrylic ornaments.
1. Prepare Your Ornaments
Before you start painting, it’s important to prepare your ornaments properly. Begin by cleaning the surface of the acrylic ornaments using a mild soap and water solution. This will remove any dirt, dust, or oils that may interfere with the adhesion of the paint. Ensure that the ornaments are completely dry before painting.
2. Choose the Right Paint
Acrylic paints are the perfect choice for painting acrylic ornaments. These paints are versatile, easy to work with, and provide vibrant colors. Opt for high-quality acrylic paints that are specifically designed for painting on non-porous surfaces. They offer better adhesion and durability, ensuring that your artwork stays intact for years to come.
3. Plan Your Design
Before you start painting, it’s a good idea to plan your design. Consider the theme or style you want to achieve and sketch out your ideas on a piece of paper. This will help you visualize your design and make any necessary adjustments before you begin painting on the ornaments.
4. Use Thin Layers of Paint
When painting acrylic ornaments, it’s best to apply thin layers of paint rather than thick ones. This allows for better control and prevents the paint from clumping or dripping. Apply the paint evenly using a soft brush or a sponge brush, building up the color gradually. Let each layer dry completely before adding another one.
5. Experiment with Different Techniques
Don’t be afraid to experiment with different painting techniques to add texture and depth to your acrylic ornaments. You can try stippling, dry brushing, splattering, or even using stencils to create unique patterns and effects. Have fun exploring different techniques and see which ones work best for your desired design.
6. Add Patterns and Details
Once your base paint has dried, you can add patterns and details to enhance your acrylic ornaments. Use fine tip brushes or paint pens to create intricate designs, lines, or lettering. You can also add metallic accents or glitter for a touch of sparkle. Take your time and be patient when adding patterns to ensure precision and neatness.
7. Seal Your Artwork
To protect your painted acrylic ornaments and make them last longer, it’s important to seal your artwork. Apply a clear acrylic sealer or varnish over the painted surface, following the manufacturer’s instructions. This will provide a protective barrier against scratches, moisture, and fading, preserving the beauty of your artwork over time.
8. Display and Enjoy
Once your painted acrylic ornaments are fully dry and sealed, they are ready to be displayed or gifted. Hang them on a Christmas tree, use them as unique gift tags, or showcase them in a decorative bowl. Admire your beautiful artwork and enjoy the festive ambiance it brings to your home or the joy it brings to your loved ones.
Summary
Painting and adding patterns to acrylic ornaments is a wonderful way to personalize your holiday decorations or create thoughtful gifts. Remember to prepare your ornaments, choose the right paints, plan your design, use thin layers of paint, and experiment with different techniques. Add patterns and details, seal your artwork, and proudly display and enjoy your beautiful creations. Let your creativity shine and spread holiday cheer with your hand-painted acrylic ornaments!
Creative Ways to Personalize Acrylic Ornaments with Names and Designs
Acrylic ornaments are a popular choice when it comes to decorating Christmas trees or adding a touch of personalization to any special occasion. These versatile ornaments can be easily customized with names and designs, making them unique and meaningful gifts or keepsakes. In this section, we will explore some creative ways to personalize acrylic ornaments with names and designs, allowing you to add a personal touch to your holiday décor or make thoughtful presents for your loved ones.
1. Laser Engraving
Laser engraving is a precise and elegant way to personalize acrylic ornaments. With the help of laser technology, intricate designs and names can be etched onto the surface of the ornament, creating a permanent and detailed customization. Laser engraved acrylic ornaments have a sleek and professional look, making them suitable for various occasions.
You can choose from a wide range of design options, including snowflakes, reindeer, Christmas trees, or even custom designs that reflect the recipient’s interests or hobbies. Personalize the ornament further by adding the recipient’s name, initials, or a meaningful message.
2. Vinyl Decals
Vinyl decals offer a versatile and affordable option for personalizing acrylic ornaments. These adhesive designs can be easily applied to the surface of the ornament, allowing for endless customization possibilities. Whether you prefer a simple monogram, a festive holiday design, or a whimsical pattern, vinyl decals give you the freedom to create unique and eye-catching ornaments.
Choose from a variety of vinyl colors and finishes, such as metallic or glitter, to enhance the overall look of the ornament. You can also experiment with different fonts and sizes to create a personalized design that suits your style.
3. Hand Painting
If you have a knack for painting, you can unleash your creativity by hand-painting acrylic ornaments. Acrylic paints are ideal for this DIY project as they adhere well to the surface of the ornament and come in a wide range of vibrant colors.
Start by sketching your design lightly on the ornament using a pencil. Then, paint your design using small brushes and acrylic paints. Whether you prefer a traditional holiday motif or a more abstract design, hand-painted acrylic ornaments can be customized to reflect your artistic style.
4. Glitter and Embellishments
Add a touch of sparkle and glamour to your acrylic ornaments by incorporating glitter and embellishments. Apply adhesive glue to specific areas of the ornament and sprinkle fine or chunky glitter over them for a dazzling effect. You can also enhance the ornament with rhinestones, sequins, or beads to create a textured and glamorous finish.
Experiment with different color combinations and patterns to achieve the desired look. From classic silver and gold to vibrant and playful hues, glitter and embellishments can transform plain acrylic ornaments into stunning personalized decorations.
5. Photo Transfer
For a sentimental touch, consider transferring photos onto acrylic ornaments. This technique allows you to showcase cherished memories and create unique keepsakes. Start by printing the desired photos onto special transfer paper using an inkjet printer. Trim the photo to fit the ornament and place it face down on the acrylic surface. Apply gentle pressure and moisten the back of the paper with a damp cloth to transfer the image onto the ornament.
Personalize the photo further by adding names, dates, or captions using a marker or paint pen. Whether you choose to display family portraits, pet photos, or vacation snapshots, photo transfer ornaments provide a heartfelt and personalized touch to your holiday decorations.
Summary
Personalizing acrylic ornaments with names and designs is a wonderful way to add a special touch to your holiday décor or create heartfelt gifts for your loved ones. Whether you opt for laser engraving, vinyl decals, hand painting, glitter and embellishments, or photo transfer, these creative techniques allow you to transform plain acrylic ornaments into one-of-a-kind keepsakes. Let your imagination soar and create personalized ornaments that will be treasured for years to come.
DIY Acrylic Ornament Embellishments to Make them Truly Stunning
Acrylic ornaments are a popular choice for holiday decorations, as they are lightweight, shatterproof, and can be easily customized. If you’re looking to make your acrylic ornaments truly stunning and unique, you can add embellishments to enhance their appearance. In this section, we will explore some creative DIY ideas to transform your acrylic ornaments into beautiful works of art.
1. Glitter and Sequins
Add a touch of sparkle to your acrylic ornaments by using glitter and sequins. Start by applying a thin layer of clear glue on the surface of the ornament. Sprinkle glitter or sequins over the glue, making sure to cover the entire surface evenly. Gently tap off any excess glitter or sequins and allow the glue to dry completely. This simple technique will instantly elevate your ornaments and give them a dazzling, eye-catching look.
2. Painted Designs
Another way to personalize your acrylic ornaments is by painting intricate designs on them. You can use acrylic paints in various colors to create patterns, such as snowflakes, stars, or geometric shapes. For a more festive touch, consider using metallic or pearlized paints. Use a fine-tip brush to ensure precise details and allow the paint to dry before handling the ornament. This technique allows you to unleash your creativity and add a personal touch to your holiday decor.
3. Decoupage
Decoupage is a versatile technique that involves gluing paper cutouts onto a surface and sealing them with a protective layer. To decoupage your acrylic ornaments, start by selecting decorative paper or napkins with patterns or images you like. Cut out the desired shapes or designs and apply a thin layer of decoupage glue to the surface of the ornament. Carefully place the cutouts onto the glue, smoothing out any wrinkles or air bubbles. Once the glue has dried, apply another layer of decoupage glue to seal the design and protect it from wear and tear. This technique allows you to create intricate and visually stunning ornaments that reflect your personal style.
4. Ribbon and Bows
Add a touch of elegance to your acrylic ornaments by attaching ribbons and bows. Choose ribbons in different colors, patterns, and textures to complement the overall theme of your holiday decor. Cut the ribbons into desired lengths and tie them into bows or create loops to hang the ornaments. You can also use a thin strip of ribbon to create a hanging loop at the top of the ornament. This simple addition will instantly elevate the look of your acrylic ornaments and make them stand out.
5. Beads and Charms
For a more intricate and glamorous look, consider adding beads and charms to your acrylic ornaments. You can use small beads in various shapes and colors to create patterns or simply string them together to form a dangling embellishment. Charms such as snowflakes, angels, or bells can be attached to the ornaments using small jump rings or thin wire. This technique allows you to create ornaments that are not only visually stunning but also have a tactile element.
By adding these DIY acrylic ornament embellishments, you can transform simple acrylic ornaments into stunning pieces of holiday decor. Whether you prefer a sparkling and glittery look or a more intricate design, these creative ideas will help you add a personal touch to your holiday decorations. Get creative, have fun, and enjoy the process of making your acrylic ornaments truly stunning.
FAQs
1. How do I decorate acrylic ornaments?
To decorate acrylic ornaments, you can use various methods such as painting them with acrylic paint, applying adhesive vinyl decals, adding glitter or rhinestones, or using permanent markers to draw designs. Make sure to clean the surface before decorating and allow the decorations to dry completely before handling.
2. Can I use acrylic paint on acrylic ornaments?
Yes, you can use acrylic paint on acrylic ornaments. Use a soft brush to apply thin layers of paint, allowing each layer to dry before applying another. You can also mix different colors of acrylic paint to create unique designs. Finish off with a clear coat or varnish to protect the paint.
3. How can I add a personal touch to acrylic ornaments?
You can add a personal touch to acrylic ornaments by customizing them with names, dates, or special messages. Use a permanent marker or acrylic paint in a contrasting color to write or draw your personalization on the ornament. Allow the ink or paint to dry completely before handling.
Conclusion:
In conclusion, decorating acrylic ornaments can be a fun and creative activity that allows you to add a personal touch to your holiday decorations or special events. By following the steps mentioned earlier, you can achieve stunning results and create unique designs that showcase your style and imagination.
Whether you choose to use paints, markers, glitter, or other embellishments, the key is to let your creativity guide you. Remember to clean the ornaments before starting, use thin layers for better adhesion, and allow each layer to dry thoroughly.
With a little practice and experimentation, you’ll soon become an expert at decorating acrylic ornaments and be able to create beautiful keepsakes that will be cherished for years to come.