
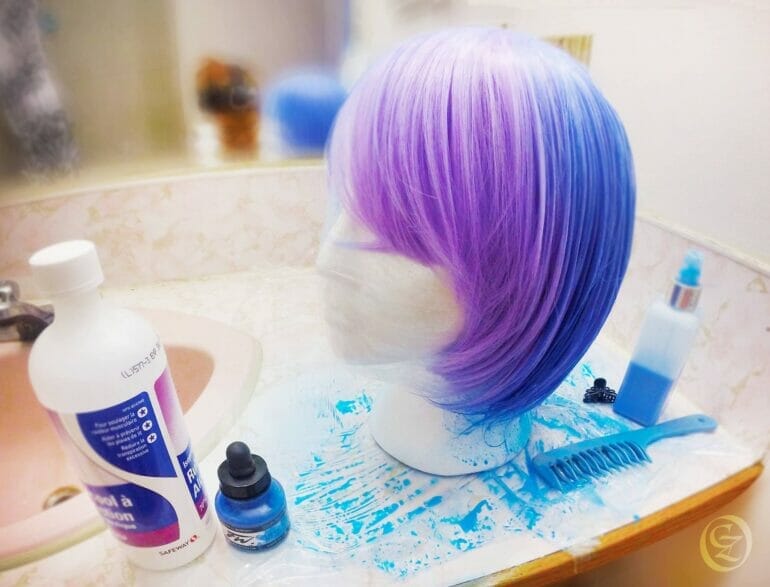
Are you looking to transform your synthetic wig with a bold and vibrant color using acrylic paint? Look no further! Dyeing a synthetic wig with acrylic paint is a creative and budget-friendly option to achieve a unique and personalized look. In this guide, we will walk you through the step-by-step process of dyeing your synthetic wig using acrylic paint, including the materials you’ll need and the best techniques to ensure a successful and long-lasting result. Let’s dive in!

Benefits of Dyeing a Synthetic Wig with Acrylic Paint
When it comes to changing the color of a synthetic wig, you may be surprised to learn that acrylic paint can be a viable option. While traditional wig dyes are often used, acrylic paint offers some unique benefits that make it an attractive choice for those looking to transform their synthetic wigs. In this section, we will explore the advantages of dyeing a synthetic wig with acrylic paint.
1. Wide Range of Colors
Acrylic paint comes in a vast array of colors, giving you the freedom to choose from an extensive palette. Whether you want a natural hair color or something bold and vibrant, acrylic paint offers a wide range of options to suit your preferences. This versatility allows you to achieve the desired look for your synthetic wig.
2. Customization and Creativity
One of the major advantages of using acrylic paint to dye a synthetic wig is the ability to fully customize and express your creativity. Unlike traditional wig dyes, which often come in limited color options, acrylic paint allows you to mix and blend colors to create your unique shade. This opens up endless possibilities for creating a personalized and one-of-a-kind look.
3. Cost-Effective Solution
Acrylic paint is generally more affordable compared to specialized wig dyes. This cost-effective solution allows you to experiment with different colors and styles without breaking the bank. Whether you want to change the color of your wig frequently or try out a new look for a special occasion, acrylic paint provides an economical choice.
4. Long-Lasting Results
When properly applied and sealed, acrylic paint can provide long-lasting color on synthetic wigs. It adheres well to the synthetic fibers, creating a durable and vibrant finish. This means that your newly dyed wig will maintain its color integrity for an extended period, allowing you to confidently wear it without worrying about color fading or washing out.
5. Easy Application Process
Dyeing a synthetic wig with acrylic paint is a relatively straightforward process. Unlike some other dyeing methods that require specialized techniques or tools, acrylic paint can be applied using a simple brush or sponge. This makes it accessible for beginners or those new to wig customization. Additionally, acrylic paint dries quickly, reducing the overall dyeing time.
6. Non-Damaging to Wig Fibers
Unlike some traditional wig dyes that can be harsh on synthetic fibers, acrylic paint is generally non-damaging when used correctly. Synthetic wigs are typically made from materials such as Kanekalon or Toyokalon, which can withstand the application of acrylic paint without significant damage. However, it is essential to test a small section of the wig before proceeding with the full dyeing process to ensure compatibility.
7. Touch-up and Correction Options
If you make a mistake or want to make adjustments to the color of your synthetic wig, acrylic paint offers touch-up and correction options. Unlike permanent dyes, acrylic paint can be easily removed or adjusted by using soap and water or makeup remover. This flexibility allows you to experiment and make changes as needed without permanently altering the wig.
In summary, dyeing a synthetic wig with acrylic paint provides several benefits, including a wide range of colors, customization and creativity options, cost-effectiveness, long-lasting results, an easy application process, non-damaging effects on wig fibers, and touch-up and correction possibilities. When considering transforming the color of your synthetic wig, acrylic paint can be a fantastic choice that offers versatility and unique styling opportunities.
Choosing the Right Acrylic Paint for Wig Dyeing
When it comes to wig dyeing, using acrylic paint can be a great option. This versatile medium provides vibrant and long-lasting colors that can completely transform the look of your wig. However, not all acrylic paints are suitable for dyeing wigs. In this section, we will discuss the factors to consider when choosing the right acrylic paint for wig dyeing.1. Water-Based Acrylic Paint
One of the most important factors to consider is whether the acrylic paint is water-based. Water-based acrylic paints are ideal for wig dyeing as they are easy to work with and offer excellent color saturation. These paints can be diluted with water, allowing you to achieve different shades and tones.2. Non-Toxic and Safe
Since you will be applying the acrylic paint directly to the wig, it is crucial to choose paints that are non-toxic and safe for use on hair. Look for acrylic paints that are labeled as non-toxic and suitable for use on skin. This will ensure that the paint does not cause any harm or irritation to your scalp or hair.3. High Pigmentation
To achieve vibrant and long-lasting color results, opt for acrylic paints that have high pigmentation. These paints contain a higher concentration of color pigments, allowing for more intense and vivid hues. High pigmentation is especially important if you are looking to dye a dark-colored wig or want to achieve a bright, bold color.4. Compatibility with Synthetic Fibers
Since most wigs are made from synthetic fibers, it is essential to choose acrylic paints that are compatible with these materials. Look for paints specifically designed for use on synthetic fibers or fabrics. These paints adhere to the wig fibers more effectively, resulting in better color retention and longevity.5. Blendability and Mixing
If you are planning to create custom colors or blend multiple shades, consider the blendability and mixing capabilities of the acrylic paint. Some paints blend more easily than others, allowing you to create seamless transitions between different colors. Additionally, check if the paint is suitable for intermixing without losing its vibrancy or consistency.6. Finishing Options
Consider the finishing options available with the acrylic paint. Depending on your desired outcome, you may want to choose paints that offer different finishes such as matte, satin, or glossy. These options can add depth and texture to your wig dyeing project, allowing you to achieve a more realistic or unique look. In summary, choosing the right acrylic paint for wig dyeing requires considering factors such as water-based formulation, non-toxicity, high pigmentation, compatibility with synthetic fibers, blendability and mixing capabilities, and finishing options. By selecting the appropriate acrylic paint, you can achieve stunning and customized color results for your wig. Remember to follow the recommended dyeing techniques and take necessary precautions to ensure the best outcome.Preparing the Synthetic Wig for Dyeing
Before you can dye a synthetic wig, it is important to properly prepare it to ensure that the color adheres evenly and the wig remains in good condition. Here are the steps to follow when preparing a synthetic wig for dyeing:
Clean the Wig
The first step in preparing a synthetic wig for dyeing is to clean it thoroughly. Gently brush the wig to remove any tangles or knots. Then, fill a sink or basin with lukewarm water and add a small amount of wig shampoo. Immerse the wig in the water and gently swish it around for a few minutes. Rinse the wig under running water until the water runs clear. Avoid rubbing or twisting the wig, as this can damage the fibers.
Condition the Wig
After cleaning the wig, it is important to condition it to keep the synthetic fibers soft and supple. Apply a small amount of wig conditioner to your hands and distribute it evenly throughout the wig, focusing on the ends. Leave the conditioner in the wig for a few minutes to allow it to penetrate the fibers. Rinse the wig thoroughly with lukewarm water to remove all traces of conditioner.
Dry the Wig
Once the wig has been cleaned and conditioned, gently squeeze out any excess water. Avoid wringing or twisting the wig, as this can cause the fibers to become tangled or damaged. Place the wig on a clean towel and gently pat it dry to remove remaining moisture. Allow the wig to air dry completely before proceeding with the dyeing process. Avoid using heat styling tools or blow dryers, as this can cause the synthetic fibers to melt or become frizzy.
Protect the Scalp Area
Before applying the dye, it is important to protect the scalp area of the wig to prevent staining. You can use petroleum jelly or a thick conditioner to create a barrier between the dye and the scalp area. Apply a small amount of the protective product along the hairline and around the edges of the wig. This will help to prevent the dye from seeping onto the scalp and staining the wig cap.
Test the Dye
Before applying the dye to the entire wig, it is recommended to perform a patch test on a small, inconspicuous area of the wig. This will allow you to check the color result and ensure that the dye adheres properly to the synthetic fibers. Follow the instructions on the dye packaging and apply a small amount of dye to the test area. Rinse the dye off after the recommended processing time and check the color result. If you are satisfied with the outcome, you can proceed with dyeing the entire wig.
Protect the Wig Cap
To prevent the dye from staining the wig cap, you can cover it with plastic wrap or a shower cap. This will help to protect the cap from any drips or splatters during the dyeing process. Secure the plastic wrap or shower cap in place with clips or elastic bands to ensure that it stays in place throughout the dyeing process.
Apply the Dye
Once the wig is prepared and the scalp area is protected, it is time to apply the dye. Follow the instructions on the dye packaging and mix the dye according to the recommended ratios. Use a dye brush or applicator bottle to apply the dye evenly to the wig, starting from the roots and working towards the ends. Ensure that all strands are saturated with dye for a consistent color result. Allow the dye to process for the recommended amount of time, as specified on the dye packaging.
Rinse and Style
After the dye has processed, rinse the wig thoroughly under lukewarm water until the water runs clear. Avoid rubbing or twisting the wig during the rinsing process, as this can cause the color to fade unevenly. Gently squeeze out any excess water and pat the wig dry with a clean towel. Allow the wig to air dry completely before styling or wearing it.
In summary, preparing a synthetic wig for dyeing involves cleaning and conditioning the wig, protecting the scalp area, performing a patch test, applying the dye, and rinsing and styling the wig. By following these steps, you can achieve a beautiful and vibrant color result while keeping the wig in good condition.
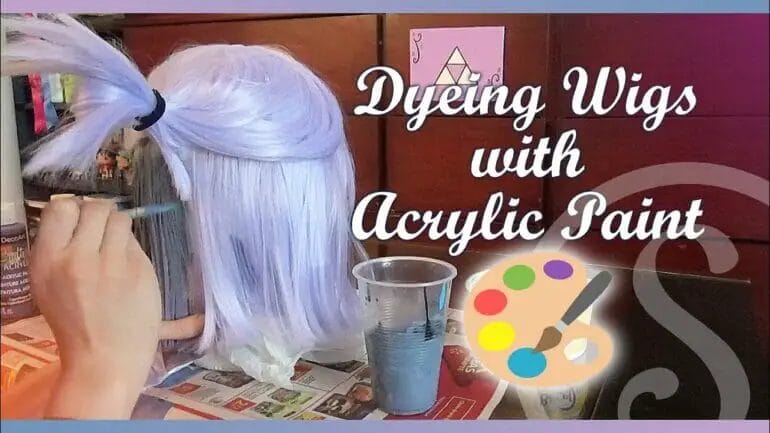
Step-by-step process of dyeing a synthetic wig with acrylic paint
Are you looking to add a pop of color to your synthetic wig? Dyeing a synthetic wig with acrylic paint can be a fun and creative way to achieve a unique and vibrant look. In this section, we will walk you through a step-by-step process of dyeing your synthetic wig with acrylic paint.
1. Gather the necessary supplies
Before you begin the dyeing process, it is essential to gather all the necessary supplies. Here’s what you’ll need:
- A synthetic wig
- Acrylic paint in your desired color(s)
- Paintbrushes
- Water
- Plastic or newspaper to protect your work surface
- Disposable gloves
- Small bowls or cups for mixing paint
2. Prepare your work area
Protect your work surface by laying down plastic or newspaper. This will prevent any accidental spills or stains on your furniture or floor. Make sure you are working in a well-ventilated area as acrylic paint can have a strong odor.
3. Detangle and comb the wig
Before applying the paint, ensure that the wig is completely detangled and combed. This will ensure even coverage and prevent any clumps or knots in the finished result.
4. Mix the paint
Start by mixing your acrylic paint in a small bowl or cup. You can mix different colors to create a customized shade. Add water to the paint to dilute it slightly and create a more fluid consistency. Test the color on a small section of the wig to ensure you have achieved the desired shade.
5. Begin the dyeing process
Put on disposable gloves to protect your hands from the paint. Dip your paintbrush into the mixed paint, making sure to coat the bristles evenly. Apply the paint to the wig in gentle, even strokes, starting from the roots and working your way down to the ends. Be careful not to saturate the wig with too much paint, as it may affect the texture.
6. Allow the paint to dry
After you have finished applying the paint, set the wig aside and allow it to dry completely. This may take several hours depending on the thickness of the paint and the ventilation in your workspace. Avoid touching or manipulating the wig while it is drying to prevent smudging or unevenness.
7. Style and care for your dyed wig
Once the wig is fully dry, you can style it as desired. Use a wide-toothed comb or wig brush to gently comb through the hair and remove any tangles. Avoid using heated styling tools on synthetic wigs, as they can melt or damage the fibers.
To extend the longevity of your dyed wig, avoid exposing it to excessive heat or direct sunlight. When not in use, store it in a cool and dry place to prevent color fading. If necessary, you can touch up the color by repeating the dyeing process.
8. Summary
Dyeing a synthetic wig with acrylic paint is a creative way to personalize and add a burst of color to your wig collection. By following these step-by-step instructions, you can achieve a vibrant and unique look. Remember to gather the necessary supplies, prepare your work area, detangle the wig, mix the paint, apply it evenly, allow it to dry, and then style and care for your dyed wig. Have fun experimenting with different colors and techniques to create your desired look!
Tips and Tricks for Achieving Desired Color and Longevity
When it comes to achieving the perfect color and ensuring the longevity of your desired results, there are several tips and tricks that can help you achieve the best outcome. Whether you are dyeing your hair, painting a room, or selecting the perfect shade for your nails, these strategies can make a significant difference. In this section, we will explore various techniques to help you achieve your desired color and ensure it lasts.
1. Prep and Prime
One of the key factors in achieving the desired color and ensuring its longevity is proper preparation. Whether you are coloring your hair or painting a surface, it is important to properly prepare the area before applying the color.
For hair dye, this means washing your hair thoroughly to remove any build-up or residue that could interfere with the color application. Additionally, consider using a color-safe shampoo and conditioner to maintain the vibrancy of your hair color between treatments.
When painting a room or a surface, make sure to clean the area thoroughly and remove any dirt, dust, or grease. It is also essential to prime the surface before applying the paint to ensure better adhesion and long-lasting results.
2. Choose the Right Products
Selecting the right products is crucial when it comes to achieving the desired color and longevity. Whether it’s hair dye, paint, or nail polish, opt for high-quality products that are known for their color intensity and durability.
When choosing hair dye, look for brands that offer a wide range of shades and have a reputation for vibrant, long-lasting colors. Additionally, consider using products specifically formulated for your hair type and color-treated hair to maintain the color’s longevity.
For painting projects, invest in quality paint that is designed to withstand wear and tear. Look for paints that are labeled as washable and scrubbable to ensure easy maintenance and long-lasting color.
Similarly, when selecting nail polish, choose brands that offer a wide range of shades and have a reputation for their chip-resistant formulas. Consider using a base coat and top coat to enhance the longevity of your manicure.
3. Follow Instructions
Following the instructions provided by the manufacturer is essential for achieving the desired color and ensuring longevity. Whether it’s the mixing ratio for hair dye, the recommended number of coats for paint, or the curing time for nail polish, following the instructions will help you achieve the best results.
When applying hair dye, be sure to mix the color and developer according to the instructions provided. Adhering to the recommended processing time and rinsing thoroughly will help you achieve the desired shade and ensure the color lasts longer.
For paint projects, follow the instructions regarding the number of coats needed, drying time between coats, and any additional steps such as sanding or sealing. This will help you achieve a professional finish and ensure the color stays vibrant for years to come.
When it comes to nail polish, allowing each coat to dry fully and applying a top coat can help prevent chipping and extend the life of your manicure.
4. Protect from Fading
To ensure the longevity of your desired color, it is important to protect it from fading. Exposure to sunlight, heat, and harsh chemicals can cause colors to fade or change over time.
When coloring your hair, consider using a color-protecting shampoo and conditioner. These products are specifically formulated to help preserve the vibrancy of your hair color and protect it from fading caused by UV rays and environmental factors.
For painted surfaces, consider using curtains, blinds, or UV-protective films on windows to minimize sun exposure. Additionally, avoid using harsh cleaning chemicals that can strip away the color and opt for gentle cleaning solutions instead.
When it comes to nail polish, avoid prolonged exposure to water and harsh chemicals as they can cause chipping and fading. Wearing gloves while doing household chores and applying a top coat every few days can help protect your manicure and extend its lifespan.
5. Maintenance and Touch-Ups
Maintaining and touching up your color plays a significant role in ensuring its longevity. Whether it’s regular touch-ups for hair color, periodic touch-ups for painted surfaces, or refreshing your manicure, these maintenance steps can help you maintain the desired color.
For hair color, schedule regular touch-up appointments with your hairstylist to cover any regrowth and maintain a consistent color. This will help you avoid color banding and ensure your hair color looks fresh and vibrant.
When it comes to painted
FAQs
1. Can I dye a synthetic wig with acrylic paint?
No, it is not recommended to dye a synthetic wig with acrylic paint. Synthetic wigs are made of plastic fibers, and acrylic paint is not suitable for this type of material. It may not adhere properly to the wig fibers and can cause damage or ruin the wig altogether.
2. How can I change the color of a synthetic wig?
To change the color of a synthetic wig, it is best to use specially formulated wig dyes or fabric markers that are designed for synthetic materials. These products are gentle on the wig fibers and provide better, longer-lasting results compared to alternative methods like acrylic paint.
3. Can I use heat to dye a synthetic wig?
No, heat should not be used to dye a synthetic wig. Synthetic fibers are sensitive to high temperatures and can melt or become permanently damaged. It is important to follow the instructions provided with wig dyes or consult a professional when coloring a synthetic wig.
Conclusion:
In conclusion, dyeing a synthetic wig with acrylic paint is an affordable and creative way to personalize your wig. By following the proper steps of prepping, mixing, and applying the paint, you can achieve a vibrant and unique color that suits your style. It is important to note that the longevity of the color may vary, and regular touch-ups may be required. Additionally, keep in mind that the use of heat styling tools should be avoided to maintain the color and integrity of the wig. Overall, with some patience and experimentation, acrylic paint can offer an exciting and temporary transformation to your synthetic wig.
However, it is essential to exercise caution and perform a patch test on a small section of the wig before full application to ensure compatibility and avoid any damage. If you are unsure or want a more permanent color change, consider professional wig dyeing services or exploring alternative methods specifically designed for synthetic wig coloring. Remember to always care for your wig properly to maintain its quality and prolong its lifespan. With diligence and creativity, you can enjoy a beautifully colored synthetic wig that expresses your individuality.