
If you are looking to rejuvenate your wooden surfaces with a fresh coat of paint, you may be wondering if you can use concrete paint on wood. While concrete paint is specifically formulated for concrete surfaces, it is not recommended for use on wood. The porous nature of concrete paint may not adhere properly to wood, leading to peeling and flaking. Instead, opt for a paint specifically designed for wood to ensure a long-lasting and professional finish.
Benefits of Using Concrete Paint on Wood Surfaces
Wood surfaces can be prone to damage and decay over time, especially when exposed to various weather conditions. To protect and enhance the longevity of wood surfaces, many homeowners and contractors turn to concrete paint as a viable solution. Concrete paint offers several benefits when applied to wood surfaces, making it a popular choice for both residential and commercial projects.
1. Protection against Moisture
One of the primary benefits of using concrete paint on wood surfaces is its ability to provide protection against moisture. Wood can absorb water, which can lead to swelling, warping, and rotting. Concrete paint acts as a barrier, preventing moisture from seeping into the wood and causing damage. This is particularly important for areas that are exposed to rain, snow, or high humidity levels.
2. Improved Durability
Concrete paint adds an extra layer of durability to wood surfaces, making them more resistant to wear and tear. It helps prevent scratches, stains, and fading, ensuring that the wood retains its aesthetic appeal for a longer period. With the right type of paint and proper application, wood surfaces can withstand heavy foot traffic, furniture movement, and other daily activities without showing signs of damage.
3. Enhanced Aesthetics
Applying concrete paint to wood surfaces can instantly transform their appearance. With a wide range of colors and finishes available, homeowners and contractors have the flexibility to choose a paint that complements the overall design and style of the space. Whether it’s a rustic wooden deck or a sleek wooden floor, concrete paint can create a visually appealing surface that enhances the overall aesthetic appeal.
4. Easy Application
Concrete paint is relatively easy to apply on wood surfaces, making it a convenient option for DIY enthusiasts and professionals alike. It can be rolled, brushed, or sprayed onto the wood, depending on the desired finish and the size of the project. This allows for quick and efficient application, saving both time and effort. Additionally, concrete paint dries relatively quickly, allowing for faster completion of the project.
5. Cost-Effective Solution
Compared to other alternatives, such as staining or sealing wood surfaces, concrete paint offers a cost-effective solution. It provides similar protective benefits while also offering versatility in terms of color and finish options. With proper maintenance, a well-applied coat of concrete paint can withstand the test of time, reducing the need for frequent repairs or replacements.
In summary, using concrete paint on wood surfaces offers several benefits, including protection against moisture, improved durability, enhanced aesthetics, easy application, and cost-effectiveness. By utilizing concrete paint, wood surfaces can be preserved and beautified, prolonging their lifespan and maintaining their visual appeal for years to come.
Step-by-Step Guide: Applying Concrete Paint on Wood
In this section, we will provide you with a step-by-step guide on how to apply concrete paint on wood. Whether you want to refresh the look of your outdoor deck or protect an indoor wooden floor, concrete paint can be a great solution. Follow the instructions below to achieve a professional-looking finish.
Materials You Will Need:
- Concrete paint
- Paint roller or brush
- Paint tray
- Drop cloth or plastic sheets
- Painter’s tape
- Sandpaper
- Clean cloth or sponge
- Primer (optional)
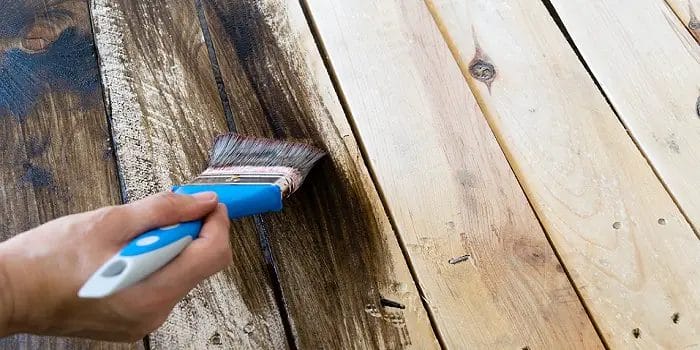
Step 1: Prepare the Surface
The first step is to prepare the wooden surface for painting. Start by cleaning the wood thoroughly to remove any dirt, dust, or debris. Use a clean cloth or sponge and warm soapy water to wipe down the surface. Allow it to dry completely before moving on to the next step.
Step 2: Sand the Wood
To ensure a smooth and even finish, it’s important to sand the wood. Use sandpaper to gently sand the surface, going with the grain of the wood. This will help remove any rough patches or imperfections and create a better surface for the paint to adhere to.
Step 3: Apply Primer (optional)
Depending on the condition of the wood and the type of paint you’re using, you may need to apply a primer. Primer can help improve the adhesion of the paint and create a more durable finish. Follow the manufacturer’s instructions for the specific primer you’ve chosen.
Step 4: Tape Off and Protect Surrounding Areas
Before you start painting, take the time to tape off and protect any surrounding areas that you don’t want to get paint on. Use painter’s tape to cover edges, trim, and any other surfaces that should remain unpainted. Lay down drop cloths or plastic sheets to protect the floor or ground.
Step 5: Stir the Paint
Open the can of concrete paint and use a stir stick to thoroughly mix the paint. This will ensure that the color and consistency are uniform throughout. Follow the manufacturer’s instructions for any specific mixing recommendations.
Step 6: Apply the Paint
Pour the concrete paint into a paint tray and dip your roller or brush into the paint. Start applying the paint to the wood, working in small sections at a time. Use smooth, even strokes to cover the surface. If needed, apply a second coat once the first coat has dried according to the manufacturer’s instructions.
Step 7: Allow the Paint to Dry
After you’ve finished applying the paint, allow it to dry completely. This may take several hours or even overnight, depending on the type of paint and environmental conditions. Avoid walking on or placing any objects on the freshly painted surface until it is fully dry.
Step 8: Clean Up
Once the paint is dry, remove the painter’s tape and carefully fold up and dispose of the drop cloths or plastic sheets. Clean your paint brushes or rollers according to the paint manufacturer’s instructions. Proper clean-up will help prolong the life of your tools and ensure they’re ready for future projects.
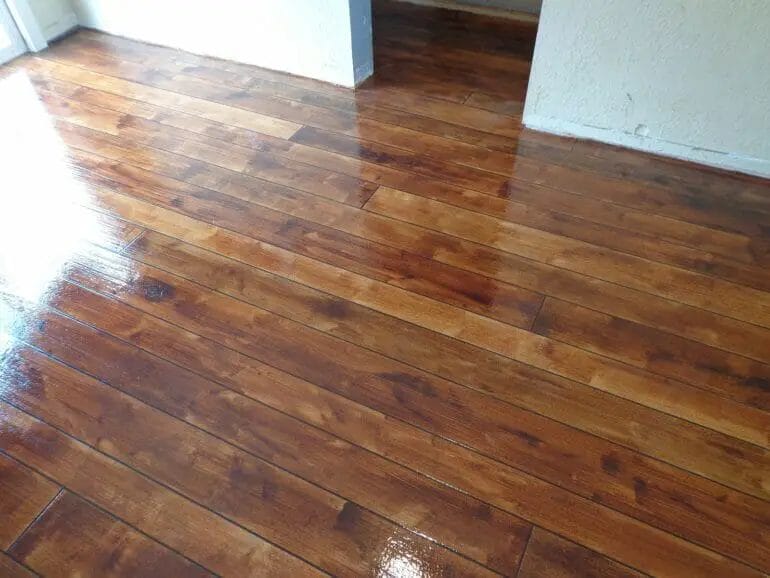
Step 9: Enjoy Your Newly Painted Wood
Once the paint is fully dry and the area is clean, you can enjoy your newly painted wood. Whether it’s a deck, floor, or other wooden surface, the fresh coat of concrete paint will add beauty and protection for years to come.
In summary, applying concrete paint on wood is a straightforward process that requires proper surface preparation, priming (if necessary), and careful application of the paint. By following this step-by-step guide, you can achieve a professional-looking finish and enhance the appearance of your wooden surfaces.
Tips for Choosing the Right Concrete Paint for Wood
Using concrete paint on wood surfaces can be a great way to give them a fresh and durable finish. Whether you’re refinishing your deck, patio, or any other wooden structure, selecting the right concrete paint is essential for a successful project. Here are some important tips to consider when choosing the right concrete paint for wood:
1. Select a Concrete Paint Specifically Designed for Wood
When choosing a concrete paint for wood, it is crucial to select a product that is specifically designed for this purpose. Concrete paints designed for wood have special formulations that adhere well to the wood surface, providing excellent durability and longevity. These paints also offer better flexibility to withstand the expansion and contraction of wood due to weather changes.
2. Consider the Type of Wood Surface
The type of wood surface you are painting will also influence your choice of concrete paint. Different types of wood require specific types of paint to ensure optimal adhesion and protection. For example, softwoods like pine or cedar may need a paint with a primer included, while hardwoods such as oak or mahogany may require a separate primer application before painting.
3. Check for UV Protection
If your wood structure is exposed to direct sunlight, it is essential to choose a concrete paint that provides UV protection. UV rays can cause colors to fade and surfaces to deteriorate over time. Look for a paint that offers UV resistance to ensure long-lasting color and protection from sun damage.
4. Consider the Desired Finish
Concrete paints for wood come in various finishes, such as matte, satin, or gloss. Consider the desired look and feel of your wood surface when choosing a paint finish. Matte finishes offer a more natural appearance, while glossy finishes provide a reflective and polished look.
5. Evaluate Durability and Resistance
Wood surfaces are exposed to various elements, including foot traffic, moisture, and harsh weather conditions. It is essential to choose a concrete paint that offers excellent durability and resistance. Look for a paint that is resistant to chipping, cracking, and peeling. Additionally, consider if the paint is suitable for high-traffic areas or if it offers resistance to stains, mold, and mildew.
6. Read Reviews and Seek Recommendations
Before making a final decision, it is beneficial to read product reviews and seek recommendations from professionals or other homeowners who have used concrete paint on wood surfaces. Their experiences and insights can help you make an informed choice and select a reliable and high-quality concrete paint.
7. Follow Proper Application Techniques
Once you have chosen the right concrete paint for wood, it is crucial to follow proper application techniques for the best results. Proper surface preparation, including cleaning and sanding, is essential to ensure optimal adhesion. Follow the manufacturer’s instructions regarding application tools, recommended number of coats, and drying times.
In summary, choosing the right concrete paint for wood involves considering factors such as the paint’s suitability for wood surfaces, the type of wood, UV protection, desired finish, durability, and resistance. Reading reviews and seeking recommendations can also provide valuable insights. By following these tips and applying the paint correctly, you can achieve a beautiful and long-lasting finish for your wood structures.
Common Mistakes to Avoid When Using Concrete Paint on Wood
Painting wood with concrete paint can give it a unique and stylish look. However, it is important to avoid certain mistakes to ensure a successful and long-lasting finish. Here are some common mistakes to avoid when using concrete paint on wood:
- Not preparing the surface: One of the biggest mistakes is not properly preparing the wood surface before applying concrete paint. It is crucial to clean the wood thoroughly, removing any dirt, dust, or debris. Additionally, sanding the surface can help create a smooth and even base for the paint.
- Using the wrong type of paint: Concrete paint is specifically designed for use on concrete surfaces, and using it on wood can lead to poor adhesion and durability. It is important to choose a paint that is specifically formulated for wood surfaces. Look for a paint that provides excellent adhesion and is suitable for both indoor and outdoor use.
- Skipping the primer: Primer is an essential step when painting wood with concrete paint. It helps the paint adhere better to the surface, improves the color coverage, and enhances the overall durability of the finish. Skipping the primer can result in an uneven and less durable paint job.
- Applying too thick of a coat: Applying a thick coat of concrete paint may seem like a time-saving technique, but it can lead to problems such as cracking, peeling, and poor adhesion. It is important to follow the manufacturer’s instructions and apply thin and even coats of paint. Multiple coats can be applied if necessary.
- Not allowing proper drying and curing time: Concrete paint requires sufficient drying and curing time to fully bond with the wood surface and achieve maximum durability. Rushing the drying process can result in paint that easily chips or flakes off. Be sure to follow the recommended drying and curing times provided by the paint manufacturer.
- Ignoring weather conditions: Painting wood with concrete paint in unfavorable weather conditions can lead to a poor finish. Extreme temperatures, high humidity, or wet conditions can interfere with the drying and curing process, affecting the performance and longevity of the paint. It is best to choose a dry and moderate temperature day for painting.
Avoiding these common mistakes can help ensure a successful and long-lasting finish when using concrete paint on wood. By properly preparing the surface, using the right type of paint, applying a primer, using thin coats, allowing for proper drying and curing time, and considering weather conditions, you can achieve a beautiful and durable painted wood surface.
Alternative Options for Painting Wood Surfaces
When it comes to painting wood surfaces, many people automatically think of using traditional paint. While paint is a popular choice, there are several alternative options available that can provide unique finishes and effects. In this section, we will explore some of these alternative options for painting wood surfaces.
1. Staining
Staining is a popular alternative to painting wood surfaces, especially when you want to enhance the natural beauty of the wood grain. Unlike paint, which sits on top of the wood, stain penetrates the wood fibers to give a more transparent and natural look. Stains are available in a variety of colors and finishes, allowing you to achieve different effects depending on your preference.
There are two main types of stain: oil-based and water-based. Oil-based stains tend to provide a deeper, richer color and are more durable, while water-based stains dry faster and have less odor. Before applying stain, it is important to prepare the wood surface by sanding it and removing any existing finish or sealant.
2. Varnishing
Varnishing is another alternative option for painting wood surfaces, particularly if you want to add a protective layer while preserving the natural look of the wood. Varnish creates a clear or slightly tinted coating on the wood surface, enhancing its natural color and providing a glossy or satin finish.
There are different types of varnishes available, including polyurethane, spar varnish, and lacquer. Polyurethane varnish is the most common and provides excellent durability and protection against scratches and moisture. Spar varnish is specifically designed for exterior use and offers enhanced UV resistance. Lacquer is a fast-drying varnish that provides a high-gloss finish but may require more maintenance.
3. Whitewashing
Whitewashing is a technique that involves applying a thin, semi-transparent layer of white or light-colored paint on the wood surface to create a washed-out, weathered look. This technique is particularly popular for achieving a rustic or vintage aesthetic. The paint is diluted with water to achieve the desired transparency, allowing the wood grain to still show through.
Whitewashing can be achieved using various methods, such as brush-on application, ragging, or spraying. After applying the whitewash, it is common to lightly sand the surface to create a more distressed appearance. Additional layers of whitewash can be added to achieve the desired level of opacity.
4. Wood Bleaching
Wood bleaching is a technique used to lighten the color of wood, making it ideal for creating a more contemporary or bleached-out look. Bleaching agents are applied to the wood surface to remove or neutralize the natural pigments, resulting in a lighter shade.
Before bleaching, it is important to thoroughly clean and prepare the wood surface. There are different types of bleaching agents available, including chlorine bleach, oxalic acid, and hydrogen peroxide. It is crucial to follow the manufacturer’s instructions and safety precautions when using bleaching agents.
5. Wood Burning
Wood burning, also known as pyrography, is a technique that involves using a heated tool to create patterns, designs, or images on the wood surface. This alternative option allows you to create intricate and personalized artwork directly on the wood.
There are various wood burning tools available, ranging from simple pens to more advanced pyrography kits. Different tips can be used to achieve different effects and levels of detail. It is important to practice on scrap wood before working on your desired project to become familiar with the tool and avoid any mistakes.
In summary, when it comes to painting wood surfaces, there are alternative options that can provide unique finishes and effects. Staining, varnishing, whitewashing, wood bleaching, and wood burning offer different ways to enhance the natural beauty of wood while achieving various aesthetics. Consider these alternative options to add a touch of creativity and uniqueness to your wood projects.
FAQs
Can I use concrete paint on wood?
No, concrete paint is specifically designed for use on concrete surfaces and may not adhere properly to wood. It is recommended to use a paint specifically formulated for wood surfaces to achieve the best results.

Conclusion
In summary, while it is technically possible to use concrete paint on wood, it may not be the most suitable option. Concrete paint is specifically formulated for use on concrete surfaces, and may not adhere properly or provide long-lasting results on wood.
If you are looking to paint a wooden surface, it is recommended to use paint that is designed specifically for wood, such as wood paint or latex paint. These types of paint are formulated to provide better adhesion, durability, and protection for wood surfaces.
So, for the best results and a long-lasting finish, it is advised to choose the appropriate paint product for the specific surface you are working with.