
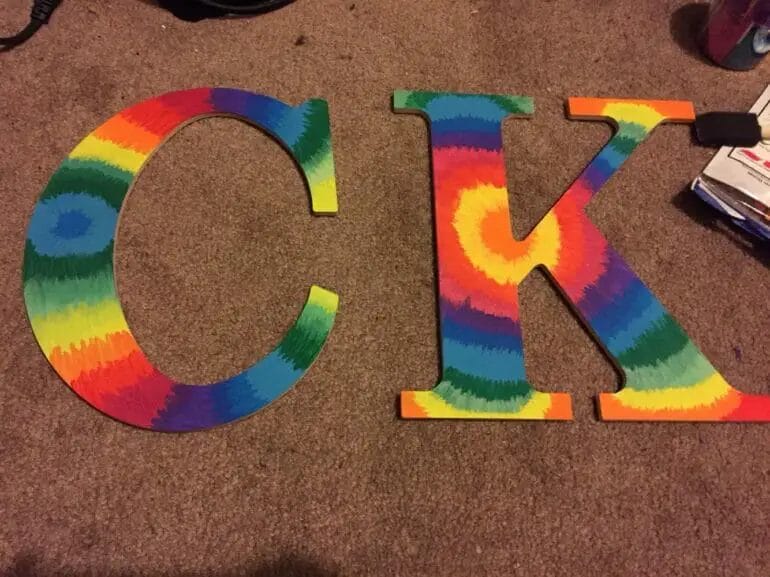
If you are looking to add a vibrant and unique touch to your wooden crafts, then spray painting tie dye on wood is the perfect technique to explore. With its bold colors and mesmerizing patterns, tie dye spray paint offers a fresh and modern twist to traditional wood finishes. Whether you want to revamp furniture, create wall art, or personalize home decor items, this DIY method allows you to unleash your creativity and achieve stunning results. Read on to discover the step-by-step process and tips to master the art of spray painting tie dye on wood.
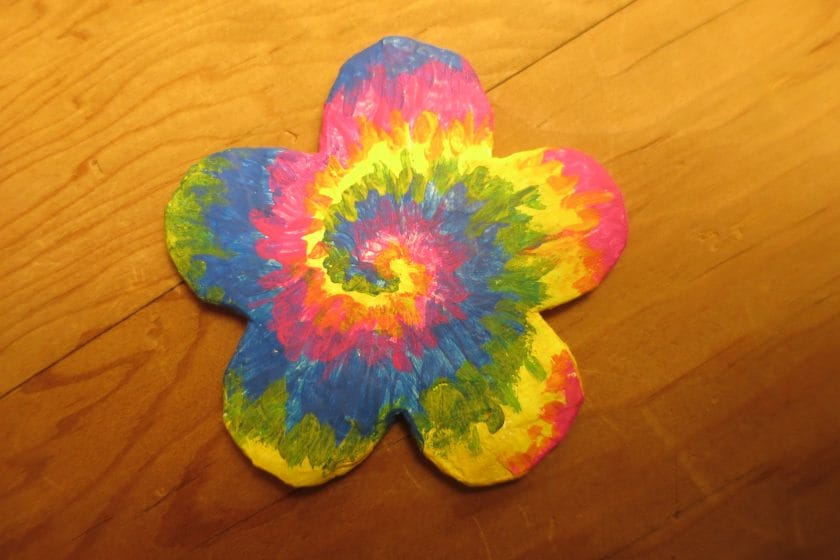
Creative DIY: Transforming Wood with Spray Paint Tie Dye
Are you looking for a fun and unique way to add a pop of color to your wooden furniture or decor? Look no further than spray paint tie dye! This creative DIY technique allows you to transform ordinary wood into a vibrant and eye-catching masterpiece. In this section, we will explore the step-by-step process of spray paint tie dye and provide some tips and inspiration to get you started.
Materials Needed
Before diving into the world of spray paint tie dye, gather the following materials:
- Wooden item(s) you wish to transform
- Spray paint in various colors
- Drop cloth or newspaper to protect your working surface
- Protective gloves and mask
- Painter’s tape
- Water-based sealant or varnish (optional)
Step 1: Prep Your Workspace
Start by setting up a well-ventilated and covered workspace. Lay down a drop cloth or newspaper to protect your working surface from any stray spray paint.
Step 2: Prepare the Wood
If your wooden item has any rough spots or imperfections, sand them down to create a smooth surface. Wipe away any dust or debris with a clean cloth.
Step 3: Masking
Use painter’s tape to mask off any areas you want to keep unpainted. This could be the edges, certain patterns, or specific sections of the wood.
Step 4: Spray Paint Application
Shake your spray paint cans thoroughly before starting. Hold the can about 6-8 inches away from the wood and lightly spray in short bursts. Experiment with different colors and techniques to create your desired tie-dye effect. Allow the paint to dry between layers if you want to add more depth and dimension.
Step 5: Remove Tape and Finishing Touches
Once the spray paint has fully dried, carefully remove the painter’s tape to reveal the unpainted areas. If desired, you can apply a water-based sealant or varnish to protect the painted surface and give it a glossy finish.
Inspiration and Tips
Looking for some inspiration to get started? Here are a few ideas:
- Create an ombre effect by gradually blending multiple colors from light to dark.
- Experiment with different patterns such as stripes, spirals, or splatters.
- Combine spray paint tie dye with other techniques like stenciling or decoupage to add more visual interest.
- Consider using contrasting colors to make your designs really stand out.
- Don’t be afraid to think outside the box and try new color combinations.
Summary
Spray paint tie dye is a fantastic way to transform plain wooden items into vibrant and unique pieces of art. By following the step-by-step process outlined above and experimenting with different colors and techniques, you can create stunning and personalized designs. So, gather your materials, set up your workspace, and let your creativity run wild!
Step-by-Step Guide: Spraying Tie Dye Patterns on Wood
If you’re looking to add a vibrant and unique touch to your wooden furniture or decor, why not try tie dye? Tie dye patterns can bring a fun and colorful element to any wooden surface, creating a one-of-a-kind look. In this step-by-step guide, we’ll walk you through the process of spraying tie dye patterns on wood, allowing you to unleash your creativity and transform your pieces into works of art.
Materials You’ll Need:
- Wooden surface (furniture, decor, or any other item you wish to dye)
- Painter’s tape
- Plastic sheet or tarp to protect your work area
- Tie dye spray bottles (available in various colors)
- Disposable gloves
- Protective goggles
Step 1: Prepare Your Work Area
Start by choosing a well-ventilated area, preferably outdoors or in a well-ventilated room. Lay down a plastic sheet or tarp to protect your work surface from the dye. This will ensure easy cleanup and prevent any unwanted stains on your surroundings.
Step 2: Prepare the Wooden Surface
If your wooden surface has any rough areas or imperfections, it’s best to sand them down lightly. This will create a smooth canvas for the tie dye patterns. Clean the surface thoroughly to remove any dust or debris, as this can affect the adhesion of the dye.
Step 3: Plan Your Design
Before you start spraying, it’s helpful to plan out your tie dye design. You can create simple patterns like stripes or opt for more intricate designs. Use painter’s tape to mark off areas that you want to remain dye-free or create specific patterns. This will help you achieve a more precise and controlled design.
Step 4: Prepare the Tie Dye Spray Bottles
Shake the tie dye spray bottles vigorously to ensure the dye is well-mixed. Put on your disposable gloves and protective goggles to prevent any contact with your skin or eyes. Make sure to read the instructions on the spray bottles for any specific recommendations or precautions.
Step 5: Apply the Tie Dye
Now comes the fun part! Hold the tie dye spray bottle about 6-8 inches away from the wooden surface and begin spraying. Experiment with different spraying techniques and patterns to create the desired effect. Don’t be afraid to layer different colors or blend them together for a more dynamic look.
Step 6: Let it Dry
Once you’ve finished applying the tie dye, allow the wooden surface to dry completely. This can take several hours depending on the type of dye used and the weather conditions. Make sure to follow the drying instructions provided by the dye manufacturer.
Step 7: Remove the Tape
Once the tie dye has fully dried, gently remove the painter’s tape to reveal your vibrant pattern. Take your time and peel the tape slowly to avoid any damage to the design.
Step 8: Seal the Surface (Optional)
If you want to protect the tie dye pattern and ensure its longevity, you can apply a clear sealant or varnish over the wooden surface. This will also provide a smooth and glossy finish. Make sure to choose a sealant that is compatible with the type of dye used.
Summary
Transforming your wooden surfaces with tie dye patterns is a creative and exciting project that can breathe new life into your furniture and decor. By following this step-by-step guide, you’ll be able to spray tie dye patterns on wood with ease. Remember to prepare your work area, plan your design, and take your time while applying the dye. With a little patience and creativity, you’ll have a stunning tie dye masterpiece to showcase in your home.
Unique Wood Art: Unleashing Your Creativity with Spray Paint Tie Dye
Wood art has been a popular form of creativity for centuries. From intricate carvings to elegant furniture, wood has always been a versatile medium for artistic expression. In recent years, a new trend has emerged in the world of wood art – spray paint tie dye. This innovative technique allows artists to create stunning and unique designs on wood, using spray paint and a few simple tools.
So, what exactly is spray paint tie dye? Essentially, it is a method of applying spray paint to wood in a way that mimics the vibrant and unpredictable patterns of traditional tie dye. By combining different colors and layering them in various ways, artists can achieve a stunning visual effect that is both eye-catching and one-of-a-kind.
The process of creating spray paint tie dye art on wood is relatively simple. Here’s a step-by-step guide to get started:
1. Prep your workspace and materials
Before you begin, make sure you have a well-ventilated area to work in, as spray paint can be strong-smelling. Lay down a drop cloth or newspaper to protect your work surface, and gather your materials – wood pieces, spray paint in various colors, plastic gloves, and a clear sealant if desired.
2. Choose your wood pieces
Wood art can be created on a variety of surfaces, from small blocks to larger panels. Choose the size and shape of your wood pieces based on the design you have in mind.
3. Prepare the wood
Give your wood pieces a light sanding to ensure a smooth surface for the paint to adhere to. Wipe away any dust or debris with a damp cloth.
4. Apply a base coat
Start by applying a base coat of spray paint to your wood pieces. This will serve as the background for your design. Choose a color that complements the overall aesthetic you’re going for.
5. Create your design
Now comes the fun part – creating your spray paint tie dye design! Start by shaking each can of spray paint vigorously to ensure the colors are well-mixed. Hold the can several inches away from the wood and spray short bursts of paint onto the surface. Experiment with different techniques, such as layering colors, creating gradients, or using stencils to add more intricate details.
6. Let it dry
Allow your artwork to dry completely before moving on to the next step. This will ensure that the colors don’t bleed or smudge.
7. Seal your artwork (optional)
If you want to protect your artwork and give it a glossy finish, you can apply a clear sealant over the spray paint. This will help prevent the colors from fading over time and add a professional touch to your finished piece.
8. Display and enjoy
Once your spray paint tie dye art is fully dry and sealed (if desired), it’s time to display your masterpiece! Whether you choose to hang it on the wall, prop it up on a shelf, or give it as a gift, your unique wood art is sure to be a conversation starter.
In summary, spray paint tie dye is a creative and exciting technique for creating unique wood art. With a few simple tools and a dash of creativity, you can unleash your artistic abilities and create stunning designs that are sure to impress. So why not give it a try and see what beautiful creations you can make with spray paint tie dye on wood?
From Bland to Bold: Revamping Wood with Spray Paint Tie Dye
Wood furniture and decor can add a touch of warmth and natural beauty to any space. However, over time, these pieces can start to look dull and outdated. If you’re looking to give your wooden items a fresh and vibrant makeover, spray paint tie dye is a creative and exciting technique to try. With just a few supplies and some imagination, you can transform your bland wood into bold and eye-catching pieces.
Materials Needed:
- Wooden item (furniture, picture frame, etc.)
- Spray paint in various colors
- Plastic drop cloth or newspaper
- Painter’s tape
- Water
- Bucket or spray bottle
- Clear varnish or sealer (optional)
Step 1: Prepare Your Workspace
Before you begin, it’s important to set up your workspace properly. Lay down a plastic drop cloth or newspaper to protect the surrounding area from overspray. If you’re working indoors, make sure the room is well-ventilated or consider wearing a mask to avoid inhaling fumes.
Step 2: Prepare the Wood
Start by cleaning the wooden item to remove any dirt, dust, or grease. You can use a mild soap and water solution or a wood cleaner specifically designed for the task. Once clean, allow the wood to dry completely before proceeding.
Step 3: Tape Off Areas
If there are any parts of the wood that you want to keep paint-free, such as handles or decorative accents, use painter’s tape to mask them off. This will ensure clean lines and prevent unwanted paint from reaching these areas.
Step 4: Create Your Design
Now it’s time to get creative! Shake your spray paint cans well and test them on a piece of scrap wood or cardboard to ensure the colors are as desired. Once you’re ready, hold the can about 6-8 inches away from the wood and start spraying. Use short bursts of paint and make sweeping motions to cover the surface evenly. Experiment with different colors and techniques, such as layering or blending, to achieve the desired effect. Allow each layer to dry before adding another to prevent smudging or running colors.
Step 5: Add Some Water
To create the tie-dye effect, spray some water onto the painted surface while the paint is still wet. You can use a spray bottle or dip a brush into water and flick it onto the wood. The water will react with the paint, creating unique patterns and textures. Play around with different amounts of water and see how it affects the outcome.
Step 6: Let It Dry
Once you’re satisfied with the design, set the wood aside to dry completely. The drying time will vary depending on the type and thickness of the paint, so be patient and give it ample time to cure.
Step 7: Optional Finishing Touch
If you want to protect your newly revamped wood and give it a glossy finish, you can apply a clear varnish or sealer. This will not only add a layer of protection but also enhance the colors and prolong the life of your creation. Follow the instructions on the product for proper application and drying time.
Summary
Spray paint tie dye is a fun and easy way to breathe new life into dull wooden items. By following these steps and letting your creativity run wild, you can transform your wood furniture and decor from bland to bold. Remember to prepare your workspace, clean and tape off the wood, create your design with spray paint, add water for the tie-dye effect, and allow it to dry completely. If desired, finish off with a clear varnish or sealer for added protection and shine. Get ready to impress your friends and family with your unique and vibrant wooden masterpieces!
Mastering the Art: Tips and Tricks for Spray Paint Tie Dye on Wood
If you are looking for a unique and creative way to add a vibrant touch to your wooden projects, spray paint tie dye on wood can be the perfect technique for you. This innovative method allows you to create stunning patterns and designs on wood using spray paint and a few simple tools. In this section, we will explore the step-by-step process of spray paint tie dye on wood and share some valuable tips and tricks to help you master this art.
Gather the Materials
Before you begin, make sure you have all the necessary materials at hand. Here’s what you’ll need:
- Wooden surface – Choose a smooth and untreated wood for best results.
- Spray paint – Opt for a variety of colors to create vibrant designs.
- Plastic gloves – Protect your hands from paint stains.
- Plastic wrap or garbage bags – These will be used for creating unique patterns on the wood.
- Painter’s tape – Use it to create clean lines and edges.
- Respirator mask – Ensure your safety by using a mask to protect yourself from fumes.
- Drop cloth or newspaper – Cover the working area to avoid any mess.
Prepare the Wood
Start by preparing the wooden surface for spray paint tie dye. Sand the wood to create a smooth and even texture. This will help the paint adhere properly and prevent any rough patches on the final result. Once the sanding is complete, wipe off any dust or debris using a clean cloth.
Create Your Design
Now it’s time to unleash your creativity and plan your design. Think about the colors you want to use and visualize the pattern you wish to create. You can go for a random abstract design or opt for more structured patterns like stripes, swirls, or even stenciled shapes.
Apply the Base Coat
Before you start spray painting, apply a base coat to the wooden surface. This can be a solid color or a light shade that complements the overall design. The base coat will act as a background for your tie dye pattern and enhance the vibrancy of the colors.
Mask and Protect
If you want to create clean lines and separate different colors, use painter’s tape to mask off specific areas. This will ensure sharp edges and prevent colors from bleeding into each other. You can also create unique patterns by crumpling plastic wrap or garbage bags and placing them strategically on the wood before spraying.
Start Spray Painting
Once your preparation is complete, it’s time to start spray painting. Shake the cans well and hold them approximately 6-8 inches away from the wood surface. Apply short bursts of paint, moving the can in a sweeping motion to cover the desired area. Remember to work in a well-ventilated area and wear a respirator mask to protect yourself from fumes.
Layer and Blend Colors
If you want to achieve a more vibrant and layered effect, let the first coat dry completely before applying additional colors. Gradually build up layers of paint to create depth and dimension in your design. Use different techniques like spraying from different angles or blending colors together to add visual interest.
Remove Masking and Let It Dry
Once you are satisfied with the spray paint tie dye effect, carefully remove any masking materials like painter’s tape or plastic wrap. Allow the paint to dry completely before handling or applying any protective finish. This will ensure that the colors stay vibrant and do not smudge or smear.
Apply a Protective Finish
To protect your spray paint tie dye design and prolong its lifespan, apply a clear protective finish. Choose a spray-on polyurethane or acrylic sealer that is suitable for wood surfaces. This will not only add a glossy or matte finish but also provide a protective barrier against wear and tear.
Enjoy Your Masterpiece
Once the protective finish has dried, your spray paint tie dye on wood project is complete. Admire your masterpiece and find the perfect spot to showcase it in your home or outdoor space. Whether it’s a decorative piece, a customized furniture item, or even wall art, your unique tie dye design is sure to impress.
In summary, spray paint tie dye on wood is a fantastic way to unleash your creativity and add a pop of color to your wooden projects

FAQs
How to spray paint tie dye on wood?
To spray paint tie dye on wood, you will need to follow these steps: 1. Prepare your wood surface by sanding and cleaning it. 2. Choose your desired spray paint colors. 3. Use painter’s tape to create the tie dye patterns on the wood. 4. Start spraying the paint in a random and overlapping pattern to create the tie dye effect. 5. Allow the paint to dry completely before removing the painter’s tape. 6. Apply a clear sealant to protect the painted surface.
Conclusion:
In conclusion, spraying paint tie dye on wood is a creative and fun way to add a pop of color and artistic flair to your wooden projects. By following the step-by-step process outlined in this guide, you can achieve stunning tie dye effects that will make your wood pieces stand out.
Remember to start with a clean and sanded surface, use a good quality spray paint designed for wood, and apply multiple layers for vibrant results. Experiment with different colors and techniques to create unique and eye-catching designs.
Whether you’re revamping furniture, making DIY crafts, or sprucing up your home decor, spray paint tie dye on wood offers endless possibilities for personal expression. So unleash your creativity and enjoy the colorful journey of transforming ordinary wood into extraordinary masterpieces!