
Achieve stunning and vibrant results by learning how to paint a vase in acrylic. With its versatile nature and quick drying time, acrylic paint is the perfect medium for this project.
Begin by selecting a vase that suits your artistic vision and ensure it is clean and dry before starting. Next, apply a base coat to the vase using a brush or sponge, allowing it to dry completely.
Once the base coat is dry, sketch out your desired design lightly using a pencil. Take your acrylic paints and carefully layer them to create depth and dimension, blending colors as needed.
Don’t forget to add details and highlights to make your vase truly stand out. Finally, once your masterpiece is complete, allow it to dry completely before displaying it proudly in your home or giving it as a thoughtful gift.
With these simple steps and a little creativity, you’ll be able to transform an ordinary vase into a stunning work of art using acrylic paint.
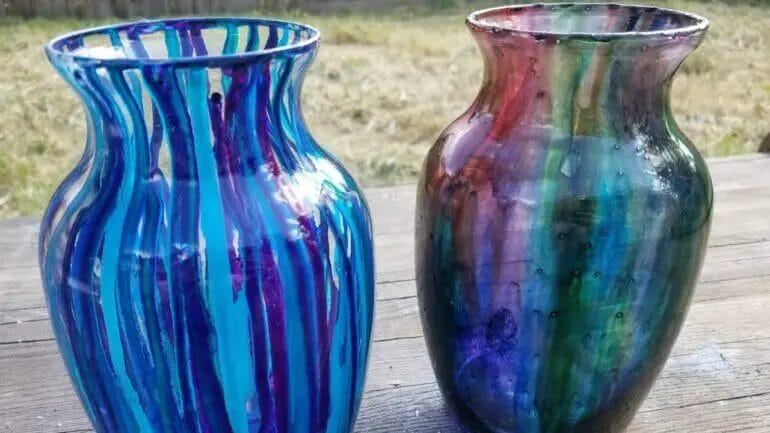
Acrylic Painting Techniques for Vases: Tips to Create Stunning Textures and Effects
Acrylic painting is a versatile medium that allows artists to create stunning textures and effects on various surfaces. One such surface that can be transformed using acrylic paints is a vase. Whether you want to give an old vase a fresh look or create a unique piece of art, mastering the right techniques can help you achieve the desired results. In this section, we will explore some tips and techniques to create stunning textures and effects on vases using acrylic paints.
1. Surface Preparation
Before you start painting, it is important to prepare the surface of the vase properly. Clean the vase thoroughly to remove any dust or dirt. Then, apply a primer or gesso to create a smooth and even surface for the paint to adhere to. This will ensure better adhesion and longevity of your artwork.
2. Layering Techniques
One of the key techniques in creating stunning acrylic paintings on vases is layering. Start by applying a base color to the entire vase using a brush or sponge. Once the base color has dried, you can add additional layers of paint using various tools such as brushes, palette knives, or even your fingers. Experiment with different colors, blending techniques, and brush strokes to create interesting textures and effects.
3. Dry Brushing
Dry brushing is a technique that involves using a dry brush and a small amount of paint to create texture and highlights on the surface of the vase. Dip the brush lightly into the paint and remove any excess on a paper towel. Then, gently brush the surface of the vase using quick, short strokes. This technique works best on vases with textured surfaces, as it enhances the details and adds depth to the overall design.
4. Splattering
Splattering is a fun and spontaneous technique that can add an element of surprise to your vase painting. Load a brush or toothbrush with paint, hold it above the vase, and flick your wrist to create splatters of paint. You can use multiple colors to create a vibrant and dynamic effect. Just make sure to protect your working area as this technique can get messy!
5. Stenciling
If you want to add intricate designs or patterns to your vase, stenciling is a great technique to try. Secure the stencil firmly onto the vase using masking tape. Then, use a sponge or stencil brush to dab the paint onto the stencil, making sure to apply an even coat. Carefully remove the stencil to reveal the pattern. You can experiment with different stencils and colors to create unique and visually appealing designs.
6. Glazing
Glazing is a technique that involves layering translucent colors over a base layer to create depth and luminosity. Start by applying a base coat of paint and let it dry completely. Then, mix a small amount of acrylic glazing medium with your desired color. Apply the glaze over the base coat using a soft brush, and blend it gently to create a smooth transition. Repeat this process with different colors to achieve a multi-dimensional effect.
7. Texturing
If you want to add texture to your vase, consider using various materials such as sand, tissue paper, or even string. Apply a layer of medium or glue to the surface of the vase, then press the chosen material onto it. Let it dry completely before painting over it. Once dry, you can paint over the textured surface using different colors and techniques to create a visually interesting and tactile design.
8. Finishing Touches
After you have painted the vase using your desired techniques, it’s time to add the finishing touches. You can use metallic paints or add details using a fine brush to enhance the overall look of your artwork. Apply a varnish or sealant to protect the paint and give it a glossy or matte finish, depending on your preference.
With these acrylic painting techniques, you can transform a plain vase into a stunning piece of art. Remember to experiment, take risks, and have fun with your creations. Each vase you paint will be a unique expression of your creativity and artistic style. So, grab your brushes and let your imagination run wild!
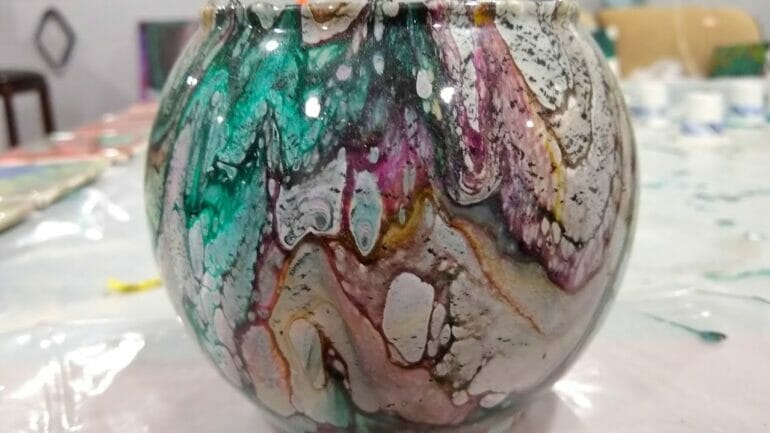
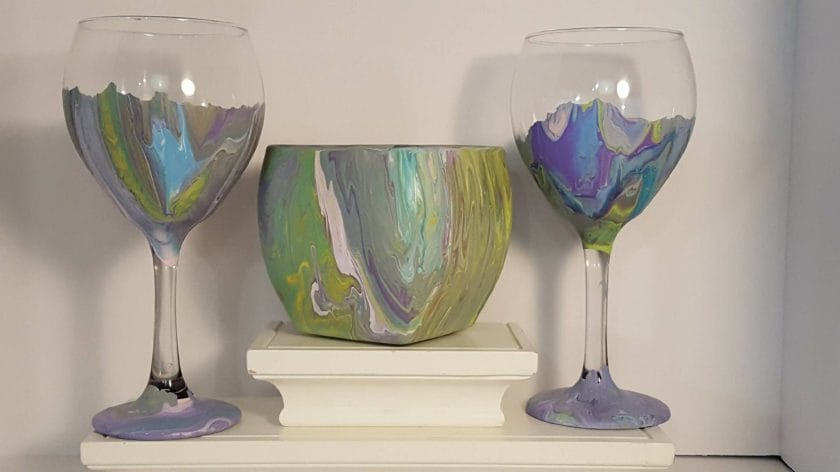
Colorful Inspirations: Ideas for Unique and Creative Designs on Acrylic Vases
Acrylic vases are the perfect canvas for expressing your creativity and adding a unique touch to your home decor. Whether you are a DIY enthusiast or simply looking for some inspiration, this article will provide you with a range of colorful ideas to transform your plain acrylic vases into stunning decorative pieces. From bold and vibrant designs to delicate and intricate patterns, there is something for everyone. Let’s explore some creative ways to bring life to your acrylic vases.
1. Abstract Art
Embrace your inner artist and create an abstract masterpiece on your acrylic vase. Use a combination of bold and contrasting colors to paint broad strokes, geometric shapes, or free-flowing patterns. You can also experiment with different painting techniques such as splatter painting or using a palette knife to create texture. Abstract art is a great way to showcase your creativity and add a modern touch to your vase.
2. Floral Delight
Bring the beauty of nature indoors by painting a floral design on your acrylic vase. Choose vibrant and eye-catching colors to depict various flowers like roses, sunflowers, or daisies. You can opt for a realistic approach or go for a more whimsical and stylized interpretation. Add some greenery and foliage to complete the floral arrangement. A floral-themed acrylic vase will brighten up any space and add a touch of elegance.
3. Ombre Magic
Create a mesmerizing ombre effect on your acrylic vase by blending two or more colors seamlessly. Start with a base color at the bottom and gradually transition to a different shade as you move upwards. You can choose colors that complement each other or go for a bold and contrasting combination. The ombre effect adds depth and dimension to your vase, making it a focal point in any room.
4. Nautical Vibes
Transport yourself to the seaside with a nautical-inspired design on your acrylic vase. Paint stripes in shades of blue and white to mimic the ocean waves. Add some nautical elements like anchors, shells, or sailboats to complete the look. This design is perfect for adding a coastal charm to your home decor and is sure to evoke a sense of relaxation and serenity.
5. Moroccan Magic
Draw inspiration from the rich and vibrant culture of Morocco by creating a Moroccan-inspired design on your acrylic vase. Use bright and warm colors like red, orange, and gold to paint intricate geometric patterns or traditional motifs. You can also add some metallic accents for an extra touch of luxury. A Moroccan-themed acrylic vase will bring a touch of exotic elegance to any room.
6. Whimsical Wonderland
Let your imagination run wild and create a whimsical wonderland on your acrylic vase. Paint adorable creatures like unicorns, mermaids, or fairies in bright and playful colors. Add some glitter or sparkles to make your design even more magical. This design is perfect for adding a touch of fantasy and enchantment to your home decor.
7. Galaxy Dreams
Bring the beauty of the cosmos to your acrylic vase by painting a galaxy-themed design. Use deep blues, purples, and blacks to create a night sky backdrop. Add stars, planets, and even a moon to complete the celestial scene. This design is perfect for adding a sense of wonder and awe to your home decor.
8. Tribal Influence
Embrace the tribal spirit by painting a tribal-inspired design on your acrylic vase. Use earthy tones like browns, oranges, and yellows to create intricate patterns and symbols. You can also incorporate tribal motifs like arrows, feathers, or dreamcatchers. This design is perfect for adding a touch of culture and tradition to your home decor.
With these colorful inspirations, you can transform your acrylic vases into unique and eye-catching decorative pieces. Let your creativity soar and unleash your artistic side to create designs that reflect your personal style. Whether you prefer bold and vibrant colors or delicate and intricate patterns, there is an idea for everyone. So, grab your paintbrushes and get ready to add a pop of color to your acrylic vases!
Step-by-Step Guide: Painting a Vase in Acrylic – From Sketching to Finishing Touches
Creating a beautiful painting can be a fulfilling and creative endeavor. If you are interested in acrylic painting and want to try your hand at creating a stunning piece of art, this step-by-step guide will walk you through the process of painting a vase using acrylic paints. From sketching the initial design to adding the finishing touches, you will learn the techniques and steps needed to create a vibrant and realistic painting.
Materials You Will Need
Before you begin, gather the following materials:
- Canvas or canvas board
- Acrylic paints
- Paintbrushes (various sizes)
- Palette for mixing paints
- Water and a jar for cleaning brushes
- Pencil
- Eraser
- Ruler
- Reference photo of a vase
Step 1: Sketching the Vase
Start by sketching the outline of the vase on your canvas using a pencil. Use a ruler to ensure straight lines and accurate proportions. Take your time with this step as a well-drawn sketch will serve as a guide for the rest of the painting process.
Step 2: Blocking in the Background
Once your sketch is complete, it’s time to block in the background. Choose a color for your background and apply it evenly using a large paintbrush. This creates a base for your painting and helps set the overall tone.
Step 3: Adding the Base Colors
Now it’s time to start adding the base colors to your vase. Refer to your reference photo and mix the appropriate colors on your palette. Use a smaller brush to paint the basic shapes and colors of the vase, focusing on capturing its form and texture.
Step 4: Adding Shadows and Highlights
To make your vase appear three-dimensional, add shadows and highlights. Observe the light source in your reference photo and determine where the shadows and highlights fall on the vase. Use darker shades of paint for the shadows and lighter shades for the highlights. Blend the colors seamlessly for a realistic effect.
Step 5: Adding Details
Now it’s time to add the intricate details to your vase. Use a smaller brush and carefully paint the intricate designs, patterns, or any additional elements present on the vase. Pay close attention to the reference photo and capture the intricate details as accurately as possible.
Step 6: Refining the Painting
Take a step back and assess your painting. Look for any areas that need adjustment or refinement. Make any necessary changes to ensure the overall composition is balanced and visually appealing. This might involve adjusting colors, adding more depth, or refining the edges.
Step 7: Finishing Touches
The final step is adding the finishing touches to your painting. Sign your name or add any personal touches that you feel enhance the artwork. Take this opportunity to fine-tune any areas that still need attention and ensure that your painting is complete.
In summary, painting a vase in acrylic involves several steps from sketching the initial design to adding the finishing touches. By following this step-by-step guide and taking your time with each stage, you can create a stunning and realistic painting that showcases your artistic abilities. Remember to practice, experiment with different techniques, and have fun with your painting process!
Preserving Your Masterpiece: Best Practices for Sealing and Caring for Acrylic Painted Vases
Acrylic painting is a popular art form that allows artists to express their creativity on various surfaces. One common canvas for acrylic painting is vases. Painting vases with acrylics can transform ordinary glass or ceramic vessels into stunning decorative pieces. However, it is important to take proper care of these painted vases to ensure their longevity and preserve their beauty. In this section, we will discuss the best practices for sealing and caring for acrylic painted vases.
1. Choose the Right Sealer
Sealing your acrylic painted vases is crucial for protecting the artwork from dust, moisture, and UV rays. There are several types of sealers available, including spray sealers and brush-on sealers. The choice of sealer depends on the type of surface and the desired finish. Some popular sealers for acrylic paintings include varnishes, gloss mediums, and clear acrylic sprays. It is important to read the instructions carefully and choose a sealer that is compatible with acrylic paints.
2. Prepare the Surface
Before applying the sealer, it is essential to prepare the surface of the painted vase. Make sure the painting is completely dry before sealing. Clean the vase thoroughly to remove any dust or dirt. If the vase has any imperfections or brush strokes, you can sand them lightly with fine-grit sandpaper and then wipe away the dust. This will create a smooth surface for the sealer to adhere to.
3. Apply the Sealer
When applying the sealer, it is important to follow the manufacturer’s instructions. Shake the sealer well before use and apply it in thin, even coats. Start from the top of the vase and work your way down, ensuring that the entire surface is covered. Avoid over-applying the sealer, as it can lead to drips or a cloudy finish. Allow each coat to dry completely before applying the next one. Depending on the sealer used, multiple coats may be required for optimal protection.
4. Handle with Care
Once your acrylic painted vase is sealed, it is important to handle it with care to avoid any damage. Avoid placing the vase in direct sunlight, as prolonged exposure to UV rays can cause the colors to fade over time. Additionally, avoid placing heavy objects on top of the vase or dropping it, as this can cause the sealer to crack or chip.
5. Cleaning and Maintenance
To clean your acrylic painted vase, use a soft, lint-free cloth or a damp sponge. Avoid using abrasive cleaners or scrubbing brushes, as they can damage the painted surface. If there are any stubborn stains, gently dab the area with a mild soap solution and then rinse it thoroughly. Always dry the vase with a soft cloth to prevent water spots.
6. Storage
If you need to store your acrylic painted vase, it is important to do so carefully. Wrap the vase in acid-free tissue paper or bubble wrap to protect it from scratches or breakage. Store it in a cool, dry place away from direct sunlight and extreme temperatures.
In summary, sealing and caring for acrylic painted vases is essential for preserving their beauty and longevity. Choose the right sealer, prepare the surface properly, and apply the sealer in thin, even coats. Handle the vase with care, avoid direct sunlight, and clean it gently using non-abrasive methods. By following these best practices, you can ensure that your acrylic painted vases remain a masterpiece for years to come.
Frequently Asked Questions
Q: How can I paint a vase using acrylic paint?
To paint a vase using acrylic paint, start by cleaning the vase thoroughly and applying a base coat. Then, sketch the design lightly with a pencil and start painting with acrylics. Layer the paint, allowing each layer to dry before adding more details. Finally, seal the painted vase with a clear varnish for protection.
Q: Can I paint a glass vase with acrylic paint?
Yes, you can paint a glass vase with acrylic paint. Before painting, clean the vase thoroughly and apply a primer suitable for glass. Then, paint the vase using acrylics, layering the paint to achieve the desired effect. Seal the painted vase with a clear varnish to protect the paint.
Q: How do I make my acrylic paint adhere better to a vase surface?
To make acrylic paint adhere better to a vase surface, you can prepare the surface by lightly sanding it to create texture. Additionally, you can apply a coat of primer or a suitable sealant before painting. These steps will help the paint adhere more effectively to the vase surface.
Conclusion:
In conclusion, painting a vase in acrylic is a creative and enjoyable process that allows you to express your artistic skills. By following the steps mentioned, such as priming the vase, sketching the design, and layering the paint, you can create a stunning piece of art. Acrylic paint is versatile and offers various possibilities for experimentation with different techniques, textures, and colors. Whether you want to create a vibrant and bold vase or a subtle and realistic one, acrylic paint gives you the flexibility to achieve your desired outcome. So, grab your brushes and start painting your own unique masterpiece!