
Yes, you can use tempera paint on pumpkins to create vibrant and eye-catching designs. Tempera paint is a water-based paint that dries quickly and adheres well to various surfaces, including pumpkins. This type of paint allows you to easily layer colors, mix them, and create intricate details on your pumpkin artworks. Whether you want to paint spooky Halloween scenes or create beautiful fall-inspired designs, tempera paint offers endless possibilities for pumpkin decorating.
Creative Pumpkin Designs with Tempera Paint
Pumpkins are not just for carving spooky faces during Halloween. With a little bit of creativity and some tempera paint, you can transform plain pumpkins into beautiful works of art. Whether you’re looking to create a festive centerpiece for your Thanksgiving table or want to add a touch of whimsy to your fall decor, painting pumpkins with tempera paint offers endless possibilities. In this section, we’ll explore some creative pumpkin designs that you can easily achieve using tempera paint.
Materials Needed
Before we dive into the various pumpkin design ideas, let’s make sure you have the necessary materials. Here’s what you’ll need to get started:
- Medium-sized pumpkins
- Assorted colors of tempera paint
- Paintbrushes (various sizes)
- Palette or disposable plate for mixing paints
- Pencil
- Optional: stencil or template
Abstract Designs
If you’re feeling adventurous and want to create a unique, eye-catching pumpkin design, abstract patterns are the way to go. Here are a few ideas to inspire your creativity:
- Create a bold, geometric pattern by painting the pumpkin with a solid base color and then using contrasting colors to add shapes and lines.
- Try a splatter paint technique by dipping your paintbrush into different colors of tempera paint and flicking it onto the pumpkin’s surface.
- Embrace the beauty of nature by painting swirling vines and flowers around the pumpkin.
Animal-inspired Designs
Who says pumpkins can’t have a touch of animal charm? Transform your pumpkins into adorable creatures with these ideas:
- Paint the pumpkin black and use white or glow-in-the-dark paint to create a spooky cat face.
- Turn your pumpkin into a charming owl by painting it with shades of brown and adding big, expressive eyes.
- Create a playful puppy design by painting the pumpkin tan and using black paint to add spots and a cute nose.
Seasonal Designs
Celebrate the beauty of the fall season by painting pumpkins with designs inspired by autumn. Here are a few ideas to get you started:
- Paint a pumpkin in shades of orange, yellow, and red to mimic the colors of falling leaves.
- Create a pumpkin patch scene by painting multiple pumpkins and adding a backdrop of green grass and blue sky.
- Use a stencil to create intricate leaf designs on your pumpkins using various shades of green and brown.
Tips and Tricks
Before you start painting your pumpkins, here are some helpful tips to ensure a successful project:
- Clean the pumpkin’s surface with a damp cloth before painting to remove any dirt or debris.
- Start with a base coat of white paint to make the colors pop.
- If you’re using a stencil, secure it tightly against the pumpkin’s surface to prevent smudging.
- Seal your finished design with a clear acrylic spray to protect it from smearing or fading.
In summary, painting pumpkins with tempera paint is a fun and creative way to decorate for the fall season. Whether you choose to create abstract designs, animal-inspired themes, or celebrate the beauty of autumn, the possibilities are endless. So gather your materials, unleash your imagination, and let the artistic journey begin!

Tips for Painting Pumpkins with Tempera Paint
Painting pumpkins can be a fun and creative way to decorate for the fall season. Whether you’re hosting a Halloween party or simply want to add a festive touch to your home, painting pumpkins with tempera paint is a great option. Here are some tips to help you create beautiful and vibrant pumpkin designs:
1. Choose the Right Pumpkins
When selecting pumpkins for painting, it’s important to choose ones that are smooth and free from blemishes or rot. Look for pumpkins with a flat surface, as they will be easier to paint on. Additionally, consider the size and shape of the pumpkin to ensure it fits your design ideas.
2. Prepare Your Workspace
Before you begin painting, set up a suitable workspace that is well-ventilated and protected. Lay down newspapers or a plastic tablecloth to prevent any paint from staining your surfaces. Have all your materials ready and easily accessible to avoid any interruptions during the painting process.
3. Clean and Dry the Pumpkins
Before painting, make sure to clean the pumpkins with a damp cloth to remove any dirt or debris. Allow them to dry completely before applying any paint. This will help the paint adhere better to the surface and ensure a smooth finish.
4. Prime the Pumpkins
For better paint adhesion and longevity, it’s recommended to prime the pumpkins before painting. Apply a coat of white tempera paint as a base layer, allowing it to dry completely. This will create a blank canvas for your designs and help the colors appear more vibrant.
5. Use High-Quality Brushes
Invest in good quality brushes that are suitable for painting with tempera paint. Different brush sizes and shapes will allow you to create various textures and details in your designs. Flat brushes are ideal for covering larger areas, while fine-tipped brushes are great for intricate patterns and lines.
6. Layer Colors
To add depth and dimension to your painted pumpkins, consider layering different colors. Start with lighter shades as the base and gradually build up with darker tones. This layering technique will give your designs a more realistic and visually appealing look.
7. Experiment with Techniques
Don’t be afraid to experiment with different painting techniques to create unique pumpkin designs. Try stippling, blending, or even splattering paint to achieve interesting textures and effects. Use sponges, cotton swabs, or even stencils to add additional details or patterns.
8. Seal the Paint
Once you’re satisfied with your painted pumpkin designs, seal the paint with a clear acrylic sealer. This will help protect your artwork from smudging or fading and ensure its longevity. Apply the sealer in thin, even coats and allow each layer to dry before adding another.
9. Display and Enjoy
Finally, find the perfect spot to showcase your painted pumpkins. Whether it’s your front porch, fireplace mantle, or dining table centerpiece, display them proudly and enjoy the festive ambiance they bring to your home.
In summary, painting pumpkins with tempera paint can be a fun and creative activity. By following these tips, you’ll be able to create stunning pumpkin designs that will add a festive touch to your home during the fall season. So, grab your brushes and get ready to unleash your artistic side!

Unique Effects and Techniques with Tempera Paint on Pumpkins
Tempera paint is a versatile and vibrant medium that can be used to create stunning designs on a variety of surfaces. Pumpkins, with their smooth and round surfaces, provide the perfect canvas for experimenting with different techniques and effects using this colorful paint.
Glow-in-the-Dark Pumpkins
One unique effect you can achieve with tempera paint on pumpkins is a glow-in-the-dark effect. To create this mesmerizing effect, you will need glow-in-the-dark tempera paint. Begin by painting the entire pumpkin with a base coat of white tempera paint and let it dry completely. Then, using a paintbrush or sponge, apply the glow-in-the-dark paint in your desired design. You can create spooky faces, intricate patterns, or even write messages on the pumpkin. Once the paint is dry, place the pumpkin in a dark room or outdoors at night, and watch it come to life with a haunting glow.
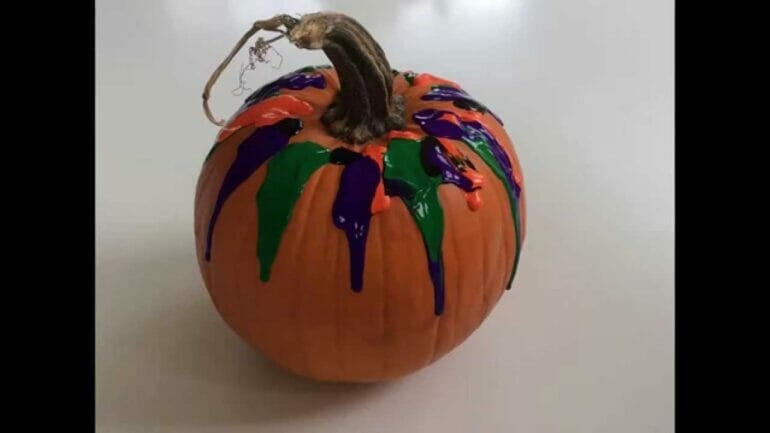
Dripping Paint Effect
If you’re looking to create a more abstract and modern design, try the dripping paint effect on your pumpkin. This technique requires tempera paint in various colors and a paintbrush or sponge. Start by applying a base coat of one color all over the pumpkin and let it dry. Then, using a different color, dip your paintbrush or sponge into the paint and gently tap it on the top of the pumpkin. Allow the paint to slowly drip down the sides, creating an eye-catching and dynamic effect. Repeat this process with different colors to achieve a multi-colored dripping paint effect.
Marbled Pumpkin
The marbled effect adds a touch of elegance and sophistication to pumpkins. To achieve this effect, you will need two or more colors of tempera paint and a paintbrush. Start by applying a base coat of one color to the pumpkin and let it dry. Then, dip your paintbrush into a different color of paint and lightly swipe it across the pumpkin. Repeat this step with another color, creating swirling patterns as you go. Blend the colors together gently using the paintbrush to achieve a marbled effect. The end result will be a pumpkin with beautiful and intricate designs.
Striped Pumpkin
A striped pumpkin is a classic yet stylish design that can be easily achieved using tempera paint. Begin by applying a base coat of one color to the pumpkin and let it dry. Then, using a different color, paint thin vertical or horizontal stripes across the pumpkin. You can use a paintbrush or masking tape to create clean and straight lines. Experiment with different color combinations to create a visually striking and unique striped pumpkin.
Glossy Finish
If you want to add a glossy finish to your painted pumpkin, you can use a clear gloss varnish or sealant. Once you have completed your desired design with tempera paint, allow it to dry completely. Then, apply the clear gloss varnish or sealant evenly over the entire pumpkin using a paintbrush. This will not only enhance the colors and details of your design but also protect it from smudging or fading. The glossy finish will give your pumpkin a polished and professional look.
Summary
Tempera paint opens up a world of possibilities when it comes to decorating pumpkins. From glow-in-the-dark effects to dripping paint and marbled designs, you can let your creativity run wild. Don’t forget to add a glossy finish to your painted pumpkin for that extra touch of elegance. So, grab your tempera paint and brushes, and start transforming ordinary pumpkins into stunning works of art!
How to Seal and Preserve Tempera Paint on Pumpkins
Painting pumpkins is a fun and creative way to decorate for Halloween or fall festivities. If you’ve used tempera paint to create your pumpkin masterpiece, it’s important to seal and preserve the paint to ensure it lasts throughout the season. In this section, we will guide you through the steps of sealing and preserving tempera paint on pumpkins, allowing you to enjoy your vibrant designs for weeks to come.
Materials You’ll Need
Before you begin, gather the following materials:
- Tempera paint
- Pumpkin(s)
- Clear acrylic spray sealer
- Paintbrushes
- Newspaper or a drop cloth
- Disposable gloves
Step 1: Paint Your Pumpkin
The first step is to paint your pumpkin using tempera paint. Choose whatever colors and designs you desire, letting your creativity shine. Whether you prefer spooky faces, cheerful characters, or intricate patterns, tempera paint offers vibrant and opaque colors that adhere well to pumpkins.
Before you start painting, make sure the pumpkin is clean and dry. Remove any dirt or debris, and pat it dry with a towel if necessary. This will help the paint adhere better to the surface.
Step 2: Allow the Paint to Dry
After you’ve finished painting your pumpkin, allow the tempera paint to dry completely. This may take a few hours, so be patient. Placing the painted pumpkin in a well-ventilated area can help speed up the drying process.
Keep in mind that tempera paint dries to a matte finish, which can appear slightly chalky. If you prefer a glossy or shiny look, you can use a clear gloss sealer instead of the matte sealer mentioned in the next step.
Step 3: Seal the Paint with Acrylic Spray Sealer
To protect your tempera paint design and help it withstand the elements, it’s crucial to seal it with an acrylic spray sealer. This will create a protective barrier that prevents the paint from smudging, fading, or peeling.
Take your pumpkin(s) outside or to a well-ventilated area, and place them on a newspaper or a drop cloth to protect the surrounding surface. Shake the can of acrylic spray sealer well before applying, and wear disposable gloves to keep your hands clean.
Hold the can of sealer about 6-8 inches away from the pumpkin, and spray an even coat of sealer over the entire painted surface. Be sure to cover all sides of the pumpkin, including the top and bottom. Allow the sealer to dry according to the instructions on the can.
Step 4: Repeat the Sealing Process (Optional)
If you want to provide additional protection for your painted pumpkin, you can repeat the sealing process for an extra layer of sealant. This step is especially recommended if your pumpkin will be exposed to harsh weather conditions, such as rain or excessive sunlight.
Apply a second coat of acrylic spray sealer using the same technique as before. Make sure to let the sealer dry completely before handling the pumpkins.
Step 5: Display and Enjoy Your Painted Pumpkins
Once the sealer has dried, your painted pumpkins are ready to be displayed. Whether you choose to showcase them indoors or outdoors, they will be protected and can withstand mild weather conditions.
Remember to keep your painted pumpkins away from direct sunlight or excessive heat, as this can cause the paint to fade over time. With proper care and maintenance, your painted pumpkins can last for several weeks, adding a festive touch to your Halloween decorations or fall-themed gatherings.
In summary, sealing and preserving tempera paint on pumpkins involves painting the pumpkin with tempera paint, allowing it to dry, and then applying a clear acrylic spray sealer. By following these steps, you can ensure that your painted pumpkins remain vibrant and intact throughout the Halloween season.
FAQs
Can I use tempera paint on pumpkins?
Yes, tempera paint can be used on pumpkins. However, it is not the most durable choice and may not withstand exposure to outdoor elements. It is best suited for indoor decorations or temporary use.
Conclusion:
In conclusion, using tempera paint on pumpkins can be a fun and creative way to decorate them. The versatility of tempera paint allows for a wide range of colors and effects, making it perfect for pumpkin painting projects. Whether you’re creating spooky faces for Halloween or vibrant designs for fall festivities, tempera paint provides a smooth and vibrant finish that will make your pumpkins stand out.
Additionally, using tempera paint on pumpkins is a great option for families and children, as it is non-toxic and easy to clean up. The paint adheres well to the pumpkin’s surface, ensuring that your designs will last throughout the season. So, grab some tempera paint and let your creativity flow as you transform pumpkins into works of art!