
Yes, chalk paint can adhere to plastic surfaces with proper preparation and techniques.
When painting plastic with chalk paint, it is important to clean the surface thoroughly and use a primer specifically designed for plastic. This will help the paint adhere better and ensure a long-lasting finish.
Additionally, applying multiple thin coats of chalk paint and allowing each coat to dry completely will help achieve better adhesion and prevent peeling or chipping.
Remember to seal the painted plastic surface with a clear topcoat or wax to protect the paint and enhance its durability.
By following these steps, you can successfully use chalk paint on plastic and transform your items with a unique and creative touch.
Tips for Ensuring Chalk Paint Adheres to Plastic Surfaces
Chalk paint has gained popularity in recent years due to its versatility and ability to transform furniture and other surfaces with minimal prep work. While chalk paint typically adheres well to most surfaces, achieving optimal adhesion on plastic surfaces can be a bit more challenging. If you’re looking to give a plastic item a chalk paint makeover, here are some tips to ensure successful adhesion:
1. Clean the Surface Thoroughly
The first step in prepping a plastic surface for chalk paint is to clean it thoroughly. Use a mild detergent or all-purpose cleaner and a soft cloth or sponge to remove any dirt, dust, or grease. Be sure to rinse the surface with water and allow it to dry completely before moving on to the next step.
2. Lightly Sand the Surface
Sanding the plastic surface helps create a slightly rough texture, allowing the chalk paint to adhere better. Use a fine-grit sandpaper (around 220 grit) and gently sand the surface in a circular motion. Avoid applying too much pressure or sanding too aggressively, as this can damage the plastic. Once you’ve sanded the surface, wipe away any dust with a clean cloth.
3. Apply a Primer
Applying a primer specifically designed for plastic surfaces can help improve the adhesion of chalk paint. Look for a primer that is compatible with both plastic and chalk paint. Apply a thin, even layer of primer to the surface, following the manufacturer’s instructions. Allow the primer to dry completely before proceeding.
4. Use High-Quality Chalk Paint
Choosing a high-quality chalk paint can make a significant difference in achieving good adhesion on plastic surfaces. Look for a paint specifically formulated for adhesion to a variety of surfaces, including plastic. It’s also helpful to select a paint that offers good coverage and durability to ensure long-lasting results.
5. Apply Multiple Thin Coats
When applying chalk paint to plastic surfaces, it’s best to apply multiple thin coats rather than one thick layer. Thin coats dry faster and adhere better to the surface, minimizing the risk of peeling or chipping. Allow each coat to dry completely before applying the next, following the manufacturer’s recommended drying time.
6. Seal the Painted Surface
After you’ve achieved the desired finish with your chalk paint, it’s important to seal the painted surface to protect it from wear and tear. Choose a clear topcoat specifically designed for chalk paint and apply a thin, even layer over the painted surface. This will not only enhance the durability of the paint but also make it easier to clean and maintain.
7. Handle with Care
While chalk paint is generally durable, plastic surfaces can still be prone to scratches and damage. It’s important to handle your newly painted plastic item with care to avoid any unnecessary wear. Avoid dragging or bumping the item against hard surfaces and use coasters or protective pads when placing it on a tabletop.
By following these tips, you can ensure that chalk paint adheres well to plastic surfaces, allowing you to achieve stunning transformations. Remember to clean and sand the surface, apply a primer, use high-quality chalk paint, apply multiple thin coats, seal the painted surface, and handle with care. With proper preparation and application, you can enjoy the beauty and charm of chalk-painted plastic surfaces for years to come.
Preparing Plastic for Chalk Paint: Effective Surface Primer and Cleaning Techniques
When it comes to painting plastic surfaces, such as plastic furniture or accessories, it is important to properly prepare the surface to ensure a smooth and durable finish. One popular choice for painting plastic is using chalk paint, which provides a matte, vintage look. However, before you start painting, there are a few key steps you should follow to ensure the best results.
1. Cleaning the Plastic Surface
The first step in preparing plastic for chalk paint is to thoroughly clean the surface. This will remove any dirt, grease, or other contaminants that could interfere with adhesion. Start by washing the plastic with warm, soapy water using a sponge or cloth. Rinse the surface thoroughly and allow it to dry completely.
For stubborn stains or residue, you may need to use a stronger cleaning solution. You can try using a mixture of equal parts vinegar and water, or a mild detergent diluted in water. Scrub the surface gently with a sponge or brush, then rinse thoroughly and allow it to dry.
2. Sanding the Plastic
Once the plastic surface is clean and dry, the next step is to lightly sand it. Sanding helps to create a rough surface that allows the paint to adhere better. Use a fine-grit sandpaper (around 120-220 grit) and gently sand the entire surface in a circular motion. Be careful not to apply too much pressure, as this could damage the plastic.
After sanding, wipe away any dust or debris with a clean, damp cloth. This will ensure a clean surface for the next step.
3. Applying a Surface Primer
To further enhance adhesion and durability, it is recommended to apply a surface primer specifically designed for plastic surfaces. Look for a primer that is compatible with chalk paint and follow the manufacturer’s instructions for application.
Using a paintbrush or roller, apply a thin and even coat of primer to the plastic surface. Allow it to dry completely before moving on to the next step. This step will create a base layer that helps the chalk paint adhere better and prevents it from peeling or chipping over time.
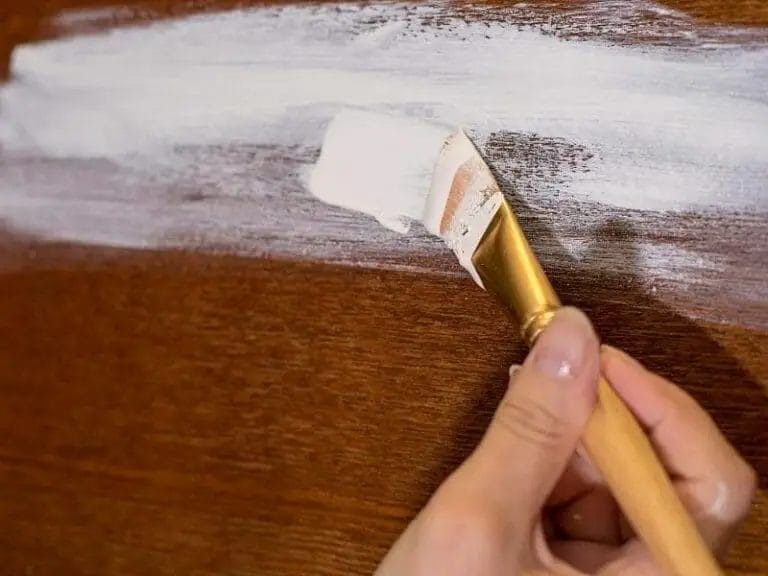
4. Painting with Chalk Paint
Once the primer is dry, you are ready to start painting with chalk paint. Stir the paint well before applying it to the plastic surface. Use a brush or roller to apply the paint in thin, even coats, working in one direction. Allow each coat to dry completely before applying the next one.
If desired, you can apply additional coats of chalk paint to achieve the desired coverage and finish. Once you are satisfied with the paint application, allow it to dry completely according to the manufacturer’s instructions.
5. Optional Sealing
While chalk paint provides a beautiful matte finish, it may not offer the same level of durability as other types of paint. If you would like to add an extra layer of protection to your painted plastic surface, you can consider applying a clear sealant or wax. This will help to seal the paint and provide additional resistance to scratches or stains.
Follow the instructions provided by the sealant manufacturer for proper application. Allow the sealant to dry completely before using or placing objects on the painted plastic surface.
Summary
Preparing plastic for chalk paint requires proper cleaning, sanding, and priming. By following these steps, you can create a smooth and durable finish on your plastic surfaces. Remember to clean the surface thoroughly, lightly sand to create a rough texture, apply a plastic-compatible primer, and then paint with chalk paint in thin, even coats. Optional sealing can be applied for added protection and durability. With these effective surface primer and cleaning techniques, you can transform your plastic items into stunning pieces with a vintage, matte look.
Topcoat Options for Sealing Chalk Paint on Plastic
When it comes to sealing chalk paint on plastic, choosing the right topcoat is crucial. The topcoat not only provides a protective barrier but also enhances the durability and longevity of your painted plastic surface. In this section, we will explore the different topcoat options available for sealing chalk paint on plastic.
1. Clear Wax
Clear wax is one of the most popular choices for sealing chalk paint on various surfaces, including plastic. It provides a smooth finish and helps protect the paint from chipping or peeling. Before applying clear wax, make sure to clean the plastic surface thoroughly and remove any dirt or debris. Apply the wax using a brush or a lint-free cloth, following the instructions on the product. Allow the wax to dry and then buff it gently to achieve a glossy or matte finish, depending on your preference.
2. Polycrylic Protective Finish
Polycrylic protective finish is another excellent option for sealing chalk paint on plastic. It is a water-based topcoat that dries clear and provides a durable protective layer. Before applying polycrylic, sand the surface lightly to create a better bond between the paint and the topcoat. Use a brush or a foam applicator to apply a thin and even coat of the polycrylic. Allow it to dry completely before applying additional coats for added protection. The polycrylic finish is available in different sheens, including matte, satin, and gloss.
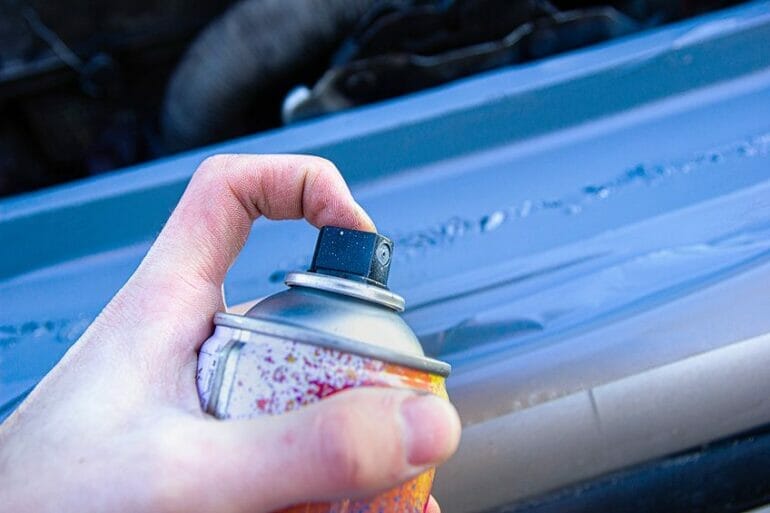
3. Spray Sealers
Spray sealers are convenient and easy to use for sealing chalk paint on plastic surfaces. They come in aerosol cans, making it quick to apply an even coat of sealer. Look for spray sealers specifically designed for plastic surfaces, as they have a formulation that adheres well to plastic and provides optimal protection. When using a spray sealer, make sure to apply thin coats, allowing each coat to dry before applying the next. This will ensure a smooth and professional-looking finish.
4. Epoxy Resin
Epoxy resin is a more advanced option for sealing chalk paint on plastic. It provides an incredibly durable and high-gloss finish. However, applying epoxy resin requires careful preparation and following the instructions accurately. Before applying epoxy resin, lightly sand the plastic surface and clean it thoroughly. Mix the epoxy resin according to the manufacturer’s instructions and apply it using a brush or a foam applicator. Allow it to cure for the recommended time, usually 24 to 48 hours, for a strong and glossy finish.
5. Mod Podge
Mod Podge is a versatile sealer that can be used for various craft projects, including sealing chalk paint on plastic. It is a water-based sealer that dries clear and provides a protective barrier. Apply Mod Podge using a brush or a foam applicator in thin and even coats. Allow each coat to dry before applying additional coats for added protection. Mod Podge is available in different finishes, such as matte, gloss, and satin, allowing you to choose the desired look for your painted plastic surface.
In summary, when it comes to sealing chalk paint on plastic, there are various topcoat options available. Clear wax, polycrylic protective finish, spray sealers, epoxy resin, and Mod Podge are all excellent choices that provide different finishes and levels of protection. Consider the specific needs of your project, such as the desired finish and durability, to choose the right topcoat for sealing chalk paint on your plastic surface.
Common Mistakes to Avoid when Applying Chalk Paint on Plastic
Chalk paint has gained popularity in recent years for its ability to transform furniture and other surfaces with minimal preparation. While chalk paint is typically used on wood, it can also be applied to plastic surfaces to give them a fresh new look. However, there are certain mistakes that people often make when applying chalk paint on plastic. In this section, we will discuss some common mistakes to avoid to ensure a successful and long-lasting finish.
1. Skipping the Prep Work
One of the biggest mistakes people make when applying chalk paint on plastic is skipping the necessary preparation. Unlike wood surfaces, plastic is non-porous and smooth, which makes it difficult for the paint to adhere properly. To ensure a durable finish, it is important to clean the plastic surface thoroughly and lightly sand it to create a rough texture for the paint to grip onto.
2. Using Low-Quality Chalk Paint
The quality of the chalk paint you choose plays a significant role in the final result. Using low-quality chalk paint may result in uneven coverage, poor adhesion, and a less durable finish. It is recommended to invest in a high-quality chalk paint specifically formulated for use on plastic surfaces. These paints are designed to adhere better to plastic and provide a long-lasting finish.
3. Applying Too Many Coats
While multiple coats of chalk paint may be necessary on some surfaces, applying too many coats on plastic can lead to a thick and uneven finish. Since plastic is smooth and non-porous, it does not require as many coats as other surfaces. It is best to follow the manufacturer’s instructions and apply thin, even coats of chalk paint to achieve the desired result without excessive buildup.
4. Not Allowing Sufficient Drying Time
Drying time is crucial when working with chalk paint on plastic. Not allowing sufficient drying time between coats or before using the painted plastic item can result in smudging, streaking, or even peeling of the paint. It is important to follow the recommended drying time mentioned on the paint can and allow the paint to cure fully before using or handling the painted plastic item.
5. Forgetting to Seal the Painted Surface
To ensure the longevity of the paint and protect it from chipping or peeling, it is essential to seal the painted plastic surface. Applying a clear wax or polyurethane sealant over the chalk paint creates a protective barrier that helps to preserve the finish and makes it more resistant to scratches and other damage.
In summary, applying chalk paint on plastic can be a great way to give your plastic items a new lease of life. However, it is important to avoid common mistakes such as skipping the prep work, using low-quality paint, applying too many coats, not allowing sufficient drying time, and forgetting to seal the painted surface. By following these tips, you can achieve a professional-looking finish that will last for years to come.
FAQs
Will chalk paint stick to plastic?
No, chalk paint is not suitable for painting plastic surfaces. It is designed to adhere to porous surfaces like wood, metal, or plaster. For plastic surfaces, it is recommended to use a specific type of paint that is formulated to bond with plastic materials.
Conclusion
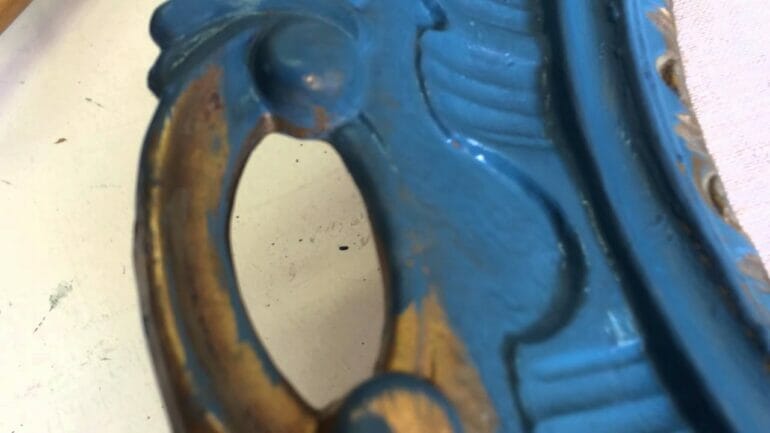
In conclusion, chalk paint can be a great option for transforming the look of plastic surfaces. Despite the smooth and non-porous nature of plastic, chalk paint can adhere well to it, providing a durable and matte finish.
Chalk paint’s versatility and ability to adhere to a variety of surfaces, including plastic, make it an ideal choice for DIY enthusiasts and upcyclers looking to revamp their plastic objects.
However, it’s essential to properly prepare the plastic surface before applying chalk paint by cleaning it thoroughly and sanding it lightly to enhance adhesion. Additionally, using a primer specifically designed for plastic can further improve the paint’s adhesion and longevity.
With the right preparation and application techniques, chalk paint can indeed stick to plastic, allowing you to create unique and personalized pieces.