Are you a beginner in watercolor painting looking for guidance on how to effectively use tubes of watercolor paint?
Using tubes of watercolor paint is a versatile and convenient way to create stunning works of art. These tubes contain highly pigmented paints that can be diluted with water to achieve various tones and effects. Simply squeeze a small amount of paint onto a palette, add water, and mix to the desired consistency.
Remember to start with a minimal amount of paint as a little goes a long way. Experiment with different combinations of colors and water ratios to achieve different effects such as washes, gradients, and dry brush techniques.
By mastering the art of using tubes of watercolor paint, you can unlock endless possibilities for your artistic expression. So, grab your brushes and let your creativity flow with these vibrant and versatile paints!

Essential Tools and Materials for Working with Watercolor Tubes
Watercolor painting is a beautiful and versatile medium that allows artists to create stunning works of art. Whether you are a beginner or an experienced painter, having the right tools and materials is essential for achieving the desired results. In this section, we will explore the must-have tools and materials for working with watercolor tubes.
Watercolor Tubes
The first and most important item on your list should be a set of high-quality watercolor tubes. Watercolor tubes contain pigments that are highly concentrated, allowing you to achieve vibrant and intense colors. Look for tubes that are made with professional-grade pigments for optimal results.
Watercolor Palette
A watercolor palette is used to hold and mix your watercolor paints. It is important to choose a palette that is large enough to accommodate all your colors and has separate wells for mixing. Some palettes also come with a lid to keep your paints moist between painting sessions.
Watercolor Brushes
Investing in a good set of watercolor brushes is crucial for achieving different effects and techniques. There are various types of brushes available, including round brushes for detailed work, flat brushes for washes, and mop brushes for blending and softening edges. It’s recommended to have a variety of brush sizes to cater to different painting needs.
Watercolor Paper
Watercolor paper is specially designed to absorb water and prevent the paint from bleeding or buckling. It comes in different weights and textures, such as cold press, hot press, and rough. Cold press paper is the most commonly used, as it provides a good balance between texture and absorbency. Ensure that you choose acid-free paper for longevity.
Water Containers
You will need water containers to rinse and clean your brushes while painting. It is advisable to have two containers: one for clean water and the other for dirty water. Using separate containers helps maintain the purity of your colors and prevents contamination.
Masking Fluid
Masking fluid is a handy tool used to preserve areas of white paper or create intricate details in a watercolor painting. It is applied to the paper before painting and acts as a barrier to prevent the paint from adhering to that area. Once the painting is dry, the masking fluid can be gently peeled off, revealing the preserved areas.
Pencil and Eraser
A pencil and eraser are essential for sketching and outlining your watercolor painting before applying the paint. Use a graphite pencil with a light touch to avoid leaving visible marks on the paper. An eraser comes in handy for correcting any mistakes or removing unwanted pencil lines.
Masking Tape
Masking tape is useful for creating clean and straight edges in your watercolor paintings. It can be applied to the edges of the paper to create a border or to mask off specific areas that you want to keep clean and free of paint. Make sure to use low-tack masking tape to avoid damaging the paper.
Spray Bottle
A spray bottle filled with water is handy for creating interesting watercolor effects, such as lifting color, creating texture, or softening edges. Spraying water onto the paper helps to reactivate the paint and manipulate its behavior on the surface.
Palette Knife
A palette knife is a versatile tool that can be used for mixing colors, applying paint onto the paper, or creating textured effects. It is especially useful for scraping off dry paint or removing excess paint from the palette.
Palette Paper or Mixing Surface
If you prefer not to mix your colors directly on your palette, you can use palette paper or a separate mixing surface. Palette paper is designed to be disposable, allowing you to easily discard any excess paint or mixtures. Alternatively, a ceramic or glass surface can be used as a mixing area.
These are the essential tools and materials that every watercolor painter should have when working with watercolor tubes. Investing in high-quality supplies will not only enhance your painting experience but also ensure the longevity and integrity of your artwork. So gather these materials and let your creativity flow!

Proper Techniques for Squeezing and Mixing Watercolor Paints
Watercolor painting is a versatile and beautiful art form that allows artists to create stunning works with vibrant colors and flowing textures. One of the essential skills for any watercolor artist is the ability to properly squeeze and mix watercolor paints. In this section, we will explore the techniques and tips for squeezing and mixing watercolor paints effectively.
1. Squeezing Watercolor Paints
When it comes to squeezing watercolor paints, there are a few key points to keep in mind:
- Use quality paints: Invest in high-quality watercolor paints that offer rich pigmentation and good lightfastness. These paints will provide better results and make the mixing process easier.
- Squeeze a small amount: Start by squeezing a small amount of paint onto your palette. It’s better to add more paint as you need it rather than squeezing out too much and wasting it.
- Arrange colors strategically: Arrange your watercolor paints on your palette in a logical order, such as grouping similar colors together. This will make it easier to find the colors you need while painting.
- Keep your palette clean: Regularly clean your palette to avoid mixing colors unintentionally. Use a damp cloth or sponge to remove any excess paint and keep your colors pure.
2. Mixing Watercolor Paints
Mixing watercolor paints opens up a world of possibilities for creating new colors and achieving various shades and tones. Here are some techniques to help you mix watercolor paints effectively:
- Start with a clean brush: Before mixing colors, make sure your brush is clean to avoid contaminating your paints. Rinse your brush thoroughly and remove any excess water.
- Use a mixing area on your palette: Reserve a specific area on your palette for mixing colors. This can be a separate well or a clean space where you can blend paints together.
- Gradual mixing: When mixing colors, start with small amounts and gradually add more as needed. This allows you to control the intensity of the mixed color and avoid creating too much at once.
- Experiment with different ratios: Mix different ratios of colors to achieve various shades and tones. You can create lighter colors by adding more water, or darker colors by using less water.
- Test colors before applying: Before applying a mixed color to your painting, test it on a separate piece of paper to see how it looks. This allows you to adjust the color if needed before committing to it.
By mastering the proper techniques for squeezing and mixing watercolor paints, you can elevate your watercolor paintings to new heights. Whether you are a beginner or an experienced artist, these tips will help you achieve the desired colors and effects in your artwork. Remember to practice and experiment with different techniques to discover your own unique style and achieve beautiful results.

Applying Watercolor Tubes to Create Different Effects
Watercolor painting is a versatile and vibrant medium that allows artists to express their creativity and create stunning artworks. One of the key elements in watercolor painting is the use of watercolor tubes, which contain concentrated pigments that can be mixed with water to achieve various effects. In this section, we will explore how to apply watercolor tubes to create different effects in your paintings.
1. Transparent Wash
A transparent wash is a common technique used in watercolor painting to create a smooth, translucent layer of color. To achieve this effect, squeeze a small amount of watercolor tube onto your palette and dilute it with water. Gradually apply the diluted paint onto your paper using a large brush, ensuring that the strokes are even and the color is spread evenly. This technique is often used for backgrounds or to build up subtle layers of color.
2. Glazing
Glazing involves applying translucent layers of color over a dried layer of paint. This technique allows you to create depth and richness in your paintings. To glaze, mix a small amount of watercolor tube with water and apply it thinly over the dried layer of paint. The underlying color will show through, giving your painting a luminous effect. Experiment with different combinations of colors to achieve the desired result.
3. Wet-on-Wet
The wet-on-wet technique involves applying wet paint onto a wet surface, resulting in soft and blended colors. Squeeze a generous amount of watercolor tube onto your palette and mix it with water. Wet the surface of your paper with a brush or spray bottle, then quickly apply the diluted paint onto the wet surface. The colors will blend together, creating beautiful gradients and soft edges. This technique is great for creating vibrant and atmospheric backgrounds.
4. Dry Brush
The dry brush technique is used to create texture and add detail to your paintings. Squeeze a small amount of watercolor tube onto your palette and use a dry brush to pick up the concentrated pigment. Apply the paint onto dry paper using short and controlled strokes. This technique allows you to create rough textures, emphasize details, or add highlights to your artwork. Experiment with different brush sizes and pressures to achieve the desired effect.
5. Lifting
Lifting refers to the technique of removing or lightening areas of paint from your painting. It is a useful method for creating highlights or correcting mistakes. Squeeze a small amount of watercolor tube onto your palette and mix it with water. Wet a brush and gently apply it to the area of paint you want to lift. Blot the brush with a tissue or paper towel to absorb the lifted paint. Repeat the process until you achieve the desired result. Remember to work carefully to avoid damaging your paper.
6. Splattering
Splattering is a fun and spontaneous technique that can add texture and interest to your paintings. Squeeze a small amount of watercolor tube onto your palette and mix it with water to achieve a runny consistency. Dip an old toothbrush or a stiff brush into the diluted paint, then use your fingers or a brush handle to flick the bristles, causing the paint to splatter onto your paper. Experiment with different colors and brush sizes to create unique splatter patterns.
In summary, watercolor tubes are a valuable tool in watercolor painting, allowing artists to explore a wide range of techniques and create different effects. Whether you want to achieve a smooth and transparent wash, create depth and richness through glazing, or add texture with techniques like wet-on-wet, dry brush, lifting, or splattering, watercolor tubes offer endless possibilities for artistic expression. So grab your brushes, tubes of paint, and let your creativity flow.
Tips and Tricks for Cleaning and Storing Watercolor Tubes
Watercolor tubes are a popular choice for artists due to their versatility and vibrant color payoff. However, to ensure that your watercolor tubes stay in good condition and last for a long time, proper cleaning and storing techniques are essential. In this section, we will discuss some useful tips and tricks for cleaning and storing your watercolor tubes effectively.
Cleaning Watercolor Tubes
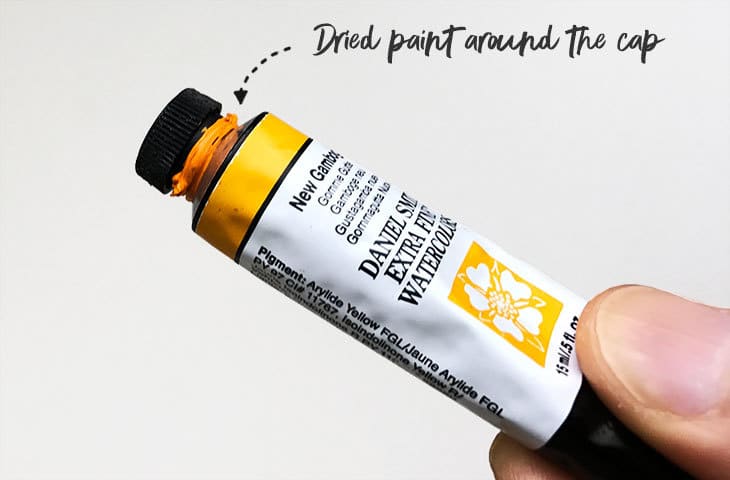
Keeping your watercolor tubes clean is crucial to prevent the buildup of dried paint and maintain their quality. Here are some steps to follow when cleaning your watercolor tubes:
- Empty any remaining paint from the tube by squeezing it gently. You can use a palette knife or a small brush to scrape out any leftover paint.
- Fill a container with warm water and place the empty tube inside. Let it soak for a few minutes to soften the dried paint.
- Once the paint has softened, use a small brush to scrub the inside of the tube, removing any remaining paint residue. Be gentle to avoid damaging the tube.
- Rinse the tube thoroughly with clean water to remove any remaining paint and cleaning solution.
- Allow the tube to dry completely before storing it.
Regularly cleaning your watercolor tubes will prevent the paint from drying and clogging the nozzle, ensuring that the paint flows smoothly when you use it.
Storing Watercolor Tubes
Proper storage of your watercolor tubes is essential to maintain their quality and prevent them from drying out. Here are some tips for storing your watercolor tubes:
- Store your watercolor tubes in an upright position to prevent the paint from settling at the bottom of the tube.
- Consider using a specialized tube wringer or squeezer to squeeze out every last bit of paint from the tube.
- Label your tubes with the color name and brand for easy identification.
- Keep your watercolor tubes in a cool and dry place, away from direct sunlight and extreme temperatures.
- Consider storing your tubes in airtight containers or a sealed plastic bag to prevent them from drying out.
By following these storing techniques, you can prolong the lifespan of your watercolor tubes and ensure that the paint remains fresh and usable for a longer period.
Troubleshooting Common Issues
Despite proper cleaning and storage, you may encounter some common issues with your watercolor tubes. Here are a few troubleshooting tips:
- If the nozzle of your tube gets clogged, use a clean pin or needle to clear the blockage gently.
- If the paint in your tube has dried out completely, you can try adding a few drops of water to rehydrate it. However, be cautious not to add too much water, as it may affect the consistency of the paint.
- If the metal tube becomes dented or damaged, consider transferring the paint to a new container to prevent any leakage or contamination.
By addressing these common issues promptly, you can maximize the longevity and functionality of your watercolor tubes.
In summary, cleaning and storing your watercolor tubes properly is essential for maintaining their quality and usability. By following the tips and tricks mentioned above, you can ensure that your watercolor tubes stay in optimal condition and provide you with vibrant and consistent paint every time you use them. Remember to clean your tubes regularly, store them upright in a cool and dry place, and troubleshoot any common issues that may arise. With proper care, your watercolor tubes can last for a long time, allowing you to create beautiful artwork.
FAQs
1. How to use tubes of watercolor paint?
To use tubes of watercolor paint, squeeze a small amount of paint onto a palette or mixing surface. Dilute the paint with water to achieve the desired consistency. Use a brush to apply the paint to your paper, starting with light washes and gradually adding more layers for depth and intensity.
Conclusion:
In conclusion, learning how to use tubes of watercolor paint can greatly enhance your creativity and artistic expression. By understanding the techniques and methods of watercolor painting, you can achieve beautiful and vibrant artworks. Remember to squeeze a small amount of paint onto your palette and add water gradually to achieve the desired consistency. Experiment with different brush strokes, layering, and blending techniques to create unique effects. Don’t be afraid to mix colors and explore the endless possibilities that watercolor paint offers. With practice and patience, you can master the art of using tubes of watercolor paint and unlock your artistic potential.
