
Looking to seal your acrylic paint on rubber? We’ve got you covered! With the right techniques and materials, you can achieve a long-lasting and durable seal on your rubber surface. Whether it’s a rubber toy, a shoe sole, or any other rubber item, sealing the acrylic paint will protect it from wear and tear, water damage, and fading. In this guide, we’ll walk you through the step-by-step process of sealing acrylic paint on rubber, ensuring a beautiful and lasting finish.
Proven Techniques for Sealing Acrylic Paint on Rubber
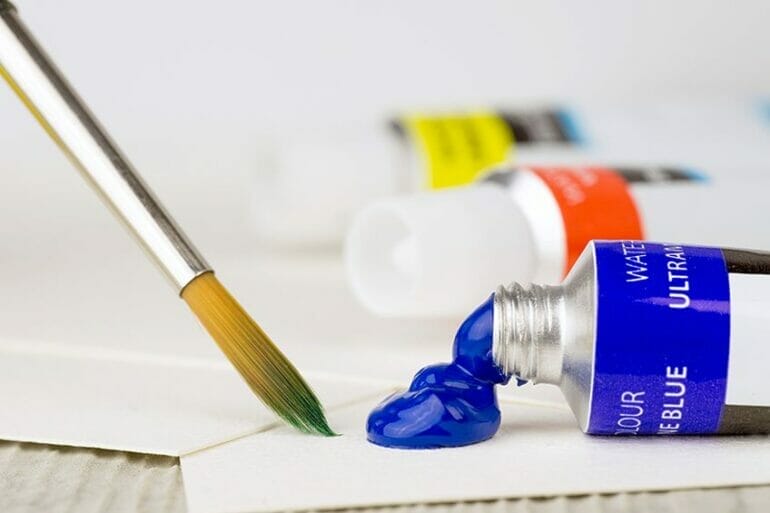
Acrylic paint is a versatile medium that can be used on a variety of surfaces, including rubber. Whether you are painting rubber shoes, phone cases, or even rubber stamps, sealing the acrylic paint is essential to ensure its durability and longevity. In this section, we will explore some proven techniques for effectively sealing acrylic paint on rubber.
1. Clean the Surface
Before applying any paint or sealant, it is crucial to clean the rubber surface thoroughly. Use a mild soap and water solution to remove any dirt, dust, or grease. Rinse the surface and let it dry completely before proceeding.
2. Choose the Right Sealant
When it comes to sealing acrylic paint on rubber, there are several sealant options available. Here are a few popular choices:
- Mod Podge: Mod Podge is a versatile sealant that works well on rubber surfaces. It provides a clear, glossy finish and can be brushed on or sprayed on for even coverage.
- Clear Varnish: Clear varnish is another excellent option for sealing acrylic paint on rubber. It dries quickly and provides a protective, waterproof barrier.
- Silicone Sealant: Silicone sealant is a more permanent option for sealing acrylic paint on rubber. It creates a strong, flexible seal and is ideal for outdoor or high-traffic applications.
Choose a sealant based on your desired finish, level of protection, and the intended use of the painted rubber object.
3. Apply Thin Layers
When sealing acrylic paint on rubber, it is important to apply thin layers of sealant rather than one thick coat. This allows for better adherence and prevents the paint from cracking or peeling over time. Use a soft brush or foam brush to apply the sealant evenly, making sure to cover the entire painted surface.
4. Allow Sufficient Drying Time
After applying the first layer of sealant, allow it to dry completely before applying any additional layers. The drying time may vary depending on the type of sealant used, so refer to the manufacturer’s instructions for guidance. Avoid rushing the drying process to ensure the best results.
5. Add Multiple Layers
To achieve maximum protection and durability, it is recommended to apply multiple layers of sealant. Each layer adds an extra barrier against moisture, UV rays, and general wear and tear. Allow each layer to dry completely before applying the next one.
6. Optional: Add a Topcoat
If you desire an extra layer of protection or a specific finish, you can opt to apply a topcoat over the sealed acrylic paint. Topcoats are available in various finishes, such as matte, satin, or glossy. They can enhance the appearance of the painted rubber object and provide additional durability.
7. Cure and Test
After the final layer of sealant has dried, it is important to allow the painted rubber object to cure for the recommended time. This ensures that the sealant has fully bonded with the paint and rubber surface. Once cured, perform a test by gently pressing on a small, inconspicuous area of the painted surface to ensure it is fully sealed and doesn’t transfer or smudge.
In summary, sealing acrylic paint on rubber is crucial to protect the paint and ensure its longevity. By following these proven techniques, you can achieve a durable and professional-looking finish on your painted rubber objects. Remember to clean the surface, choose the right sealant, apply thin layers, allow sufficient drying time, add multiple layers, consider a topcoat, and perform a final cure and test. With these steps, your acrylic paint on rubber will be sealed and ready to withstand daily use and exposure.

Step-by-Step Guide to Seal Acrylic Paint on Rubber
Acrylic paint is a popular choice for many craft projects, including painting on rubber surfaces. However, to ensure that your artwork stands the test of time and is protected from wear and tear, it is important to seal the acrylic paint on rubber. In this section, we will provide you with a step-by-step guide on how to seal acrylic paint on rubber effectively.
Materials You Will Need:
- Acrylic paint
- Rubber surface (e.g., rubber shoes, rubber mat)
- Sealer (Mod Podge, varnish, or clear acrylic spray)
- Paintbrush or sponge brush
- Masking tape
- Old newspaper or drop cloth
- Lint-free cloth
Step 1: Prepare Your Work Area
Start by preparing your work area to avoid any accidental spills or stains. Lay down a drop cloth or old newspaper to protect the surface you are working on. This will make the cleaning process much easier later on.
Step 2: Clean the Rubber Surface
Before applying the sealer, it is essential to ensure that the rubber surface is clean and free from any dust, dirt, or oil. Wipe the rubber surface with a lint-free cloth dampened with water or a mild soap solution. Allow it to dry completely before proceeding to the next step.
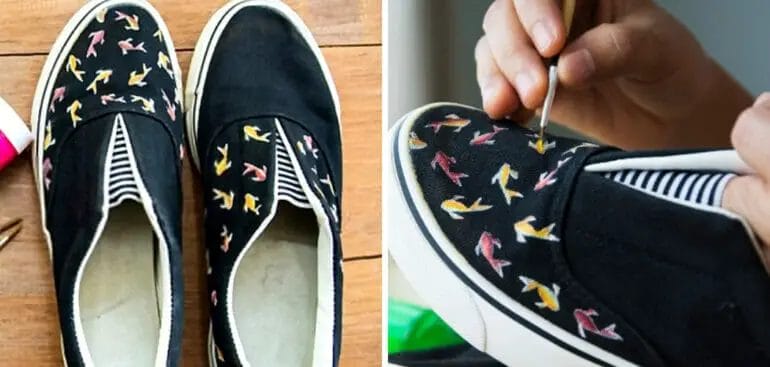
Step 3: Apply Acrylic Paint
If you haven’t already, apply your desired design or artwork using acrylic paint on the rubber surface. Allow the paint to dry completely according to the manufacturer’s instructions. This step is crucial to ensure that the sealer adheres properly to the paint.
Step 4: Choose the Right Sealer
There are various sealers available in the market that can be used to seal acrylic paint on rubber. Some popular options include Mod Podge, varnish, or clear acrylic spray. Choose a sealer that is compatible with acrylic paint and suitable for rubber surfaces.
Step 5: Apply the Sealer
Using a paintbrush or sponge brush, carefully apply an even coat of sealer over the painted area. Make sure to cover the entire design or artwork. Avoid applying the sealer too thickly, as it may cause drips or streaks. If needed, use masking tape to protect any areas you don’t want to seal.
Step 6: Let it Dry
Allow the first coat of sealer to dry completely. This may take a few hours or overnight, depending on the type of sealer used. Once dry, assess if another coat is required for better protection. Apply additional coats of sealer, if desired, allowing each coat to dry fully before applying the next.
Step 7: Cure and Test
After the final coat of sealer is dry, it is important to allow it to cure according to the instructions provided by the sealer manufacturer. This curing process helps enhance the durability and longevity of the seal. Once cured, you can test the sealer’s effectiveness by lightly rubbing the surface with your finger. If the paint remains intact and does not smudge or come off, the sealer has done its job.
Step 8: Enjoy and Maintain
Now that your acrylic paint on rubber is properly sealed, you can enjoy your artwork without worrying about it fading or getting damaged easily. To maintain the seal, avoid using harsh chemicals or abrasive cleaners on the surface. Instead, clean gently using a soft cloth and mild soap solution when necessary.
In summary, sealing acrylic paint on rubber is a crucial step to protect your artwork and ensure its longevity. By following these step-by-step instructions and using the right materials, you can create beautiful and long-lasting designs on rubber surfaces. So, unleash your creativity and start painting on rubber with confidence!
Top Tips for Sealing Acrylic Paint on Rubber Surfaces
Acrylic paint is a versatile and durable medium that can be used on a variety of surfaces, including rubber. Whether you are customizing a pair of rubber shoes or creating artwork on a rubber mat, sealing the acrylic paint is essential to ensure its longevity and protect it from fading, chipping, or peeling. In this section, we will discuss some top tips for sealing acrylic paint on rubber surfaces to achieve a professional and long-lasting finish.
1. Clean and Prepare the Surface
The first step in sealing acrylic paint on rubber is to clean and prepare the surface properly. Use warm soapy water and a soft cloth to remove any dirt, dust, or oils from the rubber surface. Rinse it thoroughly and allow it to dry completely before proceeding to the next step. This ensures that the paint adheres well and forms a strong bond with the rubber.
2. Choose the Right Sealant
When it comes to sealing acrylic paint on rubber, it is important to choose the right sealant that is compatible with both acrylic paint and rubber. Look for a sealant specifically designed for use on flexible surfaces or one that is labeled as suitable for sealing rubber. Consider using a clear acrylic sealer or a rubber sealant spray for the best results.
3. Apply Thin and Even Coats
When applying the sealant, it is crucial to do so in thin and even coats. This ensures that the sealant dries properly and does not form thick or uneven layers that can affect the appearance of the paint. Use a brush or a spray bottle to apply the sealant, following the manufacturer’s instructions for the recommended drying time between coats.
4. Allow Sufficient Drying Time
After each coat of sealant, allow sufficient drying time before applying the next coat or handling the painted rubber surface. This prevents smudging, smearing, or damaging the paint or sealant. Read the instructions on the sealant product for the recommended drying time, as it may vary depending on the brand or type of sealant used.
5. Apply Multiple Coats
To ensure maximum protection and durability, it is recommended to apply multiple coats of sealant. Two to three coats are usually sufficient, but you can apply more if desired. Remember to let each coat dry completely before applying the next one.
6. Avoid Excessive Handling
Once the sealant has dried and cured, it is important to avoid excessive handling of the painted rubber surface to prevent scratches or damage. While the sealant provides protection, it may not be as resistant to heavy wear and tear. Use caution and handle the surface gently to maintain the integrity of the paint and the sealant.
7. Maintain and Clean Properly
To prolong the life of the sealed acrylic paint on rubber, it is essential to maintain and clean the surface properly. Avoid using abrasive cleaners or scrubbing brushes that can scratch or remove the sealant and paint. Instead, use a mild soap and water solution and a soft cloth to gently clean the surface when needed.
In summary, sealing acrylic paint on rubber surfaces is crucial to protect the paint and ensure its longevity. By following these top tips, including cleaning and preparing the surface, choosing the right sealant, applying thin and even coats, allowing sufficient drying time, applying multiple coats, avoiding excessive handling, and maintaining and cleaning properly, you can achieve a professional and long-lasting finish on your rubber projects.
The Importance of Properly Sealing Acrylic Paint on Rubber
Acrylic paint is a versatile medium that can be used on various surfaces, including rubber. Whether you are painting on rubber shoes, rubberized fabric, or any other rubber surface, it is essential to properly seal the acrylic paint to ensure longevity and durability. In this section, we will explore the reasons why sealing acrylic paint on rubber is important and how it can be done effectively.
1. Protection against Wear and Tear
One of the primary reasons for sealing acrylic paint on rubber is to provide protection against wear and tear. Rubber surfaces are often subjected to frequent use and exposure to harsh elements. Without proper sealing, the acrylic paint can easily chip, peel, or fade over time, diminishing the overall appearance of the painted surface.
By applying a sealant, such as a clear acrylic topcoat or a varnish specifically designed for rubber surfaces, you create a protective barrier that helps prevent the paint from being damaged by friction, moisture, or UV radiation. This will significantly extend the lifespan of your painted rubber items, allowing them to withstand regular use and maintain their vibrant colors for a longer period.
2. Enhancing Color Intensity and Gloss
Sealing acrylic paint on rubber not only protects it but also enhances its visual appeal. When acrylic paint dries, it may appear slightly dull or matte. By applying a sealant, you can restore the glossy finish and intensify the colors of the paint. This is especially important if you want your painted rubber items to have a vibrant and eye-catching appearance.
The sealant acts as a clear coating that not only enhances the color but also adds a glossy sheen to the surface. This creates a professional-looking finish and gives your artwork a polished and attractive appearance. Whether you are painting rubber crafts, accessories, or even rubberized clothing, adding a sealant will elevate the overall aesthetic appeal of your creations.
3. Improving Longevity and Durability
Properly sealing acrylic paint on rubber significantly improves its longevity and durability. As mentioned earlier, acrylic paint on rubber can easily chip or peel off if not properly protected. This is especially true in high-friction areas or when exposed to water or cleaning agents.
The sealant creates a strong bond between the paint and the rubber surface, ensuring that it stays intact even under various conditions. It acts as a protective shield that adds an extra layer of durability to the paint, making it more resistant to scratches, abrasions, and chemical damage.
4. Ease of Maintenance
Sealing acrylic paint on rubber makes the painted surface easier to clean and maintain. The sealant forms a smooth and non-porous barrier that prevents dirt, dust, and stains from penetrating into the paint layer. This means that you can simply wipe the surface with a damp cloth or mild cleaning solution to remove any dirt or grime without damaging the paint.
Without proper sealing, acrylic paint on rubber can be more susceptible to staining and discoloration, requiring frequent touch-ups or repainting. By applying a sealant, you minimize the risk of these issues, making it easier to keep your painted rubber items looking clean and vibrant for an extended period.
In summary, properly sealing acrylic paint on rubber is crucial for protecting the paint, enhancing its appearance, improving longevity and durability, and facilitating easy maintenance. Whether you are painting rubber crafts, accessories, or any other rubber surface, investing the time and effort into sealing the acrylic paint will ensure that your creations last, look visually appealing, and can withstand the test of time.
FAQs
How do I seal acrylic paint on rubber?
To seal acrylic paint on rubber, you can use a clear acrylic sealer or a varnish. Apply an even coat of the sealer using a brush or spray, making sure to cover the entire painted surface. Allow it to dry completely before using or handling the rubber item.
Conclusion
Sealing acrylic paint on rubber is essential to preserve and protect your artwork or designs. By following the proper steps, you can ensure the longevity and durability of your painted rubber surfaces.
Firstly, clean the rubber surface thoroughly to remove any dirt, dust, or oils. Then, apply a suitable primer specifically designed for rubber to enhance paint adherence. Next, carefully apply multiple thin layers of acrylic paint, allowing each layer to dry completely before adding the next.
Lastly, to seal the acrylic paint on rubber, use a clear, waterproof sealant or varnish. Apply the sealant evenly and allow it to dry according to the manufacturer’s instructions. This final step will provide a protective barrier against moisture, UV rays, and everyday wear and tear.
With proper sealing, your acrylic paint on rubber will be better protected, ensuring its beauty and longevity over time.