
Painting floral foam can be a great way to add a pop of color to your floral arrangements and create a unique and eye-catching display.
By using acrylic or spray paint specifically designed for foam, you can easily transform the appearance of the foam to match your desired color scheme.
Whether you want to create a vibrant centerpiece for a special occasion or simply enhance the overall aesthetic of your floral designs, painting floral foam can be a fun and creative way to achieve your desired look.
However, it’s important to note that painting floral foam may affect its water absorption ability, so it’s crucial to take precautions and ensure that the painted foam does not come into direct contact with water.
Creative Uses for Floral Foam Beyond Flower Arrangements
Floral foam is a versatile and handy material that is commonly used in flower arrangements to hold and hydrate the flowers. However, its potential extends far beyond just floral designs. In this section, we will explore some creative and innovative uses for floral foam that you may not have thought of before.
1. DIY Centerpieces
Floral foam can be used to create stunning DIY centerpieces for parties, weddings, or other special occasions. Simply carve the foam to fit into a decorative container and insert your desired flowers, foliage, or even decorative items like feathers or beads. The foam will help keep your centerpiece looking fresh and vibrant throughout the event.
2. Wall Art
Create unique and eye-catching wall art using floral foam as the base. Cut the foam into various shapes and sizes, then attach flowers, dried botanicals, or other natural elements to the foam using glue or floral wire. Arrange the pieces in a visually pleasing pattern and hang them on your wall for a stunning and textured display.
3. Sculptures and Installations
Floral foam can be sculpted and shaped into intricate designs to create stunning sculptures and installations. Whether you want to create a large-scale piece of art or a small tabletop sculpture, floral foam provides a lightweight and easy-to-mold material. Add flowers, foliage, or other decorative elements to bring your vision to life.
4. Floating Floral Arrangements
Add a touch of elegance to your events with floating floral arrangements. Cut floral foam into small cubes or balls and attach flowers to them using floral picks. Place the foam pieces in a large bowl or container filled with water, and watch as the flowers float effortlessly on the surface, creating a visually captivating display.
5. Holiday Decorations
Get creative during the holiday season by using floral foam to make unique and festive decorations. Whether it’s a Christmas wreath, a Halloween centerpiece, or an Easter arrangement, floral foam can be shaped and adorned with seasonal elements like ornaments, ribbons, pinecones, or colored eggs. Let your imagination run wild and create one-of-a-kind holiday decorations.
6. Floral Cake Toppers
Add a touch of whimsy to your cakes by using floral foam to create custom cake toppers. Cut the foam into your desired shape, such as hearts, letters, or numbers, and insert flowers or greenery into the foam. Secure the topper onto your cake using toothpicks or floral wire for a beautiful and unique finishing touch.
7. Art and Craft Projects
Floral foam can be a great material for various art and craft projects. Whether you’re creating collages, mixed media artwork, or even homemade stamps, the foam’s soft and pliable nature makes it easy to work with. Use it to create texture, add dimension, or serve as a base for other materials in your artistic endeavors.
These are just a few examples of how floral foam can be used beyond traditional flower arrangements. Its versatility and ease of use make it a great material for various creative projects. So next time you have some floral foam on hand, don’t limit yourself to just floral designs – let your imagination soar and explore the endless possibilities!
Tips for Painting Floral Foam to Enhance Your Floral Designs
When it comes to creating stunning floral arrangements, every detail matters. One often overlooked element is the floral foam, which serves as the foundation for your arrangement. While floral foam is typically available in a green color that blends well with foliage, there may be instances where you want to paint the foam to match your design or create a unique look. In this section, we will provide you with some helpful tips for painting floral foam to enhance your floral designs.
1. Choose the Right Type of Paint
Before you start painting your floral foam, it’s essential to choose the right type of paint. Water-based acrylic paints are generally the best option, as they dry quickly and adhere well to the foam. Additionally, acrylic paints come in a wide range of colors, allowing you to achieve the desired shade for your arrangement.
2. Prepare the Floral Foam
Prior to painting, make sure the floral foam is clean and dry. Remove any excess dirt or debris from the foam by gently brushing it or using compressed air. It’s also a good idea to let the foam sit for a few minutes after cleaning to ensure it’s completely dry.
3. Use a Primer
If you’re painting the floral foam a color that is significantly different from its original shade, consider using a primer. Applying a primer will help the paint adhere better and ensure a more even result. Apply the primer evenly to the foam and let it dry completely before proceeding with the paint.
4. Apply the Paint
When applying the paint, it’s best to use a foam brush or a soft-bristled brush. Start by dipping the brush into the paint and gently dabbing it onto the foam. Avoid using excessive pressure, as it may cause the foam to crumble or break. Instead, build up the color gradually by applying multiple thin coats, allowing each coat to dry before adding another.
5. Experiment with Techniques
Don’t be afraid to experiment with different painting techniques to achieve the desired effect. You can create ombre effects by blending different shades of paint or use a sponge to create texture. Additionally, you may consider adding a touch of shimmer or metallic accents for a glamorous look.
6. Seal the Paint
Once you are satisfied with the painted floral foam, it’s important to seal the paint to protect it from smudging or flaking. A clear acrylic sealer spray is an excellent option for sealing the foam. Hold the spray can about 6-8 inches away from the foam and apply a light, even coat. Allow the sealer to dry completely before handling the foam.
7. Integrate the Painted Foam into Your Arrangement
After the painted foam has dried and been sealed, you can now incorporate it into your floral designs. Use the painted foam as you typically would, placing stems securely into the foam to create your desired arrangement. The painted foam will serve as a beautiful base that complements your flowers.
In summary, painting floral foam can be a simple yet effective way to enhance your floral designs. By choosing the right type of paint, preparing the foam properly, applying multiple coats, and sealing the paint, you can achieve a professional and cohesive look. Don’t be afraid to get creative and experiment with different techniques to add a unique touch to your arrangements. With these tips, you’ll be able to elevate your floral designs and create eye-catching arrangements that stand out.
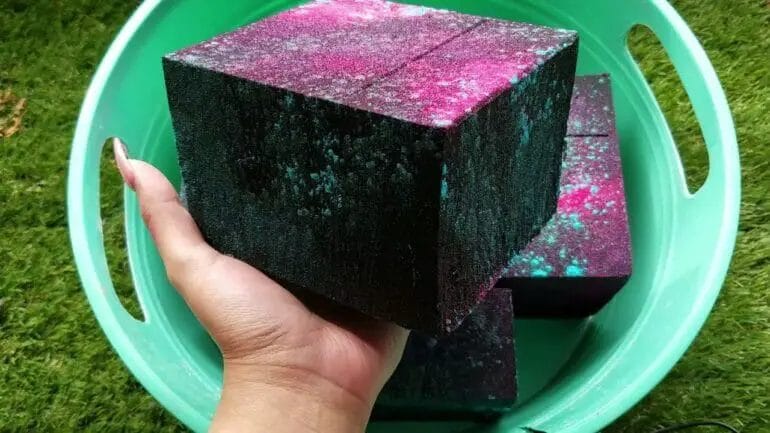
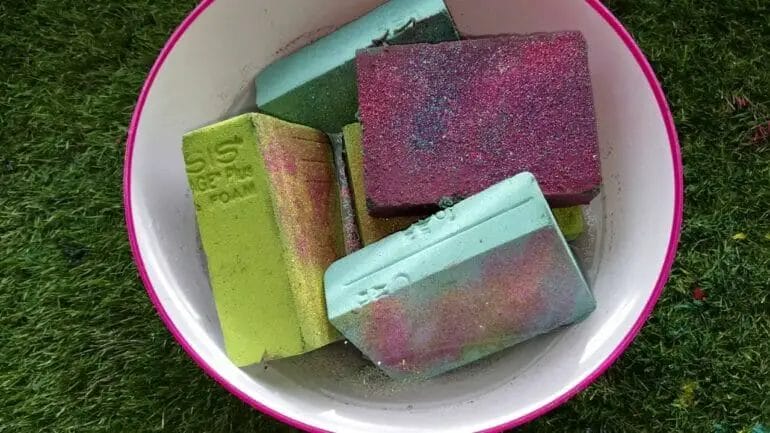
Unique Color Techniques for Transforming Floral Foam Creations
Floral foam creations are a beautiful and versatile way to display flowers, whether it’s for a special occasion or to add some life and color to your home decor. While traditional floral foam comes in a standard green color, there are many unique color techniques that can be used to transform these creations and make them even more visually stunning.
1. Dyeing Floral Foam:
One of the easiest ways to change the color of floral foam is by dyeing it. Dyeing floral foam allows you to customize the color to match your floral arrangement or overall theme. To dye floral foam, simply mix water with liquid fabric dye in a container. Then, submerge the foam into the dye solution and let it soak until it reaches your desired color intensity. Once dyed, allow the foam to dry completely before using it in your arrangements.
2. Spray Painting Floral Foam:
Another option for transforming the color of floral foam is by spray painting it. Spray paint provides a quick and even coverage, allowing you to change the color of the foam in just a few simple steps. Start by selecting a spray paint color that complements your desired floral arrangement. Then, place the foam on a protected surface and apply multiple light coats of spray paint, allowing each coat to dry before applying the next. This technique offers endless possibilities for creating unique and vibrant floral foam creations.
3. Using Colored Floral Foam:
If you’re looking for an even easier option, you can skip the DIY color techniques and opt for pre-colored floral foam. Colored floral foam is available in various shades and can be found at most craft stores or floral supply shops. This ready-to-use foam saves you time and effort, as it eliminates the need for dyeing or spray painting. Simply select the color that complements your design, and you’re ready to create eye-catching floral arrangements.
4. Adding Decorative Wraps:
Another way to add color and texture to your floral foam creations is by using decorative wraps. Decorative wraps come in a variety of colors, patterns, and materials, such as burlap, lace, or ribbon. Simply wrap the foam in the chosen material, securing it with glue or tape. This technique allows you to add a pop of color or a touch of elegance to your floral foam arrangements, enhancing their visual appeal.
5. Incorporating Natural Elements:
To create a more organic and nature-inspired look, consider incorporating natural elements into your floral foam creations. This can be done by attaching moss, leaves, or other foliage directly onto the foam. These natural elements add depth, texture, and a touch of color to your arrangements, making them visually interesting and unique.
6. Experimenting with Accessories:
Don’t limit yourself to traditional floral foam colors or materials. Get creative and experiment with accessories to transform your creations. Consider using colored beads, gems, feathers, or even small ornaments to add a pop of color and enhance the overall aesthetics of your floral arrangements.
In summary, there are numerous unique color techniques that can be used to transform floral foam creations. Whether you choose to dye, spray paint, use pre-colored foam, add decorative wraps, incorporate natural elements, or experiment with accessories, these techniques offer endless possibilities for creating visually stunning and personalized floral arrangements.
Exploring different paint options for floral foam projects
When it comes to floral foam projects, the right paint can make all the difference. Whether you’re creating a centerpiece for a special event or crafting a beautiful arrangement for your home, choosing the right paint can enhance the overall aesthetic and bring your project to life. In this section, we’ll explore different paint options that are perfect for floral foam projects.
Aerosol Spray Paint
Aerosol spray paint is a popular choice for floral foam projects due to its ease of use and versatility. It provides a quick and even coverage, allowing you to effortlessly paint large or intricate foam pieces. The fine mist of spray paint also ensures that the foam is evenly coated without saturating it, which can help preserve the structure of your arrangement.
When using aerosol spray paint on floral foam, it’s important to choose a paint that is safe and non-toxic. Look for paints that are specifically labeled for use on foam materials to ensure that they won’t cause any damage or deterioration to your project.
Acrylic Craft Paint
Acrylic craft paint is another fantastic option for floral foam projects. Available in a wide range of colors, acrylic paint offers excellent coverage and can be easily applied with a brush or sponge. It dries quickly and creates a durable finish that adheres well to the foam surface.
One of the benefits of using acrylic craft paint is its ability to mix and blend colors. This allows you to create custom shades and gradients, adding depth and dimension to your floral foam project. Additionally, acrylic paint is typically non-toxic and water-based, making it safe to use and easy to clean up.
Watercolor Paints
If you’re looking to achieve a softer, more delicate look for your floral foam project, watercolor paints are an excellent choice. Watercolors create a translucent effect that allows the texture and details of the foam to shine through, giving your arrangement a natural and organic appearance.
When using watercolor paints on floral foam, it’s essential to dilute the paints with water to achieve the desired transparency. Experiment with different brush techniques and layering to create beautiful washes and gradients that mimic the colors and textures of real flowers.
Metallic and Glitter Paints
For those who want to add a touch of glamour and sparkle to their floral foam projects, metallic and glitter paints are the way to go. These paints contain fine metallic particles or glitter that can create stunning visual effects when applied to the foam surface.
Metallic paints come in a variety of finishes, such as gold, silver, and copper, and can add a luxurious touch to your arrangements. Glitter paints, on the other hand, provide a shimmering effect that can make your foam project truly stand out.
Sponge Painting
If you’re looking to achieve a textured or mottled effect on your floral foam, sponge painting is a technique you should consider. This method involves dabbing or stippling paint onto the foam surface using a sponge or a textured brush.
Sponge painting can create interesting patterns and give your floral foam project a unique and artistic look. It works well with a variety of paint types, including acrylics and watercolors, allowing you to experiment with different colors and textures.
Choosing the right paint for your floral foam projects can help elevate their visual appeal and make them truly eye-catching. Whether you opt for aerosol spray paint, acrylic craft paint, watercolors, metallic or glitter paints, or experiment with sponge painting techniques, each option offers its own unique advantages. Consider the style and theme of your project, and select the paint that best suits your vision. With a little creativity and the right paint, your floral foam projects are sure to turn heads and bring joy to all who see them.
How to Achieve a Professional Finish when Painting Floral Foam
Painting floral foam can be a great way to add a pop of color and creativity to your floral arrangements and craft projects. However, achieving a professional finish when painting floral foam can be a bit challenging if you are not familiar with the right techniques. In this section, we will guide you through the step-by-step process of painting floral foam to achieve a flawless and professional finish.
1. Prepare the Floral Foam
Before you start painting, it is essential to prepare the floral foam properly. Begin by cleaning the foam with a soft brush or cloth to remove any dust or debris. Make sure the foam is dry before proceeding to the next step.
2. Choose the Right Paint
Choosing the right paint is crucial to achieve a professional finish. Acrylic paints are commonly used for painting floral foam, as they adhere well and dry quickly. Select colors that complement your floral arrangement or craft project.
3. Prime the Foam
Priming the floral foam before painting can help to improve the paint adherence and create a smooth surface. Apply a thin coat of white acrylic primer to the foam using a foam brush or a sponge, making sure to cover the entire surface evenly. Allow the primer to dry completely before proceeding.
4. Apply the Base Coat
Start by applying a base coat of paint to the primed floral foam. Use a foam brush or a sponge to apply the paint in smooth, even strokes. If additional coats are needed, allow each coat to dry completely before applying the next one. This will help to create a solid and vibrant base color.
5. Add Texture and Depth
To achieve a more realistic and professional finish, consider adding texture and depth to the painted floral foam. You can achieve this by using different shades of paint or by applying a second layer of paint using a dry-brushing technique. Simply dip a dry brush into a small amount of paint and gently brush it over the surface of the foam to create subtle highlights and shadows.
6. Seal the Paint
Once you are satisfied with the painted floral foam, it is essential to seal the paint to protect it from chipping or peeling. Use a clear acrylic sealer spray and apply a thin, even coat over the entire foam surface. Allow the sealer to dry completely before handling or displaying the painted floral foam.
7. Handle with Care
After achieving a professional finish, it is important to handle the painted floral foam with care to maintain its appearance. Avoid excessive handling, as oils from your hands can cause the paint to deteriorate over time. If necessary, consider using gloves when working with the painted foam.
In summary, achieving a professional finish when painting floral foam involves proper preparation, choosing the right paint, priming, applying multiple coats, adding texture and depth, sealing the paint, and handling with care. By following these steps, you can create stunning and professional-looking painted floral foam for your floral arrangements and craft projects.
FAQs
Can you paint floral foam?
Yes, you can paint floral foam using craft or spray paint. However, it is important to use a water-based paint and apply it in thin coats to prevent the foam from disintegrating. Allow the paint to dry completely before using the foam in floral arrangements.
How long does floral foam last?
Floral foam can last anywhere from a few days to several weeks, depending on the type of foam used and the environmental conditions. It is important to keep the foam moist by adding water regularly to extend its lifespan. Discard the foam if it starts to crumble or develop an unpleasant odor.
Can floral foam be reused?
Floral foam can be reused if it is still in good condition after being used in an arrangement. To reuse floral foam, remove any plant material or debris and rinse it thoroughly with water. Allow the foam to dry completely before using it again. However, keep in mind that recycled foam may not provide the same level of support as fresh foam.
Conclusion:
In conclusion, while it is possible to paint floral foam, it is important to consider the type of paint and its compatibility with the foam material. Acrylic paints are commonly used for painting floral foam due to their ability to adhere well to porous surfaces. However, it is crucial to ensure that the paint is completely dry before using the foam in floral arrangements. Additionally, it is advisable to test a small area first to ensure that the paint does not cause any damage or degradation to the foam. By following these guidelines, you can create beautiful and customized floral arrangements using painted floral foam.